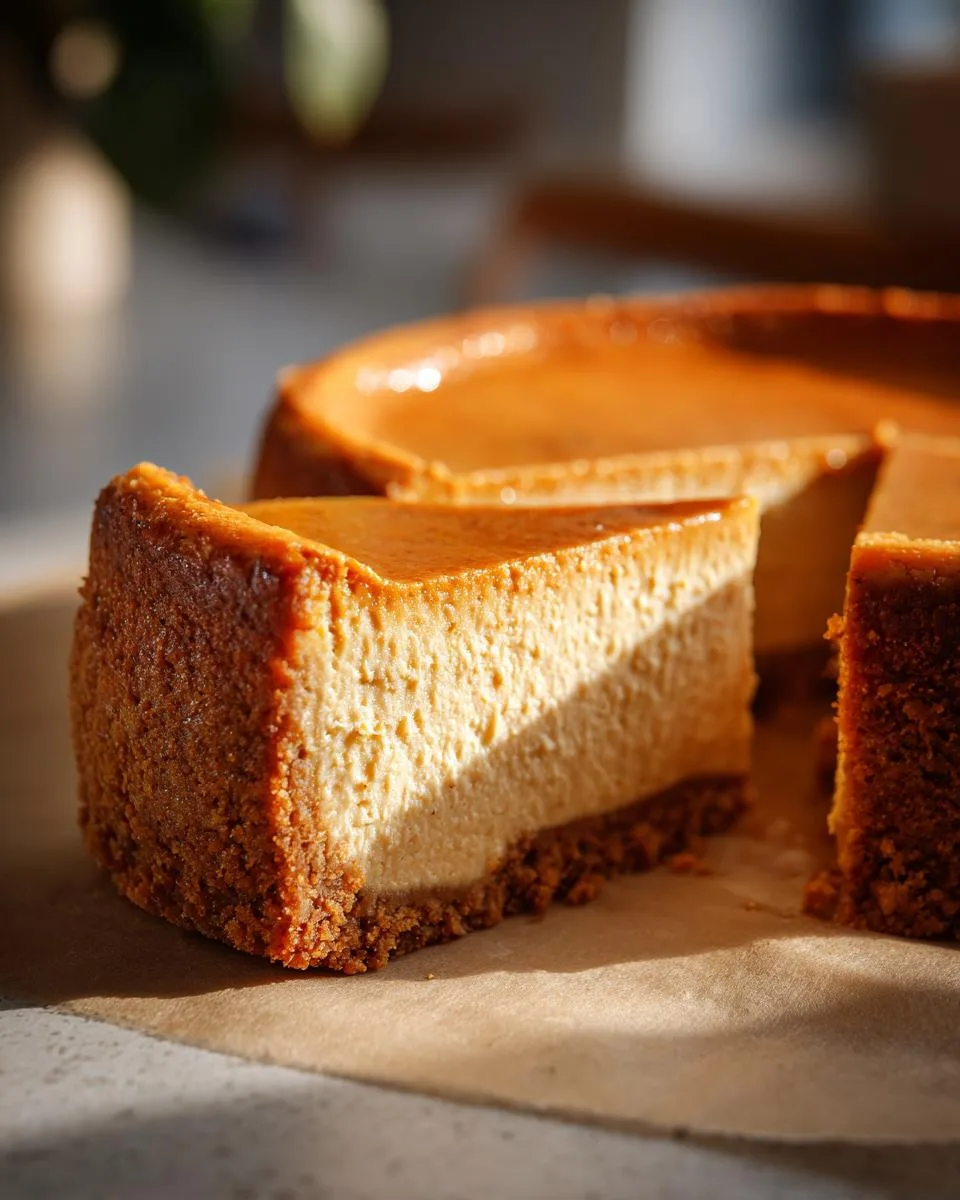
Let me tell you about my absolute favorite fall dessert – this luscious sugar free pumpkin cheesecake that tastes so indulgent, you won’t believe it’s actually low-carb! After years of experimenting (and several failed attempts that shall remain unnamed), I finally perfected this creamy dream. The secret? A magical combo of rich cream cheese, real pumpkin puree, and just the right blend of spices that makes your kitchen smell like autumn heaven. Whether you’re keto, watching your sugar intake, or just craving something deliciously different, this cheesecake delivers all the cozy pumpkin flavor without any guilt. Trust me, even sugar-lovers at our Thanksgiving table couldn’t tell the difference!
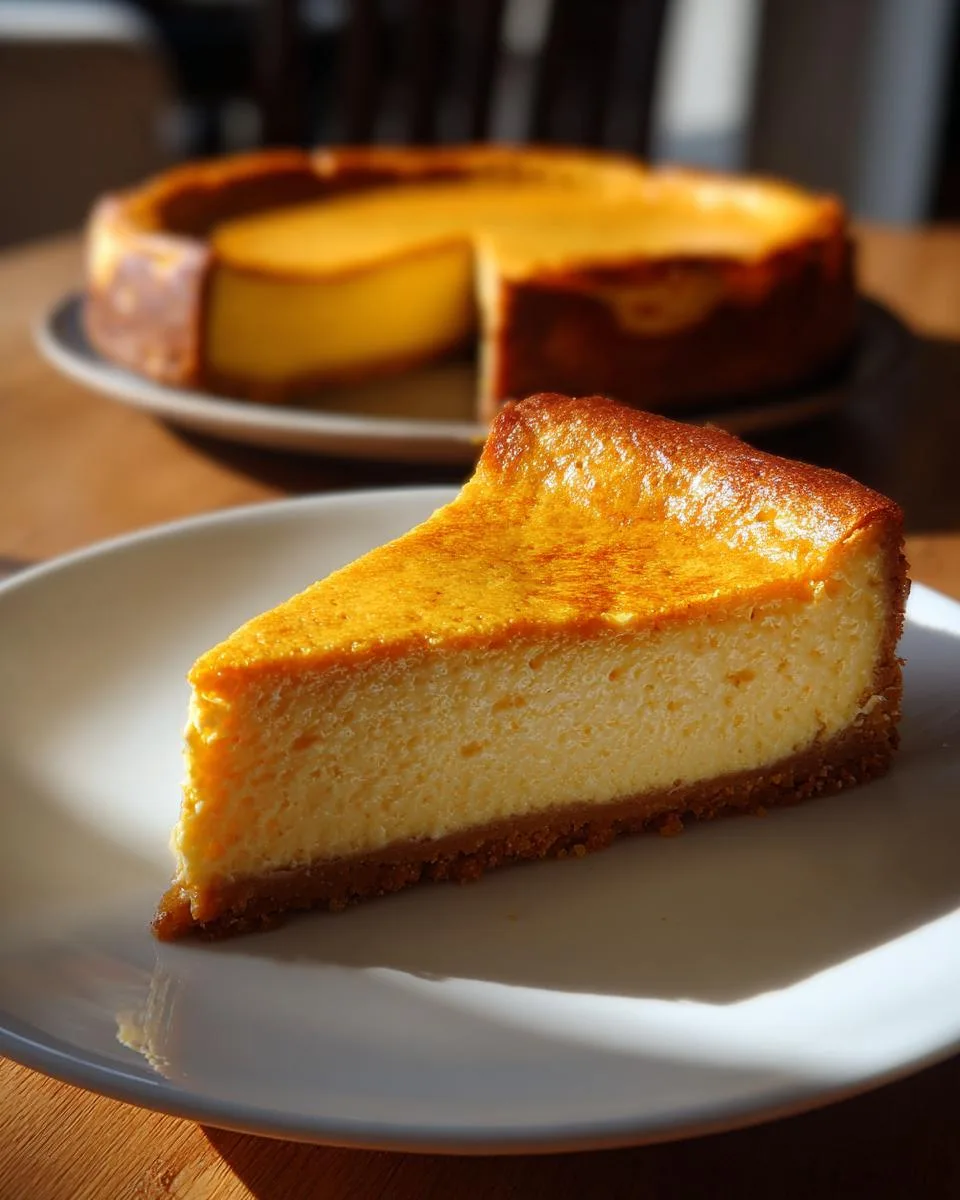
Table of Contents
Table of Contents
Why You’ll Love This Sugar Free Pumpkin Cheesecake
- Silky smooth texture that melts in your mouth
- Zero added sugar but all the sweetness you crave
- Easy to make with simple, wholesome ingredients
- Perfect make-ahead dessert for holidays and gatherings
- Gorgeous presentation that looks as good as it tastes
Ingredients for Sugar Free Pumpkin Cheesecake
Okay, let’s get real about what makes this sugar free pumpkin cheesecake so dang good. I’ve learned through plenty of trial and error that quality ingredients make all the difference – especially when you’re skipping the sugar. Here’s exactly what you’ll need to create this autumnal masterpiece:
For the Almond Crust:
- 1 1/4 cups almond meal or almond flour (trust me, the finer texture works better than almond flour)
- 1/2 cup Swerve Brown or your favorite brown sugar substitute (this gives that caramel-like depth)
- 1-2 tsp cinnamon (optional, but I always add it for extra warmth)
- 6 tbsp melted butter (the real stuff, please – it makes the crust beautifully crisp)
For the Pumpkin Filling:
- 20 oz cream cheese, room temperature (this is KEY – cold cream cheese will leave lumps)
- 1/3 cup sour cream, room temperature (adds that perfect tangy creaminess)
- 1 cup Swerve Brown or other brown sugar substitute
- 1/2 cup Swerve Granular or your preferred granulated sugar substitute
- 1/4 tsp salt (balances all those sweet flavors)
- 2/3 cup canned pumpkin puree, room temperature (not pie filling – just pure pumpkin)
- 1 tbsp vanilla extract (splurge on the good stuff if you can)
- 2 tsp pumpkin pie spice (or make your own blend if you’re fancy like that)
- 1 tsp cinnamon (because you can never have too much cinnamon)
- 2 tbsp almond flour (this little addition helps stabilize the filling)
- 4 eggs, room temperature (take them out when you take out the cream cheese)
Optional Toppings (Because Why Not?):
- Homemade whipped cream (I use heavy whipping cream with a dash of vanilla and powdered Swerve)
- Toasted pecans (that nutty crunch takes it over the top)
- Sugar-free caramel sauce (drizzle it artfully and watch your guests swoon)
Pro tip from my many kitchen experiments: Measure everything before you start mixing. There’s nothing worse than realizing your cream cheese is still rock-hard when you’re ready to bake! Also, that room temperature note isn’t just a suggestion – it makes all the difference in getting that velvety smooth texture we’re after.
How to Make Sugar Free Pumpkin Cheesecake
Now for the fun part – let’s turn these beautiful ingredients into the creamiest sugar free pumpkin cheesecake you’ve ever tasted! I’ll walk you through each step just like I would if we were baking together in my kitchen. Don’t worry if this seems like a lot – once you’ve made it once, you’ll see how straightforward it really is. Just take it one step at a time, and before you know it, you’ll have a showstopper dessert ready to impress!
Preparing the Crust
First things first – that buttery almond crust that makes this cheesecake extra special. Here’s how we do it:
- Prep your pan: Grab your 9-inch springform pan and give it a good spray with non-stick cooking spray. Trust me, you’ll thank me later when your cheesecake slides out perfectly!
- Mix the dry ingredients: In a medium bowl, combine the almond meal, Swerve Brown, and cinnamon (if using). Stir it with a fork to break up any clumps – we want this nice and even.
- Add the butter: Pour in that glorious melted butter and mix until it looks like wet sand. You should be able to squeeze a handful and have it hold together without crumbling.
- Press it in: Dump the mixture into your prepared pan and use clean hands to press it firmly into an even layer on the bottom and slightly up the sides. I like to use the bottom of a measuring cup to really compact it.
- Bake it: Now, here’s an important trick – wrap the outside of your pan tightly with foil (this prevents water from the bath seeping in later). Pop it in a 350°F oven for 8 minutes to set. Your kitchen will smell amazing already!
Mixing the Filling
While the crust cools a bit, let’s make that dreamy pumpkin filling. This is where the magic happens!
- Start with the cream cheese: In your stand mixer or large bowl, beat the room temperature cream cheese until it’s completely smooth. No lumps allowed! This might take 2-3 minutes on medium speed.
- Add the good stuff: Mix in the sour cream, both sweeteners, and salt until fully combined. Scrape down the sides – those sneaky bits at the bottom love to stay unmixed!
- Pumpkin time: Add the pumpkin puree and blend until uniform. The color will turn this gorgeous autumn orange that just makes you happy.
- Spice it up: Now for the flavors – pour in the vanilla, pumpkin pie spice, cinnamon, and almond flour. Mix until you can’t see any streaks of spice.
- Eggs last: Here’s the crucial part – add the eggs one at a time, mixing just until each is incorporated. Overbeating at this stage can lead to cracks, so easy does it! The batter should be silky and pourable when done.
Baking and Cooling
Now for the grand finale – turning this into an actual cheesecake! Here’s how we’ll do it:
- Prep the water bath: Before you pour the filling, place a large roasting pan on the bottom rack of your oven and fill it with about 1.5 inches of hot water. This creates steam that prevents cracks – game changer!
- Lower the temp: Reduce your oven to 325°F (this gentle heat is key for creamy texture). Carefully pour the filling into your cooled crust and smooth the top with a spatula.
- Bake it slow: Place the cheesecake on the center rack (above the water bath) and let it bake undisturbed for 60 minutes. No peeking – that rush of cold air can cause cracks!
- The magic wait: When time’s up, turn off the oven but leave the door slightly ajar (I wedge a wooden spoon in it) and let the cheesecake sit for another 60 minutes. This gradual cooling prevents sinking.
- Chill out: Finally, remove from oven, cool completely at room temperature, then refrigerate for at least 6 hours (overnight is best). I know it’s hard to wait, but this sets the perfect texture!
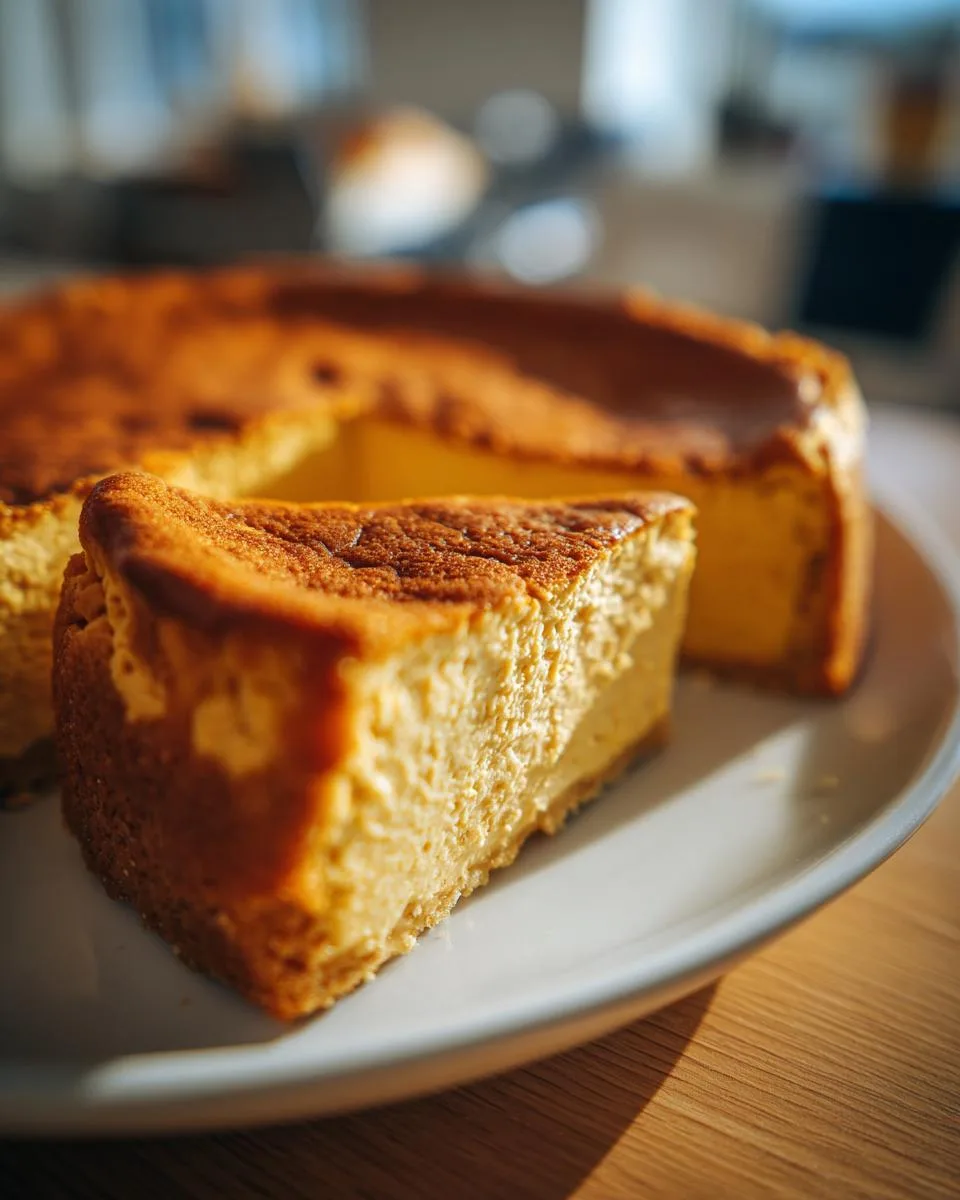
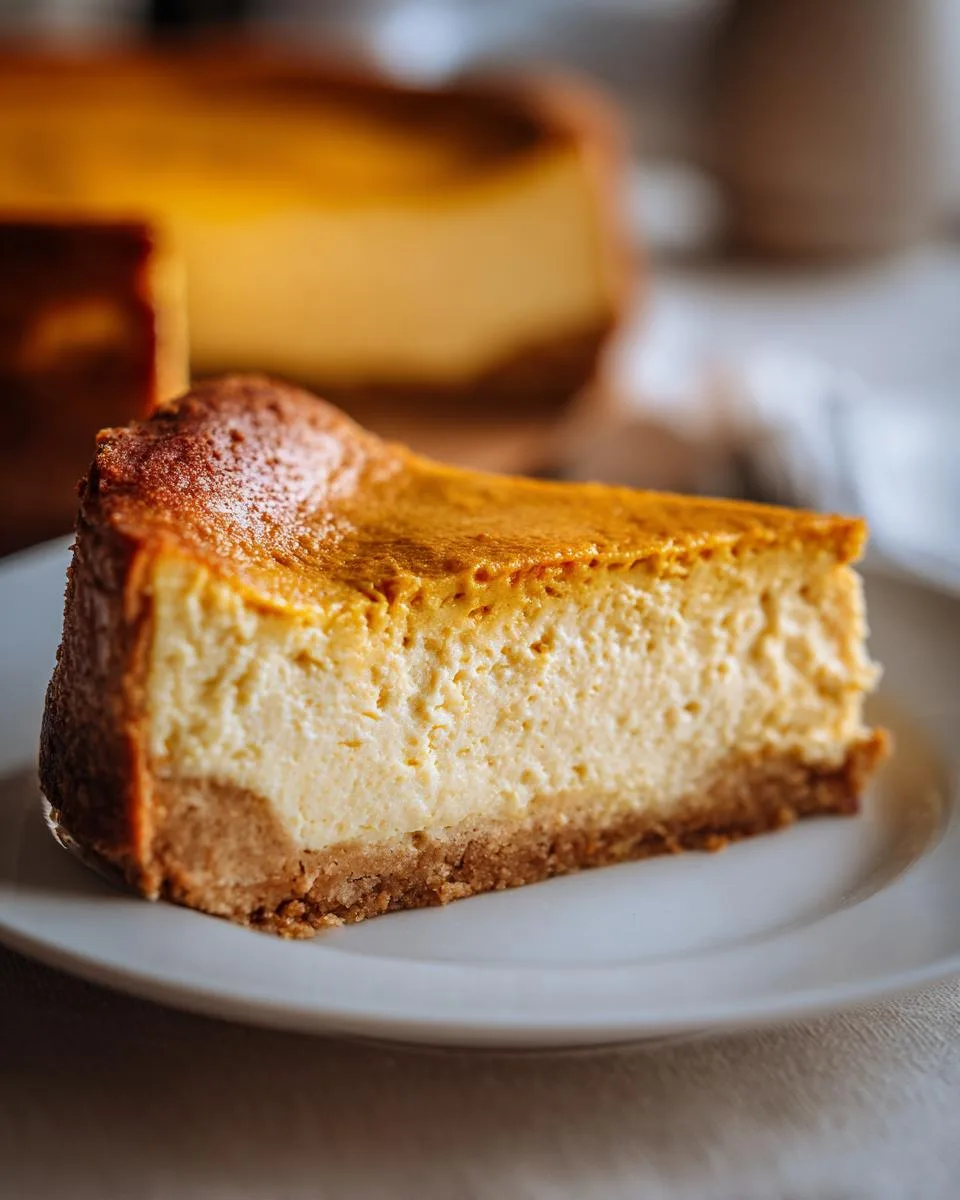
When you’re ready to serve, run a thin knife under hot water, dry it, and make your slices. Top with whipped cream, a sprinkle of cinnamon, and watch everyone’s faces light up when they taste your masterpiece!
Print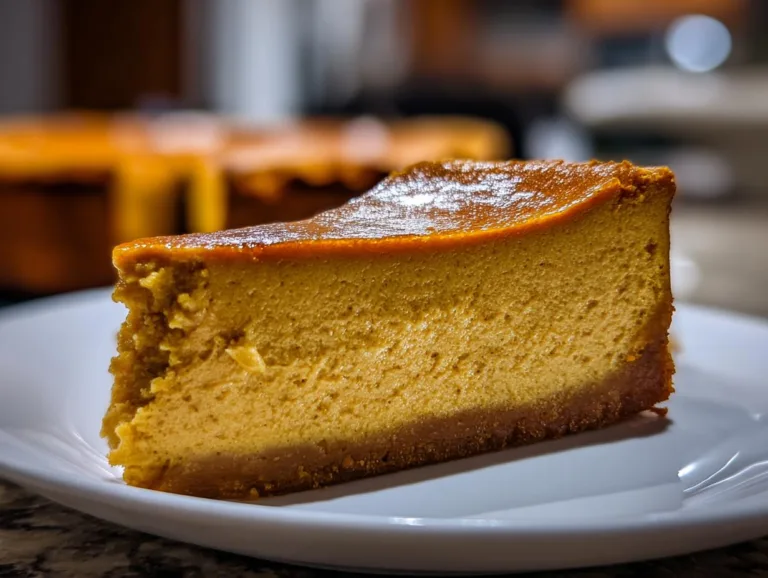
Luscious Sugar Free Pumpkin Cheesecake with 5g Net Carbs
A rich and creamy sugar-free pumpkin cheesecake with a buttery almond crust. Perfect for those looking for a low-carb, keto-friendly dessert option.
- Total Time: 8 hours 20 minutes
- Yield: 10 servings 1x
Ingredients
- 20 oz cream cheese, room temperature
- 1/3 cup sour cream, room temperature
- 1 cup Swerve Brown or other brown sugar substitute
- 1/2 cup Swerve Granular or other sugar substitute
- 1/4 tsp salt
- 2/3 cup canned pumpkin puree, room temperature
- 1 tbsp vanilla extract
- 2 tsp pumpkin pie spice
- 1 tsp cinnamon
- 2 tbsp almond flour
- 4 eggs, room temperature
- 1 1/4 cups almond meal or almond flour
- 1/2 cup Swerve Brown or other brown sugar substitute
- 1–2 tsp cinnamon (optional)
- 6 tbsp melted butter
- Non-stick cooking spray
- Homemade whipped cream (optional)
- Toasted pecans (optional)
- Sugar-free caramel sauce (optional)
Instructions
- Preheat oven to 350°F.
- Combine almond meal, Swerve Brown, and cinnamon in a bowl, then add melted butter and mix well.
- Spray a 9” springform pan with non-stick spray, press crust evenly on the bottom and slightly up the sides.
- Wrap the pan sides with foil and bake crust for 8 minutes.
- Place a pan with 1.5 inches of hot water on the bottom oven rack.
- Reduce oven to 325°F.
- Mix cream cheese, sour cream, sweeteners, salt, and pumpkin puree until smooth.
- Add vanilla, spices, almond flour, and eggs one at a time, mixing well after each.
- Pour filling into the cooled crust and smooth the top.
- Bake at 325°F for 60 minutes, then turn off the oven and let sit for another 60 minutes with the door slightly open.
- Cool to room temperature, then refrigerate for at least 6 hours or overnight.
- Slice with a hot knife and serve with optional toppings.
Notes
- Use room temperature ingredients for a smoother batter.
- Do not overmix the filling to maintain density.
- Refrigerate overnight for best texture.
- Store leftovers in the fridge for up to 5 days.
- Prep Time: 20 minutes
- Cook Time: 2 hours
- Category: Dessert
- Method: Baking
- Cuisine: American
- Diet: Low Calorie
Nutrition
- Serving Size: 1 slice
- Calories: 320
- Sugar: 2g
- Sodium: 280mg
- Fat: 28g
- Saturated Fat: 14g
- Unsaturated Fat: 10g
- Trans Fat: 0g
- Carbohydrates: 8g
- Fiber: 3g
- Protein: 8g
- Cholesterol: 120mg
Tips for the Perfect Sugar Free Pumpkin Cheesecake
After making this sugar free pumpkin cheesecake more times than I can count (hey, it’s a tough job but someone’s gotta do it), I’ve picked up some game-changing tricks that’ll take yours from good to “Oh my goodness, how is this sugar-free?!” Here are my absolute must-know tips:
Room temperature is non-negotiable
I know I already mentioned this, but it’s so important I’m saying it again – every single dairy ingredient needs to be at room temperature before mixing. Cold cream cheese equals lumpy batter, and who wants that? Take everything out about 2 hours before baking. If you forget (we’ve all been there), you can microwave the cream cheese for 10-second bursts at 50% power until it gives slightly when pressed – just don’t let it melt!
The gentle art of mixing
Here’s where most first-timers go wrong – overmixing after adding the eggs. Once those eggs go in, mix just until the yolk disappears into the batter. Overbeating incorporates too much air, which leads to cracks and a less creamy texture. I like to use the lowest setting on my mixer for this part, or even switch to a spatula for the final stir.
Patience makes perfect
I know it’s tempting to dive in right after that agonizing bake-and-cool process, but hear me out – refrigeration is what transforms this from good to spectacular. That overnight chill (minimum 6 hours) allows the flavors to develop and the texture to set properly. My grandma used to say “good cheesecake can’t be rushed,” and she was absolutely right! My grandma used to say “good cheesecake can’t be rushed,” and she was absolutely right!
Slicing secrets
Want those picture-perfect clean slices? Run your sharpest knife under hot water, wipe it dry, and make one smooth cut. Repeat for each slice – the heat helps glide through that creamy filling without dragging. For extra-clean edges, you can even dip the knife in hot water between cuts. Bonus tip: wipe the knife with a damp cloth after each slice for pristine presentation.
The crust insurance policy
If you’re worried about your crust sticking (especially with that delicate almond meal), try this trick I learned from a pastry chef friend: after spraying your pan, cut a round of parchment paper to fit just the bottom. When it’s time to serve, run a knife around the edge, then place the whole pan on a can of beans or a wide glass. The ring should slide right down, leaving your gorgeous crust intact!
Remember, even if your cheesecake cracks (mine did the first three times!), it’ll still taste incredible. That’s what whipped cream topping is for – the baker’s best friend for covering up any imperfections. The most important thing? Have fun with it and enjoy every creamy, pumpkin-spiced bite of your creation! If you are looking for more dessert ideas, check out our general recipes section.
Sugar Free Pumpkin Cheesecake Variations
One of the best things about this sugar free pumpkin cheesecake is how easily you can switch things up to make it your own! Over the years, I’ve played around with so many variations – some were total wins (hello, chocolate swirl!), and others… well, let’s just say not every experiment belongs in the recipe book. Here are my favorite foolproof twists that always impress:
Crazy-Good Crust Alternatives
That almond crust is delicious, but sometimes you want to change things up:
- Pecan paradise: Swap half the almond meal for finely ground pecans – the toasty flavor pairs amazingly with pumpkin. Just pulse them in your food processor until they’re the texture of coarse sand.
- Ginger snap magic: Crush up sugar-free ginger snaps (about 1 1/2 cups) and mix with 5 tbsp melted butter for a spicy-sweet base that’ll knock your socks off.
- Coconut lover’s dream: Use 1 cup almond meal and 1/4 cup unsweetened shredded coconut for a tropical twist. Toast the coconut first for extra flavor!
Filling Twists That Wow
- Chocolate pumpkin bliss: Stir 2 tbsp unsweetened cocoa powder into your dry ingredients for a mocha-pumpkin hybrid that’s downright addictive. Top with sugar-free chocolate shavings if you’re feeling fancy.
- Espresso kick: Add 1 tbsp instant espresso powder to enhance all those warm spices – it doesn’t make it taste like coffee, just deeper and more complex.
- Orange zest delight: Grate in the zest of one orange for a bright citrus note that cuts through the richness beautifully.
Diet-Friendly Swaps
- Dairy-free version: Use coconut cream instead of sour cream and dairy-free cream cheese (I like Kite Hill). For the crust, coconut oil works instead of butter.
- Nut-free option: Make the crust with sunflower seed meal or ground pepitas for that same toasty crunch without the nuts.
- Egg-free hack: While I haven’t perfected this yet, some readers swear by using 1/4 cup plain Greek yogurt per egg needed. The texture will be slightly denser but still delicious.
The beauty of this recipe is how forgiving it is – as long as you keep the basic ratios the same, you can get creative with flavors. My advice? Start with one variation at a time until you find your perfect combo. And when you do, write it down! (Speaking from experience after forgetting an amazing hazelnut-cinnamon version I once made…) Whatever variation you choose, that creamy pumpkin goodness will still shine through! If you enjoy pumpkin desserts, you might also love my recipe for tiny pumpkin tarts.
Serving and Storing Sugar Free Pumpkin Cheesecake
Now comes the best part – enjoying your masterpiece! This sugar free pumpkin cheesecake is amazing plain, but let me tell you about my favorite ways to dress it up. First, let it sit at room temperature for about 15 minutes before serving – that slight chill coming off makes the flavors pop even more. When I really want to impress guests, I go all out with toppings:
- Cloud-like whipped cream: I whip heavy cream with a splash of vanilla and powdered Swerve until soft peaks form. Pipe little rosettes around the edges or go rustic with a big dollop on each slice.
- Toasty pecans: Toss pecan halves in melted butter and cinnamon, then toast at 350°F for 5-7 minutes until fragrant. The crunch contrast is heavenly!
- Caramel drizzle: Warm up some sugar-free caramel sauce (I like ChocZero) and zigzag it over the top with a spoon. Pro tip: microwave for 10 seconds to make it perfectly pourable.
- Spiced dusting: Mix powdered Swerve with cinnamon and pumpkin pie spice, then sift lightly over each slice for a pretty finish.
For storage, here’s what I’ve learned from years of cheesecake trials (and occasional errors!):
- Fridge life: Keeps beautifully for 5 days covered in the fridge. I press plastic wrap directly on the surface to prevent drying, then cover the whole pan with foil.
- Slicing ahead: Cut just what you need each time – the edges stay fresher when left whole. Use that hot knife trick again for clean cuts every time!
- Freezing option: Surprisingly, this cheesecake freezes well for up to 2 months! Wrap individual slices in parchment, then foil, and thaw overnight in the fridge. The texture might be slightly denser but still delicious.
One last serving tip from my holiday disasters – if you’re transporting this beauty, chill it overnight first, then secure the springform bottom to a cake board with a dab of frosting before traveling. Nothing worse than your gorgeous cheesecake sliding around in the car! Whether you’re serving it straight from the fridge or dressed to impress, every creamy, spiced bite will have people begging for the recipe – sugar-free magic at its finest!

Sugar Free Pumpkin Cheesecake FAQs
Over the years, I’ve gotten so many questions about this sugar free pumpkin cheesecake – and I love helping fellow bakers get it just right! Here are the answers to everything you might be wondering:
How long does sugar free pumpkin cheesecake last in the fridge?
Properly stored with plastic wrap pressed right on the surface, it keeps beautifully for 5 days. The flavors actually deepen after a day or two – some say it’s even better on day three!
What’s the role of sugar in traditional cheesecake?
Sugar isn’t just for sweetness – it helps create that smooth texture and balances the tanginess. In our version, the sugar substitutes provide sweetness while the sour cream and cream cheese give that perfect creamy mouthfeel.
Can I use a different sugar substitute?
Absolutely! I’ve had great results with monk fruit blends and erythritol-based sweeteners. Just stick to the same measurements – no need to adjust. Avoid liquid stevia though, as it can throw off the texture.
Why did my cheesecake crack?
Don’t worry – it still tastes amazing! Cracks usually happen from overmixing (too much air) or temperature changes. Next time, try the water bath method and let it cool gradually in the oven like we discussed.
Can I freeze pumpkin cheesecake?
You bet! Freeze individual slices wrapped in parchment then foil for up to 2 months. Thaw overnight in the fridge – the texture will be slightly denser but still delicious.
Is canned pumpkin really better than fresh?
For consistent results, yes! Canned pumpkin has less water content, which means your cheesecake won’t be watery. If you use fresh, roast and puree it first to concentrate the flavor.
Can I make this dairy-free?
Definitely! Use dairy-free cream cheese and coconut cream instead of sour cream. The texture will be slightly different but still creamy and delicious.
Remember – even if your cheesecake isn’t picture-perfect, it’ll still taste incredible! The most important thing is enjoying every bite of your homemade creation.
Nutritional Information
Let’s talk numbers – because I know you’re curious about what’s actually in this indulgent-tasting sugar free pumpkin cheesecake! Here’s the breakdown per generous slice (based on 10 servings from a 9-inch cheesecake):
- Calories: 320 (but packed with good fats that keep you satisfied!)
- Total Carbs: 8g (that’s less than half a slice of bread!)
- Fiber: 3g (thanks to that almond crust and pumpkin)
- Net Carbs: 5g (perfect for keto friends)
- Protein: 8g (from all those eggs and cream cheese)
- Fat: 28g (the good kind that makes this so creamy)
A quick heads-up – these numbers can vary slightly depending on your exact ingredients. Different brands of cream cheese or almond flour might have slightly different nutrition profiles. Also, if you go wild with toppings (no judgment – I’ve been there!), those will add to the totals. But compared to traditional pumpkin cheesecake that can run 500+ calories and 50g+ carbs per slice? This sugar free version lets you enjoy every luscious bite without derailing your healthy eating goals. Now that’s what I call a win-win!