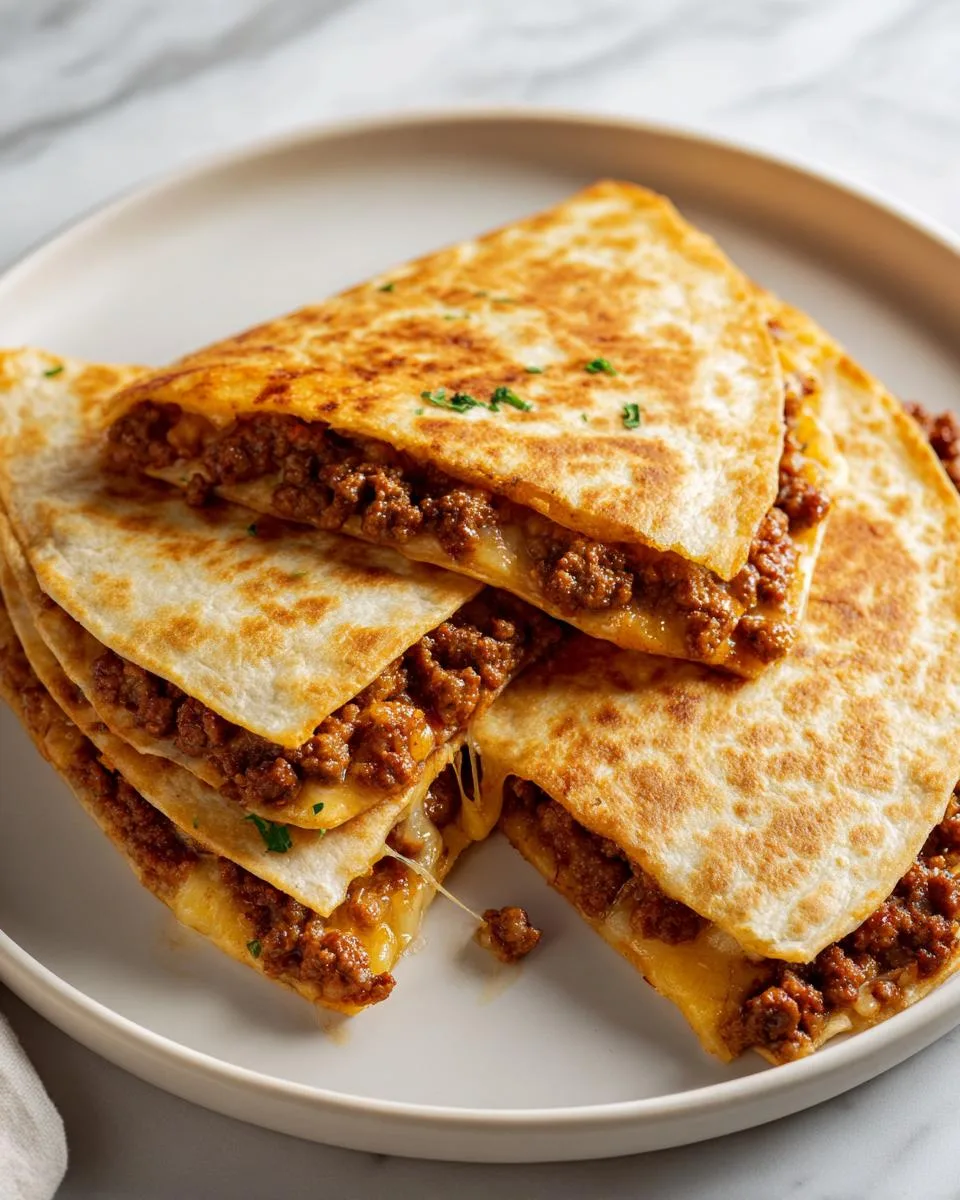
Nothing beats the sizzle of ground beef hitting a hot pan when you’re starving after a long day. I remember my mom’s genius solution when we’d groan “tacos again?” on busy weeknights – she’d transform that same seasoned beef into crispy, melty ground beef quesadillas in minutes flat. The kid-approved magic? That glorious layer of cheese sealing all the spicy beef goodness between golden tortillas.

Table of Contents
Table of Contents
Why You’ll Love Ground Beef Quesadillas
Nowadays when my own family hears the spatula scraping against the cast iron, they come running. These ground beef quesadillas are my emergency dinner hero – cheaper than takeout, faster than delivery, and infinitely customizable. The secret’s in the crust: that perfect balance where the tortilla crackles when you bite but still bends without breaking. Pro tip: make extra filling because someone will sneak spoonfuls straight from the pan.
What makes this recipe special? Unlike fussy restaurant versions, we’re using simple ingredients you likely have already. That half-used packet of taco seasoning works fine in a pinch, but I’ll share my favorite homemade blend that makes the beef sing. Whether you’re feeding picky kids or spice-loving adults, this flexible formula never fails me – even on nights when the baby’s crying and the dog’s underfoot.
Ingredients for Ground Beef Quesadillas
Here’s what you’ll need for those crispy, melty wonders (measurements matter!):
- 1 tablespoon olive oil – or whatever oil you’ve got, but olive adds nice flavor
- 1 pound lean ground beef – 85/15 works best, not too greasy
- 1 tablespoon tomato paste – that little can in your fridge door is perfect
- 1 ½ tablespoons chili powder – the backbone of our spice blend
- 1 teaspoon ground cumin – smells like my abuela’s kitchen
- ½ teaspoon garlic powder – trust me, fresh garlic burns too fast
- ½ teaspoon kosher salt – plus more to taste
- ¼ teaspoon black pepper – freshly ground if you’re feeling fancy
- ¼ cup water – for deglazing all those tasty browned bits
- 2 cups shredded cheese – packed measure! I mix Monterey Jack and cheddar
- 4 large whole wheat tortillas – 10-inch diameter, flour works too
Ingredient Substitutions
No ground beef? No problem! Here’s how to adapt:
- Ground turkey or chicken – add an extra tablespoon oil since it’s leaner
- Corn tortillas – use two per quesadilla (they’re smaller) and expect more crunch
- Dairy-free cheese – look for blends that melt well (Violife is my favorite)
- No tomato paste? – 2 tablespoons ketchup works in a pinch
Warning: Super lean meats (like 99% fat-free) will dry out, and corn tortillas tear easier when folding. Been there, cried over broken quesadillas!
How to Make Ground Beef Quesadillas
Listen, I’ve burned more quesadillas than I care to admit before nailing this method. The key? Treat your ground beef like royalty and your tortillas with TLC. Here’s how we get those perfect golden pockets every time.
Cooking the Filling
First, grab your biggest skillet – cast iron if you’ve got it – and warm that olive oil over medium-high heat. When it shimmers, add your ground beef in chunks like little meat islands. Resist the urge to stir immediately! Let those beauties brown for a solid 2 minutes (I count slowly to 120).
Now attack it with your spatula, breaking it into crumbles. You’ll know it’s ready for spices when most pieces turn from pink to gray with crispy brown edges. That’s when I sprinkle in my chili powder, cumin, garlic powder, salt, and pepper like I’m seasoning the heck out of a TV cooking show. Stir in the tomato paste – it’ll stick at first but keep scraping!
After about 5 minutes, when your kitchen smells like a taqueria, pour in that 1/4 cup water. Scrape up all the flavor bombs stuck to the pan (chefs call this “fond” – we call it “the good stuff”). Remove from heat before it dries out completely – the beef should look juicy, not swimming.
Assembling & Grilling
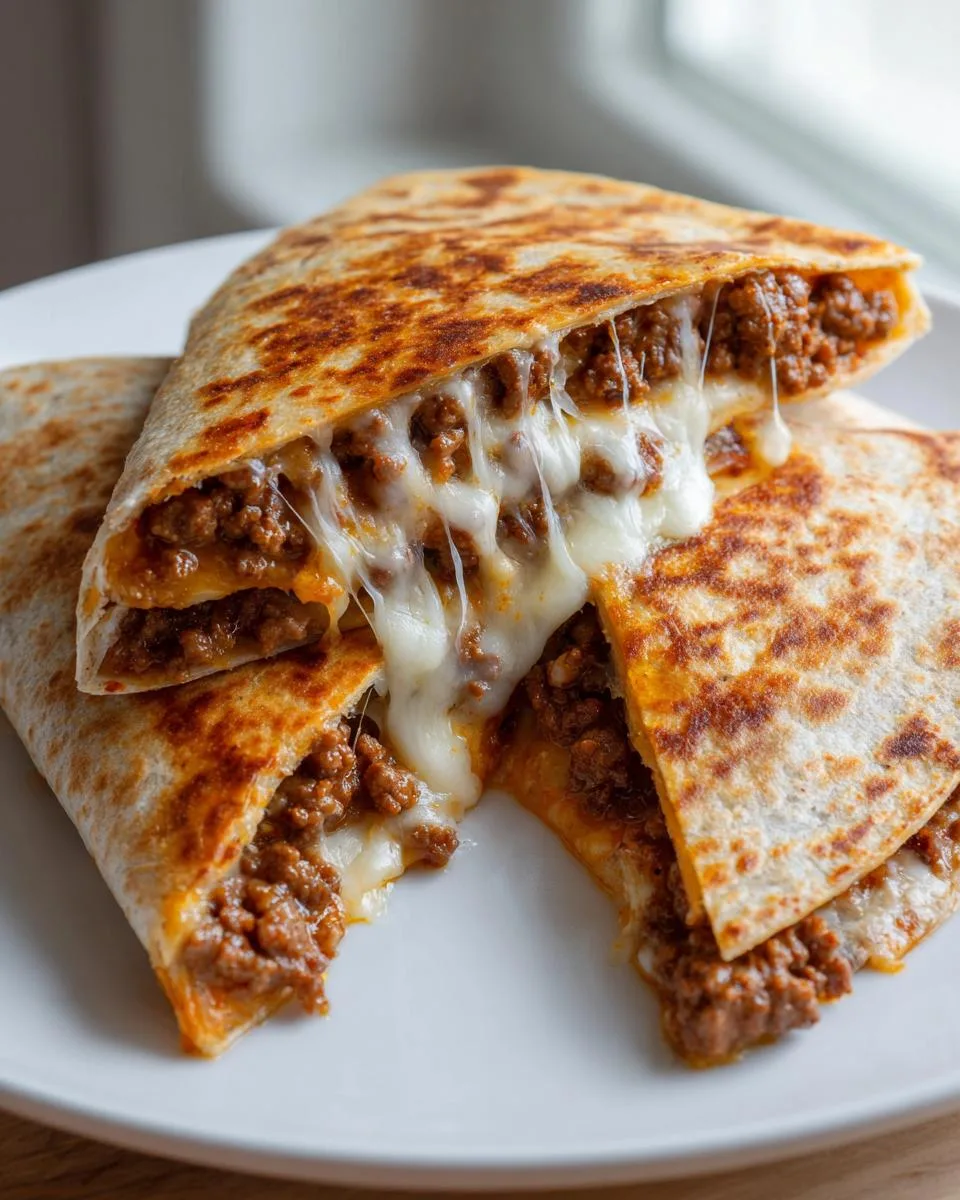
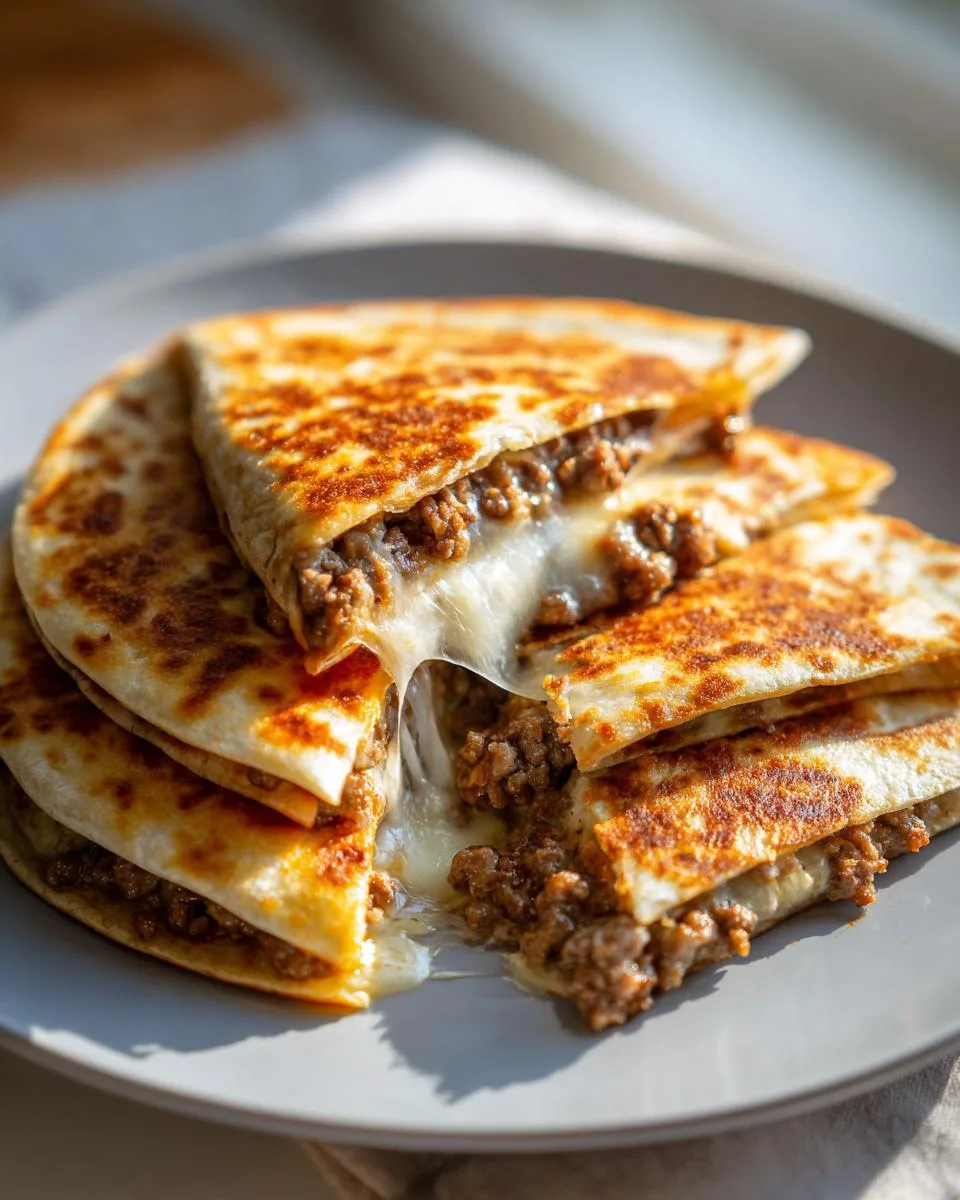
Here’s where most quesadillas go wrong: the cheese-to-filling ratio. For each 10-inch tortilla, I do a thin layer of cheese (about 1/4 cup), then 1/2 cup beef, then another 1/4 cup cheese. Any more and it’ll burst like a overstuffed suitcase when you flip it!
Heat your clean skillet over medium-low (not medium, not high – this isn’t a race). Melt a smidge of butter or spray lightly. Lay your assembled quesadilla in the pan and press gently with the spatula. Peek after 3 minutes – golden spots should appear like a lovely tortilla tan.
When the bottom looks like a crispy dream (about 4 minutes), here’s the flip trick: Slide the spatula underneath, place your other hand gently on top like you’re holding a burger, and confidently flip. If cheese oozes out, press the edges together – no shame in a cheesy fringe! Cook another 3-4 minutes until both sides sing when tapped.
Transfer to a cutting board and let it rest 2 minutes (I know, torture!) before slicing. This lets the cheese set so you get clean wedges instead of a molten lava situation. Trust me, that patience pays in perfect layers!
Print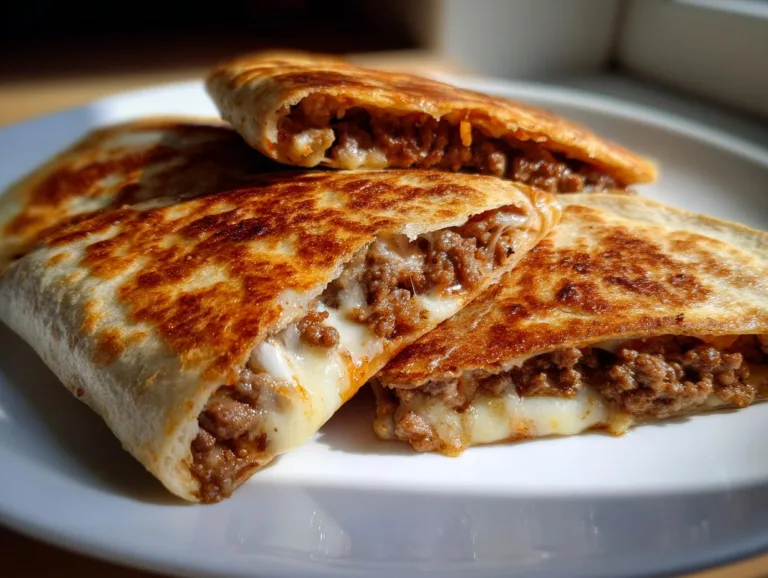
Savory Ground Beef Quesadillas in 20 Minutes Flat
Easy ground beef quesadillas with seasoned beef and melted cheese between crispy tortillas.
- Total Time: 25 minutes
- Yield: 4 quesadillas 1x
Ingredients
- 1 tablespoon olive oil
- 1 pound lean ground beef
- 1 tablespoon tomato paste
- 1 ½ tablespoons chili powder
- 1 teaspoon ground cumin
- ½ teaspoon garlic powder
- ½ teaspoon kosher salt
- ¼ teaspoon ground black pepper
- ¼ cup water
- 2 cups shredded cheese (Monterey jack, pepper jack, or Mexican blend)
- 4 large whole wheat tortillas
- Oil, butter, or nonstick spray for cooking
- Optional toppings: sour cream, guacamole, salsa, cilantro
Instructions
- Heat oil in skillet over medium-high heat. Cook ground beef for 2 minutes before breaking into pieces.
- Add tomato paste and spices. Cook 5-7 minutes until beef is browned.
- Stir in water and scrape pan. Remove from heat.
- Assemble quesadillas with cheese, beef, and more cheese between tortillas.
- Cook in buttered skillet 4 minutes per side until golden and crisp.
- Let cool briefly before slicing into wedges.
Notes
- Use sturdy spatula for flipping quesadillas
- Let cheese melt completely before serving
- Adjust spice levels to taste
- Prep Time: 10 minutes
- Cook Time: 15 minutes
- Category: Main Dish
- Method: Stovetop
- Cuisine: Mexican
- Diet: Low Lactose
Nutrition
- Serving Size: 1 quesadilla
- Calories: 420
- Sugar: 2g
- Sodium: 680mg
- Fat: 22g
- Saturated Fat: 9g
- Unsaturated Fat: 11g
- Trans Fat: 1g
- Carbohydrates: 28g
- Fiber: 4g
- Protein: 28g
- Cholesterol: 75mg
Pro Tips for Perfect Quesadillas
After years of both glorious successes and tragic quesadilla fails (RIP to that one that flipped onto the floor), I’ve learned these golden rules that make all the difference:
- Press with purpose! That gentle spatula pressure while cooking isn’t just for show – it helps the cheese melt evenly and creates that signature crispy-yet-bendable texture we love. Think of it like tucking in a blanket around the filling.
- Let them rest like a good steak. I know it’s tempting to dive right in, but giving your quesadilla 2 full minutes off the heat before slicing means no cheese avalanches. The wait builds character…and prevents burnt tongues!
- Room temp tortillas save lives. Straight-from-the-fridge tortillas crack when folded like my patience on a Monday morning. Take them out 15 minutes early or microwave the stack (wrapped in a damp paper towel) for 10 seconds to make them flexible.
Bonus tip from my 5-year-old sous chef: If your cheese isn’t melting fast enough, cover the skillet with a lid for 30 seconds to create a mini oven effect. Just don’t walk away – that’s how you get the dreaded “soggy bottom!”
Serving Suggestions
Oh, the joy of sliding that first golden wedge onto a plate! Now comes the really fun part – dressing up your ground beef quesadillas. I always set up a “build-your-own” station with these must-haves:
- Fresh pico de gallo – the acidic tomatoes cut through all that cheesy richness perfectly
- Pickled jalapeños – my dad keeps a jar in his glove compartment (don’t ask)
- Lime wedges – a quick squeeze brightens everything
- Cooling agents – sour cream, guacamole, or even just Greek yogurt in a pinch
- Cilantro – for those who love it (I know some of you think it tastes like soap!)
For sides, you can’t go wrong with Mexican rice – the kind that’s fluffy but still slightly sticky. When I’m feeling fancy, I’ll throw together a quick corn and black bean salad. But let’s be real – most nights it’s just a handful of tortilla chips and whatever salsa is open in the fridge.
Pro tip: If you’ve got kids at the table, serve the quesadillas whole with toppings on the side. Watching them carefully construct each bite (while you sneak extra jalapeños onto yours) is half the fun!
Storage & Reheating
Listen, I know the idea of leftover quesadillas seems crazy when they’re this good, but life happens! Here’s how to keep that crispy magic going strong:
Fridge Facts: Stack cooled quesadillas between parchment paper in an airtight container. They’ll keep for 3 days max – after that, the tortillas get sad and soggy. (Pro tip: Write “EAT ME” on the container with the date – my husband ignores anything without clear instructions!)
Reheating Like a Pro: Skip the microwave unless you love rubbery tortillas! Instead:
- Heat a dry skillet over medium (no oil needed)
- Add quesadilla and cover with a lid for 1 minute to steam the cheese
- Remove lid and cook 1-2 more minutes until crisp
For extra crunch, pop them under the broiler for 30 seconds – just watch closely unless you enjoy charcoal flavors! If the edges dry out, brush lightly with water before reheating.
Freezer Hack: Wrap individual wedges in foil then freeze for up to 1 month. To reheat: Bake at 375°F straight from frozen (still wrapped) for 15 minutes, then unwrap and crisp 5 more minutes. Perfect for emergency snack attacks!
Nutrition Information
Okay, let’s talk numbers – but don’t worry, I won’t make you feel guilty about that extra cheese! Here’s the breakdown per quesadilla (because let’s be real, who stops at half?). These are estimates since your exact ingredients might vary slightly from mine.
| Serving Size | 1 quesadilla (about 1/4 of recipe) |
| Calories | 420 |
| Total Fat | 22g |
| Saturated Fat | 9g |
| Carbs | 28g |
| Fiber | 4g |
| Sugar | 2g |
| Protein | 28g |
Now, before anyone comes at me with their calculator – yes, these numbers can change! Using extra cheese (no judgment) or different tortillas will shift things. My sister makes them with turkey and low-carb wraps that clock in around 300 calories, but I’ll take the full-fat joy any day.
Fun fact: That 28g of protein per serving is what makes this my go-to post-workout meal. Pair it with a side salad and you’ve got what my trainer calls “a balanced plate” – though I call it “delicious victory.”
FAQ About Ground Beef Quesadillas
After years of making (and sometimes mangling) these cheesy wonders, I’ve heard every question imaginable. Here’s the real scoop on avoiding disaster and maximizing flavor:
What should I season my ground beef with for quesadillas?
My magic blend is chili powder + cumin + garlic powder – the holy trinity of Tex-Mex flavor! But honestly? Raid your spice drawer. Smoked paprika, oregano, even a pinch of cinnamon can work. Just taste as you go (raw beef disclaimer: cook that test bite first!).
How long can a beef quesadilla sit out?
Two hours max if you want to live dangerously (I’ve pushed to three when desperate). After that? Bacteria party time. For potlucks, I keep them in a thermos or on a warming tray. Leftovers go straight into the fridge – no shame in eating cold quesadillas over the sink at midnight though! You can see more of my kitchen adventures over at my Facebook page.
Why do my tortillas get soggy?
Three likely culprits:
- Overstuffing: More filling ≠ better. That extra beef moisture steams the tortilla from inside.
- Low heat: Medium-low is your friend! Too cold = sad, greasy tortillas.
- Wet toppings: Add salsa after cooking unless you like the “wet diaper” texture.
Can I prep these ahead?
Absolutely! Cook the beef filling up to 3 days early (it actually tastes better). Just don’t assemble until ready to cook – nobody likes a pre-soggy quesadilla. Pro tip: Freeze individual portions of filling for emergency quesadilla nights! If you’re looking for more quick dinner ideas, check out my full list of recipes.
Help! My cheese won’t melt!
First, check your cheese isn’t straight from the fridge (30 minutes at room temp helps). Second, cover the skillet for 30 seconds to trap heat. Still not melting? Your “cheese” might be that weird oily kind – spring for real Monterey Jack next time!
Final Thoughts
Alright, my fellow quesadilla enthusiasts – it’s go time! I want you to grab that skillet, crank up the heat, and let’s make some cheesy, beefy magic happen tonight. This isn’t just another recipe – it’s your new secret weapon for those “what’s for dinner?!” panic moments. And hey, if your first flip ends up more like a quesadilla pancake (we’ve all been there), just call it “deconstructed” and keep going!
When you make these – and I mean when, not if – do me a favor: snap a pic of that gorgeous golden crust and tag me. Nothing makes me happier than seeing your kitchen victories (or even your hilarious fails – remember, crispy cheese fringe is a feature, not a bug!). Whether it’s your first rodeo or your hundredth, I want to hear about your ground beef quesadilla adventures. Now get cooking – your future crispy, melty self thanks you!