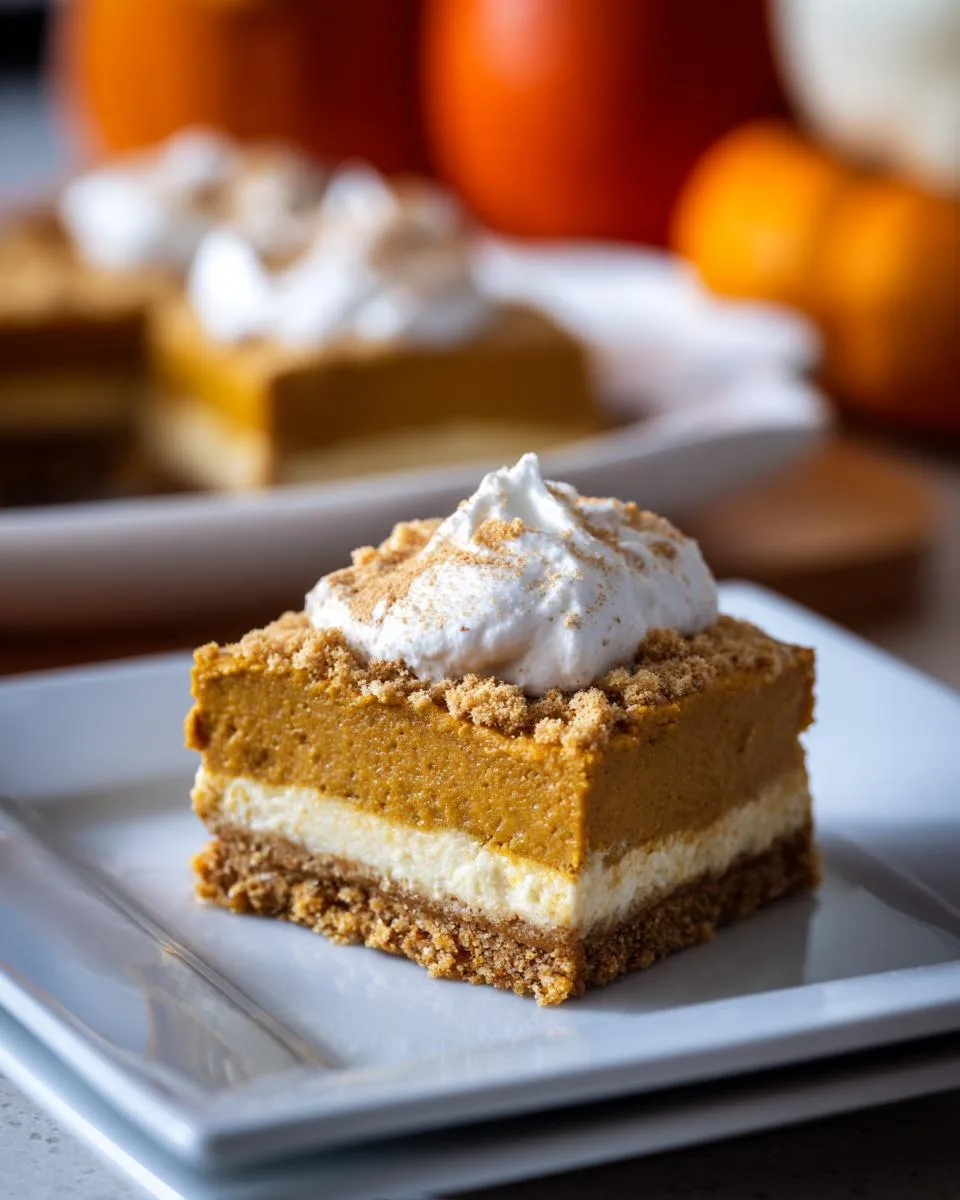
Oh my gosh, you have to try these no bake pumpkin cheesecake bars – they’re my absolute go-to when I need a showstopper dessert without turning on the oven! Every fall, when the leaves start changing and pumpkin spice everything appears, I pull out this recipe that never fails to wow at potlucks and family gatherings. The best part? You probably already have most of these ingredients in your pantry right now.
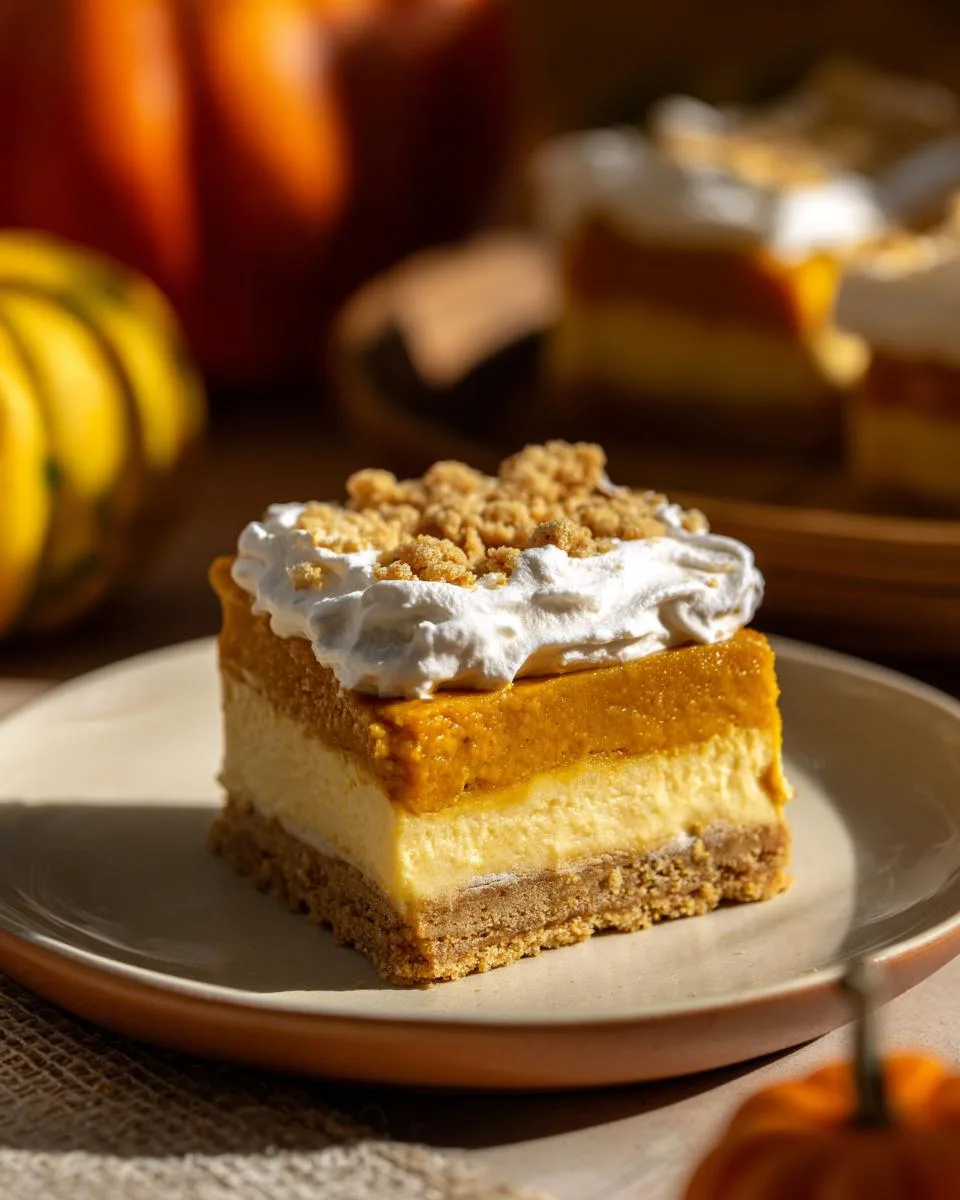
Table of Contents
Table of Contents
Why You’ll Love These No Bake Pumpkin Cheesecake Bars
I’ve been making this version for years – ever since my neighbor brought over a pan when I was recovering from surgery. One bite of that creamy pumpkin layer sitting on top of the tangy cheesecake and buttery graham cracker crust, and I just had to get the recipe. Now it’s become my signature fall treat that friends beg me to bring to every autumn get-together. And honestly? I don’t mind one bit because it’s so ridiculously easy to throw together!
These no bake pumpkin cheesecake bars combine everything we love about classic cheesecake with the warm spices of pumpkin pie – but without any of the fuss of baking. Just mix, layer, chill, and watch them disappear faster than you can say “pumpkin spice latte season!
Let me count the ways these bars will become your new fall obsession:
- No oven required – Seriously, just mix and chill while you binge your favorite show
- All the cozy fall flavors – Pumpkin spice meets creamy cheesecake in every bite
- Foolproof layers – That graham cracker crust won’t crumble if you chill it first (my secret!)
- Crowd-pleaser magic – I’ve never brought leftovers home from a party
- Make-ahead dream – They actually taste better after chilling overnight
Trust me, after one bite you’ll understand why my friends request these every September through November!
Gathering Your Ingredients for No Bake Pumpkin Cheesecake Bars
Okay, let’s raid the pantry and fridge – here’s everything you’ll need to make these dreamy pumpkin cheesecake bars. I like to organize everything by layer so nothing gets missed in the excitement (because trust me, when that pumpkin spice hits your nose, you might forget what you’re doing!).
For the Crust (the buttery foundation):
- 12 full sheets graham crackers – about 1.5 cups when crushed. I use the classic honey kind, but cinnamon works great too!
- 8 tablespoons (1 stick) unsalted butter, melted – and yes, it must be real butter for that perfect crisp texture
For the Cream Cheese Layer (the tangy superstar):
- 24 ounces cream cheese (that’s three 8-oz packages) – full fat only, and please let it sit out until it’s room temperature. Cold cream cheese = lumpy sadness.
- 3 tablespoons sugar – just enough sweetness to balance the tang
- 3 tablespoons milk – whole milk makes it extra creamy
- 1 teaspoon vanilla extract – the good stuff if you’ve got it
- 8 ounces frozen whipped topping (like Cool Whip) – thawed but still cold
For the Pumpkin Layer (that autumn magic):
- 30 ounces pumpkin puree – NOT pumpkin pie filling! Look for 100% pumpkin
- 2 cups milk – again, whole milk gives the best texture
- 10.2 ounces instant vanilla pudding mix (two 5.1-ounce boxes) – secret weapon for perfect consistency
- 2 teaspoons ground cinnamon – because is it really pumpkin spice without it?
- 2 teaspoons pumpkin pie spice – my kitchen smells like fall just typing this
For the Topping (because more fluff is always better):
- 8 ounces frozen whipped topping – the other half of that 16-ounce container
See? Mostly pantry staples with a few special ingredients that make all the difference. Now let’s get mixing!

How to Make No Bake Pumpkin Cheesecake Bars
Alright, let’s make some magic happen! Don’t let the layers intimidate you – I’ll walk you through each step so you end up with perfect pumpkin cheesecake bars every time. Just follow along and resist the urge to dig in too early (I know, it’s hard!).
Step 1: Prepare the Graham Cracker Crust
First, grab those graham crackers and turn them into crumbs – I like putting them in a ziplock bag and rolling them with a rolling pin (great stress reliever!). Mix the crumbs with melted butter until it looks like wet sand. Now here’s my trick: press it FIRMLY into your 9×13″ pan using the bottom of a glass – this keeps it from crumbling later. Pop it in the freezer for 15 minutes to set while you make the next layer. This chilling step is non-negotiable for that perfect crisp base!
Step 2: Make the Cream Cheese Layer
Now for the creamy goodness! Beat the room temperature cream cheese (see why we let it soften?), sugar, milk and vanilla together until silky smooth – no lumps allowed! Gently fold in half the whipped topping (that’s 8 ounces) with a spatula until just combined. Spread this over your chilled crust, going all the way to the edges. Pro tip: dip your spatula in warm water for super smooth spreading.
Step 3: Create the Pumpkin Layer
In a large bowl, whisk together the pumpkin puree and milk until completely smooth. Add the pudding mixes and spices, then whisk like crazy for about 2 minutes until it starts to thicken. This is when your kitchen will smell like pumpkin spice heaven! Carefully spread this over the cream cheese layer – I like to dollop spoonfuls across the surface first to make spreading easier.
Step 4: Assemble and Chill
Almost there! Spread the remaining whipped topping over the pumpkin layer – be gentle so you don’t mix the layers. Now comes the hardest part: refrigerate for at least 4 hours (overnight is even better). I know it’s tempting, but this chilling time lets all the flavors meld and the layers set properly. When you finally cut into it, you’ll get those gorgeous clean layers that make everyone go “wow!”
Print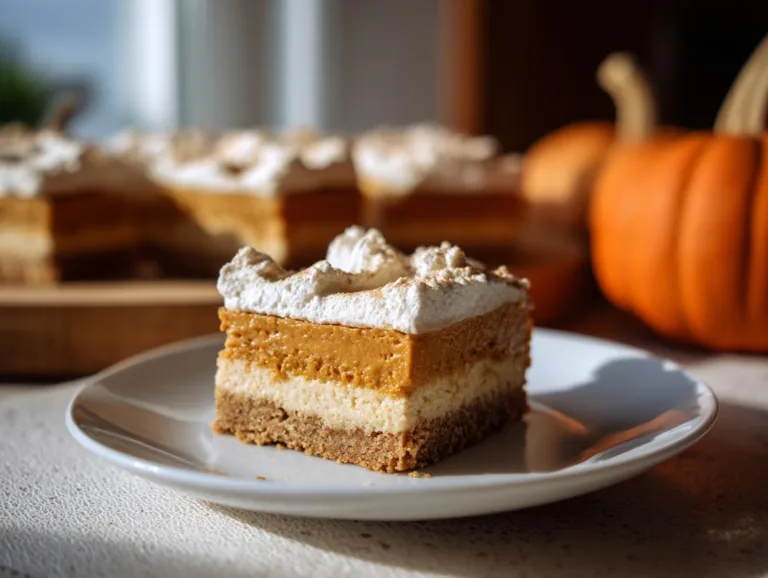
Easy No Bake Pumpkin Cheesecake Bars in 4 Simple Steps
No bake pumpkin cheesecake bars are a delicious and easy dessert perfect for fall. They feature a graham cracker crust, creamy cheesecake layer, spiced pumpkin filling, and a light whipped topping.
- Total Time: 4 hours 20 minutes
- Yield: 12 servings 1x
Ingredients
- For the Crust:
- 12 full sheets graham cracker
- 8 tablespoons unsalted butter melted, full stick
- For Cream Cheese Layer:
- 24 ounces cream cheese three 8-oz packages at room temperature
- 3 tablespoons sugar
- 3 tablespoons milk
- 1 teaspoon vanilla extract
- 8 ounces frozen whipped topping like Cool Whip, thawed
- For Pumpkin Layer:
- 30 ounces pumpkin puree
- 2 cups milk
- 10.2 ounces instant vanilla pudding two 5.1 ounce boxes
- 2 teaspoons ground cinnamon
- 2 teaspoons pumpkin pie spice
- Topping the Dessert:
- 8 ounces frozen whipped topping
Instructions
- In a medium sized bowl, combine together graham cracker crumbs and melted butter. Press into the bottom of a greased 9×13″ baking dish or two 8×8″ baking dishes, use the bottom of a glass to really pack it down. Chill in the freezer for 15 minutes.
- In the bowl of a stand mixer, add in the cream cheese, 3 tablespoons milk, sugar, and vanilla extract. Beat until well combined. Gently fold in 8 ounces of the thawed whipped topping (half of a 16 ounce container). Spread on top of the graham cracker crust.
- In a large bowl, combine together the pumpkin puree, 2 cups milk, dry vanilla pudding, cinnamon, and pumpkin pie spice. Spread on top of the cream cheese layer.
- Top with 8 ounces of thawed whipped topping (the rest of the 16 ounce container) over the cream cheese layer. Refrigerate at least 4 hours before serving.
Notes
- Make sure the cream cheese is at room temperature for smooth mixing.
- Chill the crust before adding the layers to prevent crumbling.
- Use full-fat cream cheese for the best texture.
- Store leftovers covered in the refrigerator for up to 5 days.
- Prep Time: 20 minutes
- Cook Time: 0 minutes
- Category: Dessert
- Method: No Bake
- Cuisine: American
- Diet: Vegetarian
Nutrition
- Serving Size: 1 bar
- Calories: 320
- Sugar: 22g
- Sodium: 280mg
- Fat: 18g
- Saturated Fat: 10g
- Unsaturated Fat: 6g
- Trans Fat: 0g
- Carbohydrates: 35g
- Fiber: 2g
- Protein: 5g
- Cholesterol: 45mg
Tips for Perfect No Bake Pumpkin Cheesecake Bars
After making these bars more times than I can count, I’ve picked up some secrets that make all the difference:
- Room temp is key – Take that cream cheese out at least 2 hours ahead. Cold cream cheese = lumpy texture no matter how long you mix!
- Chill that crust – Don’t skip the freezer time for the graham cracker layer – it’s what keeps your slices from crumbling apart.
- Go full-fat – I know, I know, but trust me, low-fat cream cheese and milk make the layers weep. Save the diet for January!
- Spice it right – Fresh pumpkin pie spice makes all the difference. If yours has been in the cabinet since last Thanksgiving, treat yourself to a new jar.
- Patience, grasshopper – That 4 hour chill isn’t just a suggestion. The flavors develop and the layers set perfectly when you wait.
Follow these simple tricks and you’ll have bars that look and taste bakery-perfect every time!
Ingredient Substitutions and Notes
Listen, I get it – sometimes you’re staring into your fridge thinking “I don’t have THAT ingredient!” Don’t panic – here’s how to adapt this recipe without losing that amazing flavor:
Whipped topping swap: If Cool Whip isn’t your thing, homemade whipped cream works beautifully. Just whip 2 cups heavy cream with 2 tablespoons sugar until stiff peaks form.
Graham cracker alternatives: Gluten-free friends, use your favorite GF grahams. No grahams at all? Crushed vanilla wafers or shortbread cookies make a delicious crust too!
Pumpkin puree pro tip: Fresh pumpkin works if you roast and puree it first, but canned is way easier and more consistent. Just make sure it’s pure pumpkin, not pie filling!
Spice adjustments: No pumpkin pie spice? Mix 1 tsp cinnamon + ½ tsp ginger + ¼ tsp nutmeg + ¼ tsp allspice. Easy peasy!
Storing and Serving No Bake Pumpkin Cheesecake Bars
These beauties keep like a dream in the fridge – just cover the pan tightly with plastic wrap or foil, and they’ll stay fresh for up to 5 days (if they last that long in your house!). For picture-perfect slices every time, run your knife under hot water and wipe it dry between cuts. The heat helps glide right through those creamy layers without sticking. I like to serve them chilled straight from the fridge with an extra sprinkle of cinnamon on top – the perfect little bite of fall!

Nutritional Information
Just a heads up – these nutrition facts are estimates since we all tweak recipes a bit! Per generous square (about 1/12 of the pan), you’re looking at:
- 320 calories – Perfect for a treat that doesn’t weigh you down
- 18g fat (10g saturated) – That’s the cream cheese and butter working their magic
- 35g carbs – Mostly from the graham crackers and natural pumpkin sweetness
- 5g protein – A little bonus from the dairy
Remember, portion sizes may vary depending on how big you cut those bars (no judgment here – I’ve been known to sneak an extra “taste test” slice!).
Frequently Asked Questions
I get asked these questions all the time when I bring my no bake pumpkin cheesecake bars to gatherings – here are the answers straight from my messy recipe notebook!
How long do these no bake cheesecake bars stay fresh?
They’ll keep beautifully in the fridge for up to 5 days when covered tightly. The flavors actually get better after a day or two as the spices meld together. Just resist eating them straight from the pan (easier said than done, I know!).
Can I use fresh pumpkin instead of canned?
You can, but it’s extra work! Roast and puree sugar pumpkin until smooth – about 2 small pumpkins should yield 30 ounces. Canned is my go-to because it’s consistent and saves so much time.
Why did my cream cheese layer turn out lumpy?
Ah, this happens when the cream cheese isn’t fully softened. Take it out 2-3 hours before starting, or microwave cold blocks for 10-15 seconds if you’re in a pinch (just don’t melt it!).
Can I freeze these bars?
Absolutely! Freeze them before adding the final whipped topping layer. Thaw overnight in the fridge, then add fresh topping before serving. They’ll keep frozen for about a month.
Share Your No Bake Pumpkin Cheesecake Bars
I’d absolutely love to see your creations! Snap a pic of your pumpkin cheesecake bars and tag me on social – or leave a comment telling me how they turned out. Did you add any fun twists? Trust me, nothing makes me happier than hearing about your baking adventures! You can also find more delicious recipes on our recipes page or follow us on Facebook.