Let me tell you about my new obsession – Mini Cherry Pie Bites! These adorable little treats became my go-to dessert last holiday season when I needed something quick but impressive for a last-minute potluck. You won’t believe how easy they are – just crescent roll dough, cherry pie filling, and a simple glaze. The best part? They bake up in under 15 minutes and disappear from the plate even faster! My niece actually thought I’d spent hours in the kitchen making mini pies from scratch. Nope – just a little kitchen magic with pantry staples. Now they’re my secret weapon for everything from brunch gatherings to “oops I forgot dessert” emergencies.
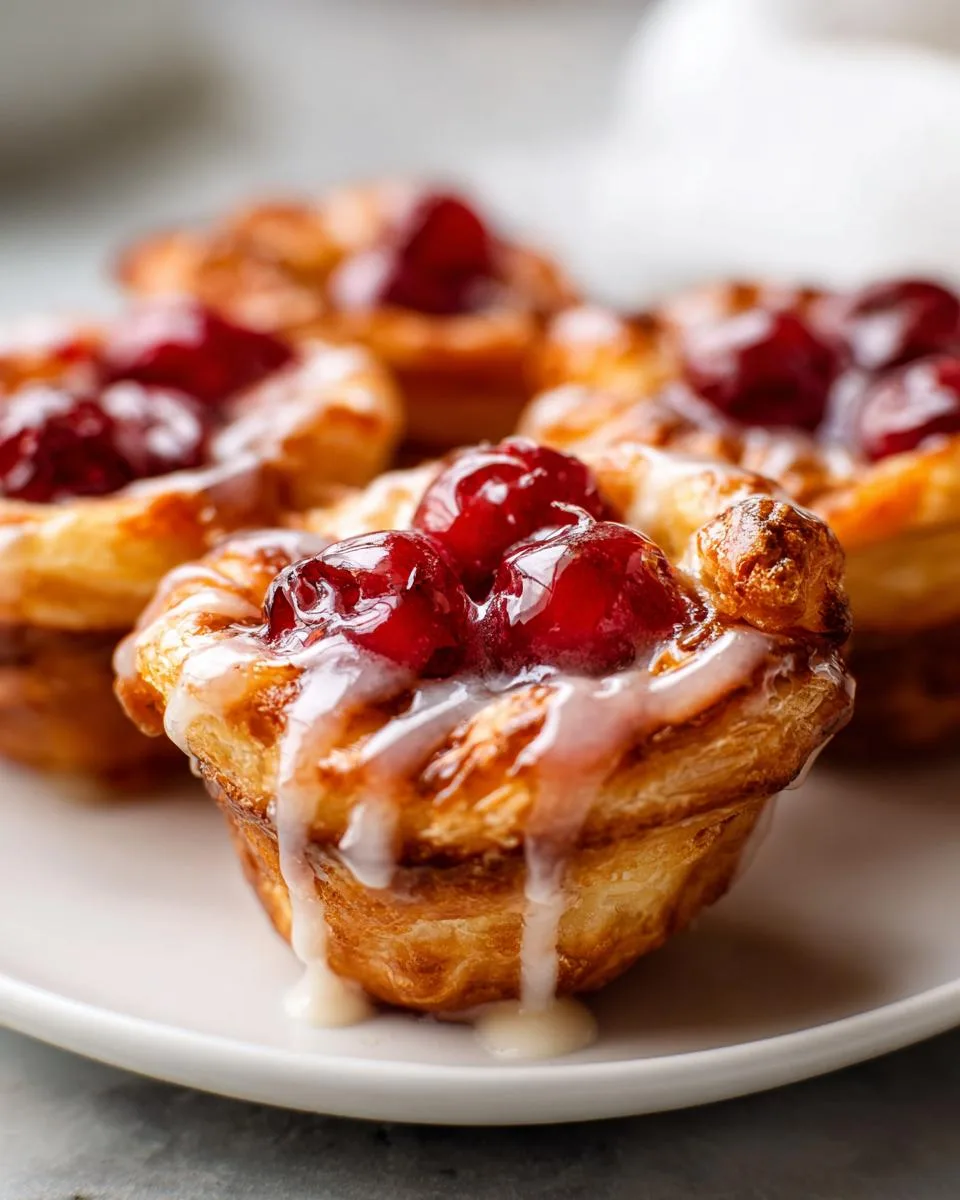
Table of Contents
Table of Contents
Why You’ll Love These Mini Cherry Pie Bites
These little gems check all my dessert boxes – they’re fast, foolproof, and always disappear at gatherings. Let me count the ways they’ll become your new favorite treat!
Quick and Easy Dessert
From fridge to table in under 25 minutes? Yes please! That’s less time than it takes to decide what to watch on Netflix. The dough comes ready-to-use, and the filling’s pre-made – just assemble, bake, and glaze. My kind of baking!
Perfect for Any Occasion
I’ve served these everywhere from bridal showers to football parties. Their mini size makes them ideal for buffets, and that sweet-tart cherry flavor pleases every crowd. Kids go crazy for them at bake sales, and adults love them with afternoon coffee. Pro tip: double the batch – they freeze beautifully!
Ingredients for Mini Cherry Pie Bites
Here’s the beautiful part – you only need four simple ingredients to make magic happen! I always keep these basics stocked because you never know when a cherry pie bite emergency might strike (and trust me, they happen more often than you’d think).
- 1 (21 oz) can cherry pie filling – Don’t skimp here! Get the good stuff with plump, juicy cherries. I’ve tried generic brands and always regret it.
- 2 (8 oz) tubes crescent roll dough – The kind that comes in those scary pop-open tubes (you know the ones that make you jump every time). Keep them chilled until ready to use!
- 1 cup powdered sugar – For that dreamy glaze that takes these from good to “oh my gosh I need another one”
- 1-2 tablespoons milk – Any kind works! I’ve used everything from whole milk to almond milk in a pinch.
Oh! And don’t forget to lightly grease your muffin tin – I use that handy nonstick spray, but butter works too if you’re feeling fancy. That’s it! No fancy equipment, no hard-to-find ingredients – just pure, simple deliciousness waiting to happen.

Equipment You’ll Need
One of my favorite things about these mini cherry pie bites? You probably already have everything you need in your kitchen right now! Here’s the short and sweet list:
- Standard muffin tin – The 12-cup kind you use for cupcakes. No fancy mini muffin pans needed!
- Mixing bowl – Any medium-sized bowl will do for whisking up that dreamy glaze
- Whisk or fork – To get your glaze perfectly smooth (I’ve used a fork in desperation – works just fine!)
- Measuring cups – For the powdered sugar and milk
- Spoon – For scooping that glorious cherry filling
That’s seriously it! No stand mixers, no special tools – just basic kitchen gear. I’ve even made these while traveling using my sister’s sad little bachelor pad kitchen equipment. If she can do it, anyone can!
How to Make Mini Cherry Pie Bites
Okay, let’s get to the fun part – making these adorable little cherry pies! I promise it’s easier than you think. Just follow these simple steps, and you’ll have a tray of golden, glazed perfection in no time.
Preparing the Dough
First things first – preheat that oven to 375°F (190°C). While it’s heating up, lightly grease your muffin tin. I use nonstick spray, but butter works too if you’re feeling fancy. Now for the dough – this is where the magic starts!
Unroll your crescent dough (careful with that pop – gets me every time!). You’ll see it’s divided into triangles – perfect for our mini pies. Place each triangle into a muffin cup with the wide part at the bottom and the pointy end sticking up. Don’t worry about perfection here – rustic is charming!
Adding the Filling
Now for the best part – the cherries! Spoon about 3-4 heaping tablespoons of pie filling into each dough cup. I like to make sure each bite gets plenty of those juicy cherries. Pro tip: if some cherries are huge, I’ll chop them slightly so they distribute evenly.
Next, gently fold the pointy ends of the dough over the filling. They won’t completely cover it – that’s okay! We want some cherry goodness peeking through. The dough will puff up beautifully around the filling as it bakes.
Baking and Glazing
Pop those beauties in the oven for 13-14 minutes. You’ll know they’re done when the dough turns golden brown and smells heavenly. While they bake, whisk together your glaze – just powdered sugar and milk until smooth. I start with 1 tablespoon milk and add more if needed – you want it thick but pourable.
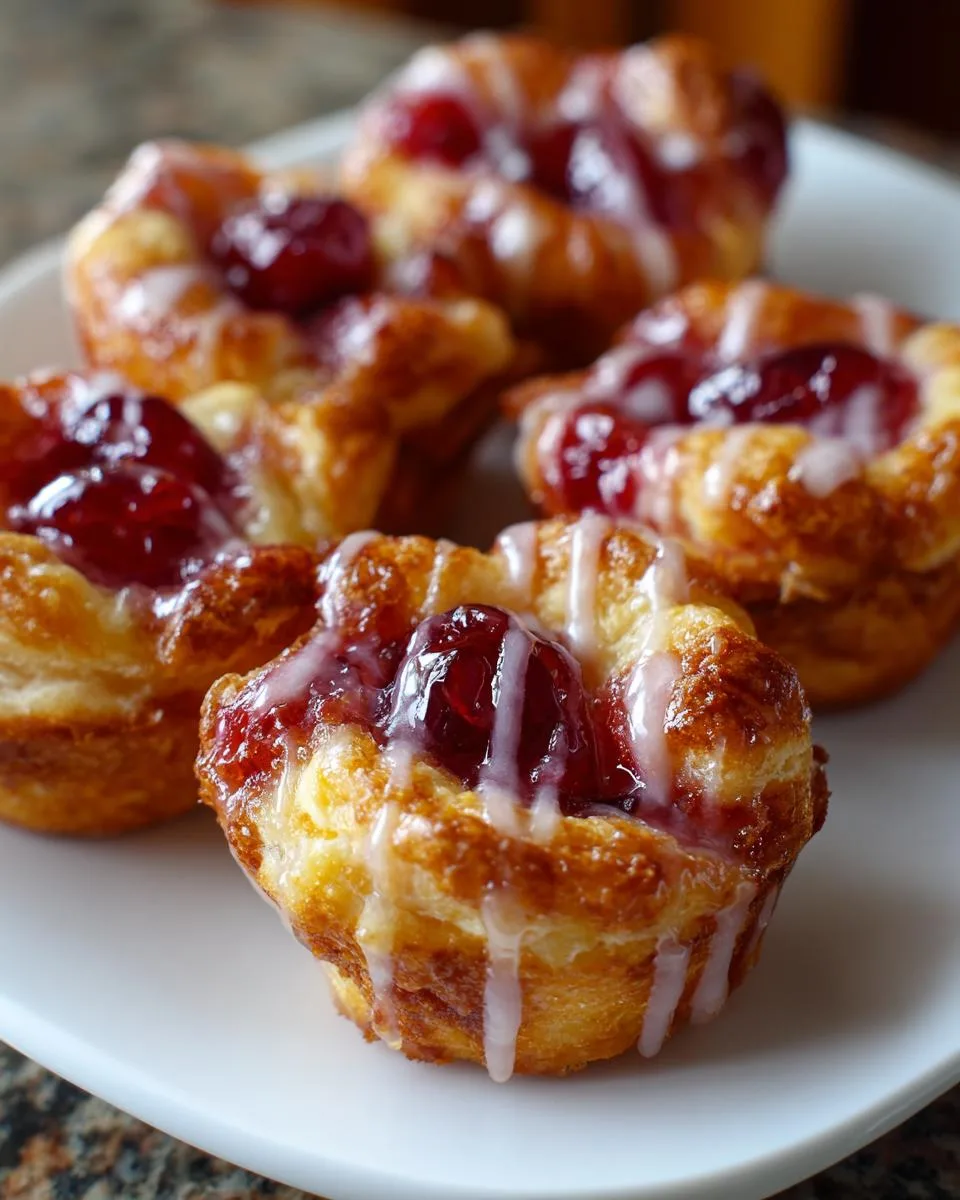
As soon as the pies come out of the oven (careful – they’re hot!), drizzle that gorgeous glaze over them while they’re still warm. The heat helps the glaze melt slightly into all the nooks and crannies. Let them cool for about 5 minutes before serving – if you can wait that long!
Print
15-Minute Mini Cherry Pie Bites That Wow Every Time
Mini Cherry Pie Bites are a quick and easy dessert made with crescent roll dough and cherry pie filling, topped with a sweet glaze.
- Total Time: 24 minutes
- Yield: 12 mini pies 1x
Ingredients
- 1 21 oz can cherry pie filling
- 2 8 oz tubes crescent roll dough
- 1 cup powdered sugar
- 1–2 tablespoons milk
Instructions
- Preheat your oven to 375°F (190°C). Lightly grease a standard muffin tin with nonstick cooking spray.
- Unroll the crescent roll dough and place each piece into a muffin tin, positioning the widest part at the bottom.
- Spoon cherry pie filling into each dough cup, using about 3 to 4 heaping tablespoons.
- Gently fold the dough corners over the filling to enclose it as much as possible.
- Bake for 13-14 minutes, or until golden brown.
- In a small bowl, whisk together the powdered sugar and milk until smooth.
- Drizzle the glaze over the warm cherry bites using a spoon. Serve and enjoy!
Notes
- You can use other pie fillings like apple or blueberry.
- Adjust the milk in the glaze for a thinner or thicker consistency.
- Prep Time: 10 minutes
- Cook Time: 14 minutes
- Category: Dessert
- Method: Baking
- Cuisine: American
- Diet: Vegetarian
Nutrition
- Serving Size: 1 mini pie
- Calories: 150
- Sugar: 12g
- Sodium: 180mg
- Fat: 6g
- Saturated Fat: 2g
- Unsaturated Fat: 3g
- Trans Fat: 0g
- Carbohydrates: 22g
- Fiber: 1g
- Protein: 2g
- Cholesterol: 0mg
Tips for Perfect Mini Cherry Pie Bites
After making dozens (okay, maybe hundreds) of these little cherry delights, I’ve picked up some tricks that’ll guarantee perfect results every time. Trust me – I’ve learned from all my mistakes so you don’t have to!
Don’t Overfill Those Cups!
Resist the urge to pack in extra filling – I know it’s tempting! Too much cherry goodness makes the dough soggy and can cause messy spills in the oven. Stick to 3-4 tablespoons max per cup. The dough needs room to puff up and cradle that sweet filling.
The Golden Brown Test
Ovens vary, so keep an eye on yours around the 12-minute mark. Perfect mini cherry pie bites should be golden brown with slightly darker edges. If they’re browning too fast, tent loosely with foil. Still pale at 14 minutes? Give them another minute – but watch closely!
Let Them Rest
I know it’s hard, but let your pies cool in the tin for 5 minutes before removing. This helps them set so they don’t fall apart when you take them out. Use a butter knife to gently loosen any stubborn edges if needed.
Glaze Like a Pro
For picture-perfect drizzles, let your glaze cool slightly before applying. Too thin? Add more powdered sugar. Too thick? A few drops of milk will fix it. I like to drizzle in zigzags for that bakery-style look – but honestly? They taste amazing no matter how messy your glaze technique is!
Storage Savvy
If by some miracle you have leftovers (rare in my house!), store them in an airtight container at room temperature for up to 2 days. The glaze might lose its shine, but the flavor stays perfect. Want to prep ahead? Assemble without baking and refrigerate overnight – just add a few extra minutes to the bake time.

Variations and Substitutions
One of my favorite things about this recipe is how easily you can mix it up! I’ve experimented with all sorts of fillings and tweaks over the years – here are my absolute favorite twists on the classic cherry version.
Fruit Filling Adventures
That can of cherry pie filling is just the beginning! I keep several varieties in my pantry for when I want to change things up:
- Apple pie filling – Add a sprinkle of cinnamon sugar before baking for cozy fall vibes
- Blueberry pie filling – Top with lemon zest glaze for a bright, summery twist
- Peach pie filling – Divine with a dash of nutmeg in the glaze
- Mixed berry filling – My niece’s favorite – she calls them “confetti pies”
Dough Options
While crescent dough is my go-to, I’ve had great success with other shortcuts when I’m in a pinch:
- Puff pastry – Gives a flakier, more elegant result (bake at 400°F)
- Biscuit dough – Creates a heartier, biscuit-like base
- Pie crust – For traditionalists who want that classic pie texture
Dietary Tweaks
Need to accommodate food restrictions? No problem! Here are my tested swaps:
- Gluten-free – Use gluten-free crescent dough (several brands make it now!)
- Dairy-free – Substitute almond or oat milk in the glaze
- Lower sugar – Try sugar-free pie filling and reduce glaze sugar by half
The possibilities are endless – once you master the basic technique, you’ll be dreaming up your own variations. My neighbor swears by adding chocolate chips to the cherry filling (and honestly? She’s onto something). What will your signature twist be? Check out more of my recipes for more inspiration!

Serving and Storage
Oh, the joy of pulling these warm, glazed mini cherry pie bites out of the oven! That first bite when they’re still slightly warm is absolute heaven – the dough crisp at the edges but soft inside, the cherries bursting with juice. I always serve them fresh from the oven if possible, arranged on my favorite vintage cake stand for that extra special touch.
Keeping Them Fresh
If you somehow end up with leftovers (doesn’t happen often in my house!), here’s how to keep them tasting their best:
- Room temperature: Store in an airtight container for up to 2 days. The glaze might lose its shine, but the flavor stays delicious.
- Freezing: These freeze beautifully! Place cooled bites on a baking sheet to freeze individually, then transfer to freezer bags. They’ll keep for about a month.
Reheating Like a Pro
Want that fresh-from-the-oven magic days later? Here are my tried-and-true methods:
- Oven: 300°F for 5-7 minutes brings back that perfect crispness
- Air fryer: 2-3 minutes at 320°F works wonders!
- Microwave: 10-15 seconds if you’re impatient (like me), but the dough won’t be as crisp
Pro tip: If you froze them, add an extra minute or two to the reheating time. And for frozen bites, I like to add a fresh drizzle of glaze after reheating – makes them look and taste freshly made! If you want to see more of my favorite holiday desserts, check out my tiny pumpkin tarts.
Nutritional Information
Now, I’m no nutritionist, but I know folks like having the numbers – especially when you’re trying to decide whether to have one mini cherry pie bite or three (spoiler: always go for three). These estimates are based on standard ingredients, but remember – your exact amounts might vary depending on how generous you are with that cherry filling!
- Serving size: 1 mini pie (because let’s be real, nobody stops at just one)
- Calories: About 150 per bite – totally worth it for that cherry bliss
- Sugar: 12g (mostly from those sweet, sweet cherries)
- Sodium: 180mg (not bad for such a tasty treat!)
- Fat: 6g (that buttery crescent dough is magic)
- Carbs: 22g (because happiness comes in carbohydrate form)
- Protein: 2g (surprise! There’s actually some protein in there)
Remember, these numbers can change if you use different brands or tweak the recipe. I once calculated them with sugar-free filling and almond milk glaze – dropped the sugar down to 8g per serving! But honestly? Sometimes you just need to enjoy the full-sugar, full-joy version. Life’s too short not to indulge in warm cherry pie bites straight from the oven. You can also find more dessert ideas on my dessert page.
Frequently Asked Questions
I’ve gotten so many questions about these mini cherry pie bites over the years – here are the ones that pop up most often! If you’re wondering something, chances are someone else has too.
Can I make these without a muffin tin?
Absolutely! When I’m traveling and don’t have my trusty muffin tin, I just shape the dough triangles into little pouches on a baking sheet. They won’t be as uniform, but they taste just as delicious. You can also use ramekins or even foil cupcake liners in a pinch.
How do I know when they’re done baking?
The golden rule (literally!) is when the dough turns that perfect golden brown color – usually around 13-14 minutes in my oven. The edges will be slightly darker, and you’ll smell that heavenly baked dough scent. If you’re unsure, peek at one – the dough should look cooked through with no raw spots.
Can I use homemade pie filling instead of canned?
Of course! I’ve used my homemade cherry filling when I’m feeling fancy – just make sure it’s thick enough so your mini pies don’t get soggy. If your homemade filling is runny, try thickening it with a bit of cornstarch before using. That said, I won’t judge if you stick with the canned stuff – it’s what I use 90% of the time!
Why did my glaze turn out lumpy?
Ah, the powdered sugar lump struggle is real! Here’s my trick – sift the powdered sugar first, then add the milk gradually while whisking constantly. If you do get lumps, let the glaze sit for 5 minutes – often they’ll dissolve on their own. Still lumpy? A quick zap in the microwave for 10 seconds usually fixes it.
Can I make these ahead of time?
You bet! I often assemble them the night before and refrigerate (covered) until baking time – just add an extra minute or two to the bake time since they’re going in cold. They also freeze beautifully after baking – just reheat in a 300°F oven until warm. The glaze might need a refresh after freezing though!
Final Thoughts
Now that you’ve got all my secrets for perfect mini cherry pie bites, I just know you’re going to fall in love with them like I did! There’s something magical about how such simple ingredients can create something so special. I still grin every time I pull a tray of these golden, glazed beauties from the oven – they never fail to make any occasion feel extra sweet.
Promise me you’ll try them soon? And when you do, tag me on Instagram or leave a comment telling me how they turned out! Did you stick with classic cherry or try a fun variation? I’m always looking for new ideas to test in my kitchen. Whether it’s your first time baking or your hundredth, these little bites are sure to become your new go-to treat. Happy baking, my friend – may your kitchen be filled with the sweet smell of cherries and buttery dough! You can also follow along with more of my kitchen adventures on Facebook.