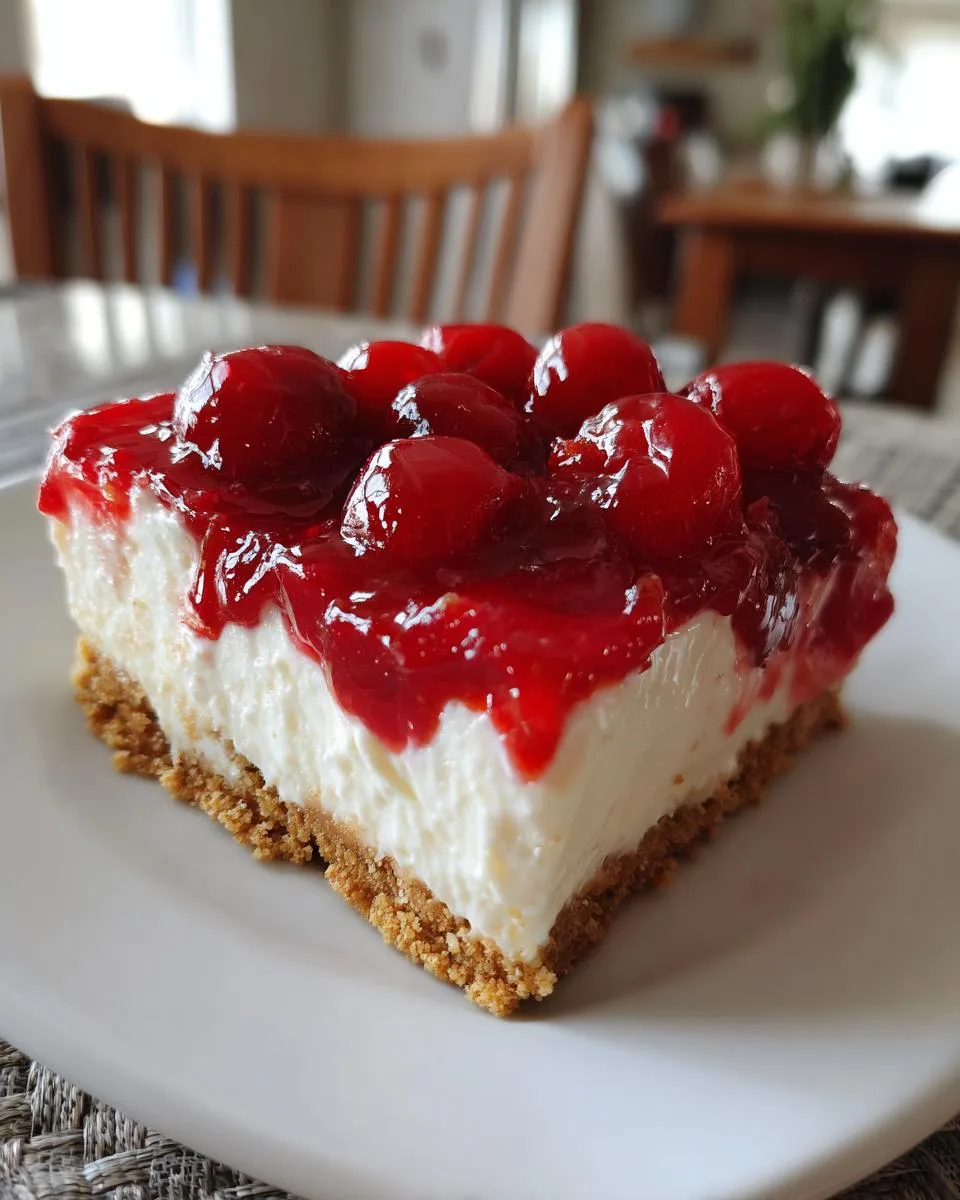
You know those desserts that disappear before you even set them on the table? That’s my family’s Classic Cherry Delight for you. I still remember my aunt bringing it to every summer potluck – the adults fighting over seconds while us kids licked our spoons clean. This no-bake wonder hits all the right notes: buttery graham cracker crust, creamy cloud-like filling, and that sweet-tart cherry topping that makes your eyes roll back. Best part? You probably have most ingredients in your pantry right now. In 15 minutes of active work (and a little patience while it chills), you’ve got a dessert that’ll have everyone begging for the recipe.
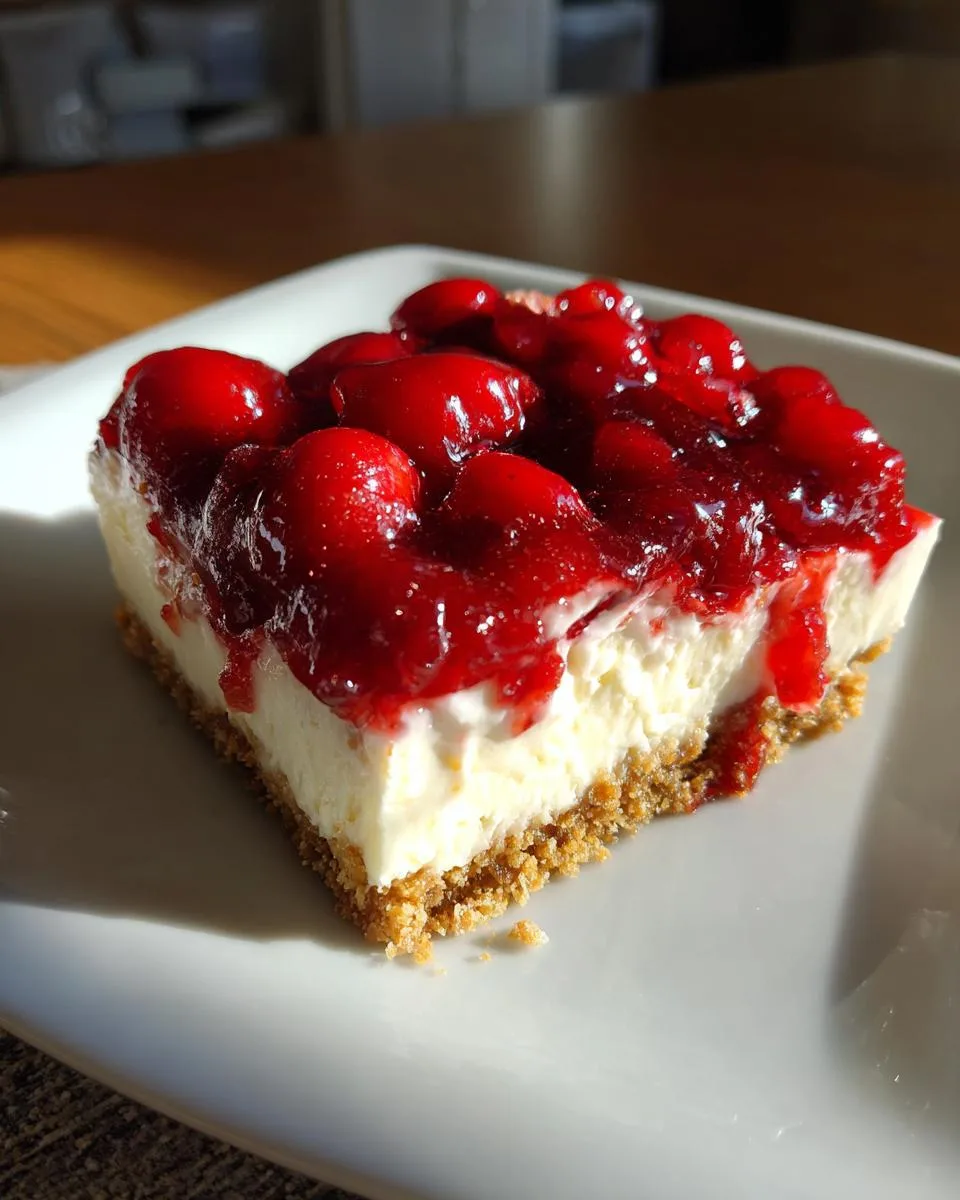
Table of Contents
Table of Contents
Why You’ll Love Classic Cherry Delight
This dessert has been my secret weapon for decades, and here’s why it’ll become yours too:
- No oven required – When summer heat hits or you’re just too tired to bake, this chilled beauty saves the day
- 15-minute prep – Seriously, I’ve timed myself! You’ll spend more time deciding which serving spoon to use than making it
- Creamy dreamy texture – That cloud-like filling sandwiched between crisp crust and juicy cherries? Pure magic
- Crowd pleaser – From picky kids to fancy dinner parties, I’ve never met anyone who didn’t ask for seconds
- Pantry staples – No fancy ingredients here – just good old cream cheese, graham crackers, and that glorious cherry pie filling
Trust me, once you make this once, you’ll start keeping extra cans of cherry pie filling in your pantry “just in case.”
Classic Cherry Delight Ingredients
This recipe is all about simple ingredients doing big things. I learned the hard way that measuring matters here – too much butter makes the crust greasy, and cold cream cheese leaves lumps no one wants. Here’s exactly what you’ll need, grouped by layer because that’s how my grandma taught me to organize:
For the Crust
- 7 tablespoons unsalted butter – Melted (I zap mine in the microwave but watch it doesn’t splatter!)
- 1 1/2 cups graham cracker crumbs – That’s about 9 whole crackers smashed to oblivion (my kids love this job)
- 3 tablespoons granulated sugar – Just enough to sweeten the deal
For the Cloud-Like Filling
- 8 ounces cream cheese – Softened (leave it out 30 minutes or cheat with 10 sec microwave bursts)
- 1 cup powdered sugar – Pack it in like you mean it
- 1 teaspoon pure vanilla extract – The good stuff makes all the difference
- 1 container (8 ounces) Cool Whip – Thawed (overnight in fridge or 30 mins on counter)
For That Gorgeous Top Layer
- 1 can (21 ounces) cherry pie filling – The star of the show (Comstock brand is my go-to, but any will work)

See? Nothing weird or fussy – just pantry staples ready to transform into something magical. Pro tip: Set everything out before starting. Cold cream cheese fights back when you try to mix it, and nobody’s got time for lumpy filling!
How to Make Classic Cherry Delight
Okay, here’s where the magic happens! This recipe is foolproof if you follow these steps. I’ve made this so many times I could do it in my sleep, but I still get a little thrill when that creamy filling comes together. Just take it one layer at a time – we’re building something wonderful here.
Step 1: Prepare the Graham Cracker Crust
First things first – let’s make that buttery foundation. Grab your 8×8 baking dish (glass shows off those pretty layers best!) and melt your butter. I use the microwave in 15-second bursts because burnt butter smells awful. While that’s cooling slightly, crush those graham crackers. You want fine crumbs with a few little bits for texture – I use a rolling pin right in the bag to avoid mess.
Now mix your crumbs, sugar, and melted butter until it looks like wet sand. Dump it into your pan and press, press, press! I mean really get in there with your fingers or the bottom of a measuring cup. You want it firm and even – no wimpy crust that falls apart when you slice it. Pop it in the fridge while you make the filling to let it set up.
Step 2: Make the Cream Cheese Filling
This is where people mess up – please make sure your cream cheese is actually soft! If you press your thumb into it and it leaves a deep indent, you’re good. Beat it with an electric mixer until it’s completely smooth – no lumps allowed! Gradually add your powdered sugar (unless you want a sugar cloud explosion in your kitchen) and that beautiful vanilla.
Now here’s the secret: fold in the Cool Whip gently with a spatula. Don’t beat it to death! You want to keep all that airiness. I do this in three additions, turning the bowl as I go. When it’s all combined, it should look like a fluffy pink cloud (well, off-white really, but you get the idea). Taste it – I always do! – and try not to eat half of it with a spoon.
Step 3: Assemble and Chill Classic Cherry Delight
Almost there! Pull your crust from the fridge and spread your filling evenly over the top. I use an offset spatula to get it smooth, but a butter knife works fine too. Now for the grand finale – open that can of cherry pie filling. Spoon it over the cream layer and gently spread it to the edges. Don’t press down hard or you’ll mix the layers!
Now the hardest part: walk away. Seriously, cover it with plastic wrap and refrigerate for at least 2 hours, but overnight is even better. This waiting time lets the flavors marry and the crust firm up perfectly. I know it’s tempting to peek, but trust me – good things come to those who wait!
Print
Irresistible Classic Cherry Delight Recipe in Just 15 Minutes
A creamy, no-bake dessert with a graham cracker crust, smooth cream cheese filling, and topped with cherry pie filling.
- Total Time: 2 hours 15 minutes
- Yield: 9 servings 1x
Ingredients
- 7 tablespoons unsalted butter
- 1 1/2 cups graham cracker crumbs (about 9 whole crackers)
- 3 tablespoons granulated sugar
- 8 ounces cream cheese, softened
- 1 cup powdered sugar
- 1 teaspoon pure vanilla extract
- 1 container cool whip, 8 ounces
- 1 can cherry pie filling, 21 ounces
Instructions
- Melt butter and mix with graham cracker crumbs and sugar. Press firmly into an 8×8 baking dish.
- Beat cream cheese until smooth. Add powdered sugar and vanilla, then mix in cool whip.
- Spread filling over the crust. Top with cherry pie filling.
- Refrigerate for at least 2 hours before serving.
Notes
- Best served chilled overnight.
- Store leftovers in the refrigerator.
- Prep Time: 15 minutes
- Cook Time: 0 minutes
- Category: Dessert
- Method: No-Bake
- Cuisine: American
- Diet: Vegetarian
Nutrition
- Serving Size: 1 slice
- Calories: 320
- Sugar: 28g
- Sodium: 180mg
- Fat: 18g
- Saturated Fat: 10g
- Unsaturated Fat: 6g
- Trans Fat: 0g
- Carbohydrates: 36g
- Fiber: 1g
- Protein: 3g
- Cholesterol: 45mg
Expert Tips for Perfect Classic Cherry Delight
After making this dessert more times than I can count, I’ve picked up some tricks that take it from good to “Oh my gosh, what’s in this?” territory. These are the little things my grandma never wrote down but passed along with a wink and a nudge:
For the crispiest crust imaginable
That graham cracker layer can go from perfect to soggy if you’re not careful. Here’s my secret – after pressing it into the pan, pop it in the freezer for 10 minutes before adding the filling. The quick chill sets the butter faster, creating an almost cookie-like base that stands up to the creamy layers. Bonus: This trick lets you lick the filling bowl without rushing!
Temperature matters more than you think
Room temperature cream cheese is non-negotiable, but did you know your Cool Whip matters too? If it’s still frosty from the freezer, it’ll deflate your gorgeous filling. I take mine out when I start the crust so it’s perfectly thawed but still cold. And please – don’t use the low-fat versions. That extra richness from full-fat cream cheese makes all the difference in taste and texture.
The cherry on top (literally)
That can of pie filling holds more secrets than you’d think! Always give it a good stir before spreading to distribute those juicy cherries evenly. If it looks too gloopy, I’ll drain just a tablespoon or two of the syrup – you want enough to be saucy but not watery. And for special occasions? I’ll add a splash of almond extract (just 1/4 teaspoon!) to the cherries for a flavor that’ll have guests guessing your secret ingredient.
Slice like a pro
Ever tried cutting a slice only to have the filling smoosh everywhere? Run your knife under hot water and dry it quickly before each cut – the heat glides right through those layers cleanly. Wipe between cuts for picture-perfect servings. And if you’re taking this to a potluck, assemble it in a disposable pan and chill it in the freezer for 30 minutes before transport – no sliding layers in the car!

Classic Cherry Delight Variations
While I’m fiercely loyal to the original version (some family traditions shouldn’t be messed with!), I’ve played around with enough variations over the years to know which twists actually work. Here are my favorite ways to mix things up when I’m feeling adventurous or need to use what’s in my pantry:
Berry Beautiful Swaps
That cherry topping is iconic, but don’t be afraid to switch it up! Blueberry pie filling makes a stunning “Midnight Delight” version – the deep purple against the white cream layer looks almost too pretty to eat. Raspberry is my go-to for summer picnics, and peach pie filling with a sprinkle of cinnamon tastes like sunshine in a pan. Just keep the same 21-ounce can size for perfect proportions.
Zesty Little Surprises
Sometimes I’ll sneak a teaspoon of lemon zest into the cream cheese filling when I want a brighter flavor. It cuts through the richness beautifully without being overpowering. My cousin swears by adding a tablespoon of instant vanilla pudding mix to the filling for extra body – I thought she was crazy until I tried it! Almond extract (just 1/4 teaspoon) in the crust or filling adds a subtle sophistication that’ll have people wondering what your secret is.
Crust Adventures
That graham cracker base is classic for good reason, but chocolate lovers should try this: swap half the graham crumbs with crushed chocolate wafers or Oreos (filling scraped out). For nutty depth, I’ll sometimes add 2 tablespoons of finely chopped pecans to the crust mixture. And when I’m feeling extra fancy? A gingersnap crust around the holidays adds the most wonderful warm spice that pairs magically with cherries.
The beauty of this recipe is how forgiving it is – as long as you keep the basic ratios, you can get creative with flavors. Just promise me one thing: whatever variation you try, save me a corner piece with extra topping!

Serving and Storing Classic Cherry Delight
Here’s the thing about Classic Cherry Delight – it’s practically begging to be the star of your dessert table, but only if you treat it right! After that agonizing wait while it chills (I know, I know), you’ll want to serve it straight from the fridge. The cold makes that creamy layer extra dreamy and helps the slices hold their shape beautifully. I like to let mine sit on the counter for just 5 minutes before cutting – takes the edge off the chill without getting too soft.
Presentation matters with this beauty! I always garnish with a dollop of fresh whipped cream and maybe a mint leaf if I’m feeling fancy. For parties, I’ll cut it into small squares and arrange them on a platter – they disappear twice as fast that way. Pro tip: Keep extra cherry pie filling on hand to spoon over individual servings for those who want an extra fruity punch.
Keeping It Fresh
Leftovers? Ha! Just kidding – though they’re rare in my house. If you do have some, cover the pan tightly with plastic wrap or transfer slices to an airtight container. It’ll keep happily in the fridge for up to 3 days, though the crust gets slightly softer each day. Never leave it out at room temperature for more than an hour – that cream cheese filling doesn’t take kindly to warmth.
Can you freeze it? Technically yes, but I don’t recommend it. The texture changes when thawed, getting a bit weepy. If you must freeze, do it without the cherry topping (add fresh when serving) and wrap the pan in both plastic and foil. Thaw overnight in the fridge before serving. But honestly? This dessert is so quick to make fresh, I’d rather whip up a new batch when the craving strikes!
Classic Cherry Delight FAQs
After years of making this dessert (and fielding questions from friends who beg for the recipe), I’ve heard it all! Here are the answers to the most common questions that pop up:
Can I use homemade cherry pie filling?
Absolutely! I love using homemade when cherries are in season. Just make sure to drain any excess liquid first – you want about 2 cups of thick filling. Simmer fresh pitted cherries with sugar and a bit of cornstarch until thickened, then cool completely before using. The flavor is incredible, but honestly? The canned stuff works beautifully in a pinch.
How long does Classic Cherry Delight last in the fridge?
In my house? Maybe 24 hours if I hide it! But seriously, it keeps beautifully for 3 days covered tightly in the refrigerator. The crust softens slightly over time, but the flavors actually improve. Just avoid leaving it out at room temperature too long – that cream cheese filling prefers to stay chilled.
What’s the best alternative to graham cracker crust?
While nothing beats the classic for me, crushed vanilla wafers or shortbread cookies make a delicious twist. For a nuttier base, try blending 1 cup graham crumbs with 1/2 cup finely ground pecans or almonds. Chocolate lovers can substitute crushed Oreos (scrape out the filling first) – the dark crust looks stunning against the white and red layers.
Can I make this dessert ahead of time?
It’s actually better that way! The flavors meld beautifully overnight. Assemble it the day before, cover tightly, and refrigerate. Just add any whipped cream garnish right before serving. For parties, I sometimes make two – one for now, one for tomorrow (if it lasts that long!).
Nutritional Information
Now, I’m no nutritionist, but I know folks like to have the numbers – especially when something tastes this indulgent! Keep in mind these are estimates based on standard ingredients. Your exact counts might vary depending on brands and any substitutions you make.
Per serving (that’s 1/9th of the pan, if you can stop at just one piece!):
- Calories: 320 – Consider it fuel for happy memories
- Fat: 18g (10g saturated) – That’s where all the creamy goodness comes from
- Sugar: 28g – Mostly from the cherry topping and powdered sugar
- Sodium: 180mg – Not bad for such a flavorful dessert
- Carbs: 36g – Worth every single one
- Protein: 3g – Hey, cream cheese counts!
Remember, this is meant to be a treat – not an everyday health food! I always say life’s too short to skip dessert, especially when it’s as easy and delicious as Classic Cherry Delight. Everything in moderation, right?
Share Your Classic Cherry Delight Experience
Nothing makes me happier than hearing how this recipe turns out in your kitchen! Did your kids go crazy for it like mine do? Maybe you discovered a brilliant new variation we should all try? I’d love to hear your stories – the messy kitchen moments, the happy accidents, even the “oops I ate half the pan” confessions (we’ve all been there!).
My favorite part of sharing recipes is seeing how they become part of other families’ traditions too. Maybe you made this for a special birthday, or it’s now your go-to potluck dish like my Aunt Martha’s was. Snap a photo of your masterpiece (or the empty pan – no judgment here!) and tag me so I can cheer you on. Your kitchen adventures inspire me to keep creating and sharing these family favorites. You can also follow along with more of my family’s cooking adventures over on Facebook!
And hey – if you’ve got questions or ran into any hiccups, shout those out too! We’ve all had our dessert disasters (who knew cream cheese could lump up like that?), and sometimes the best tips come from troubleshooting together. Happy baking, friends – may your Cherry Delight always be delightfully cherry!