There’s something magical about turning a simple ingredient into a showstopper, and that’s exactly what happens when you make Spooky Mozzarella Skulls. I still remember standing in my grandmother’s kitchen, pressing dough into cookie cutters and laughing when the shapes came out a little crooked. Today, I get that same nostalgic joy when I unmold these mozzarella skulls—only this time, they bring a playful chill to the table. They’re the kind of recipe that makes kids wide-eyed, adults amused, and party guests eager to reach for more.
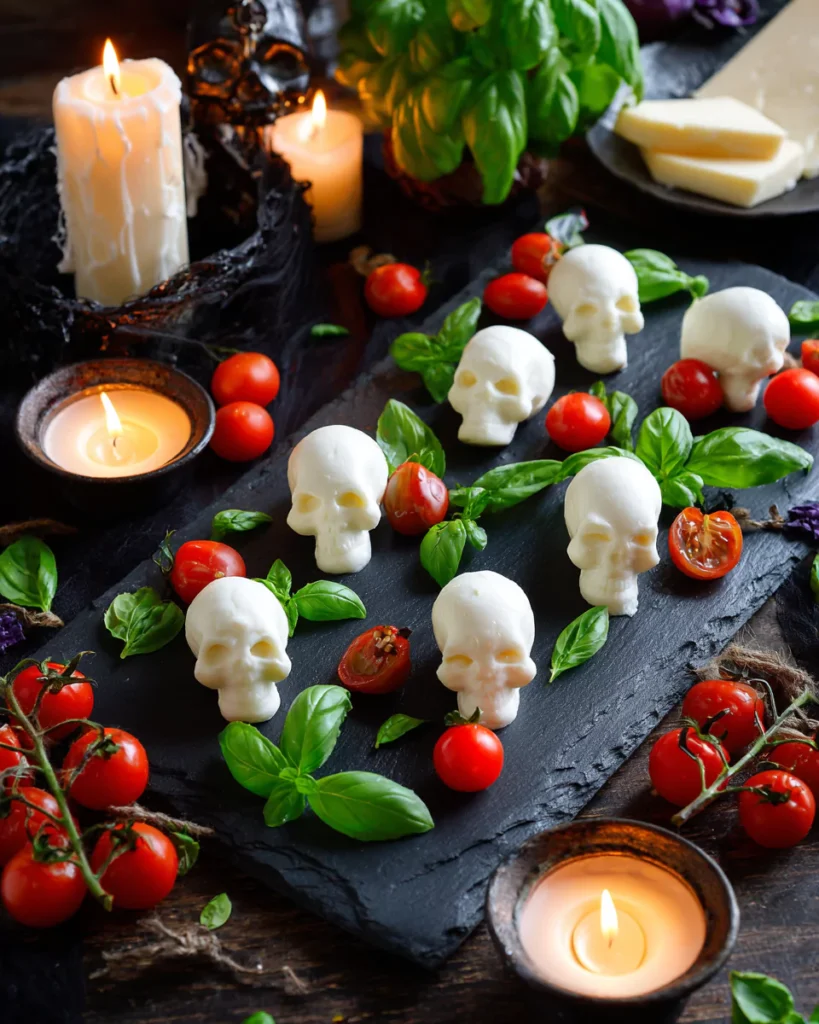
Table of Contents
Table of Contents
A Halloween Party Hit with Mozzarella Skulls
Spooky Mozzarella Skulls aren’t just food, they’re an experience. Picture opening your fridge to a tray of tiny skulls that look like they belong at a haunted house feast but taste creamy, mild, and melt-in-your-mouth delicious. The best part? They’re unbelievably easy to make. With just mini mozzarella balls and a silicone mold, you can bake, press, and chill your way into a party-ready appetizer in under an hour. They’re perfect on their own, served with fresh basil and cherry tomatoes, or topping off a pasta salad.
These skulls also pair beautifully with other eerie creations like my Halloween Eyeball Pasta Salad, turning your table into a complete haunted spread. Whether you’re planning a kids’ party, an adults-only gathering, or just want a fun kitchen activity, these mozzarella skulls will become a new October tradition.
Why Mozzarella is Perfect for Halloween Recipes
Mozzarella is the ultimate cheese for spooky fun. Its soft, stretchy texture makes it easy to shape, while its mild flavor blends into savory or festive dishes without overpowering them. It holds form just long enough to impress, but still has that creamy melt we all love. Unlike harder cheeses, mozzarella molds into designs without breaking, making it ideal for silicone trays. That’s why Spooky Mozzarella Skulls stand out—they’re a playful twist on a beloved cheese that delivers both taste and presentation.
Print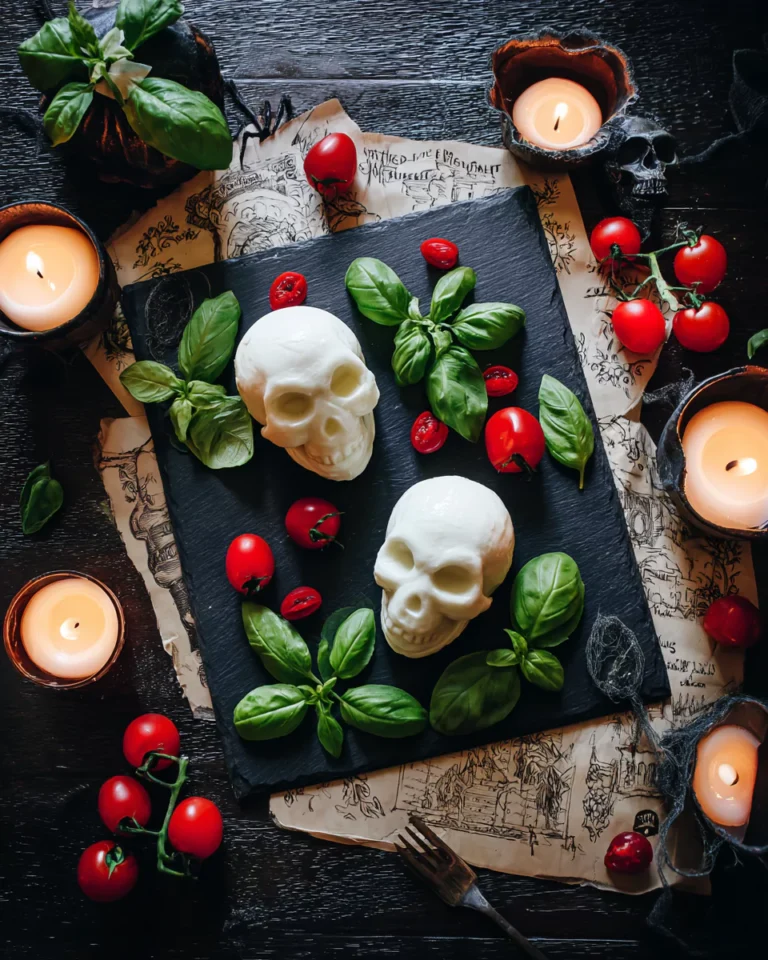
Spooky Mozzarella Skulls Recipe for Halloween Fun
Spooky Mozzarella Skulls are a fun, easy, and cheesy Halloween snack. With just mozzarella pearls and a silicone mold, you can create skull-shaped bites perfect for parties, snack boards, or spooky-themed meals.
- Total Time: 20 minutes
- Yield: 12 mozzarella skulls
Ingredients
Mini Mozzarella Balls (ciliegine, about cherry tomato size)
Silicone Skull Mold (oven-safe)
Olive Oil (optional, for serving)
Fresh Basil Leaves (optional, garnish)
Cherry Tomatoes (optional, garnish)
Instructions
1. Preheat oven to 350°F. Pat mozzarella balls dry with paper towels and place one in each skull mold cavity.
2. Bake for 8–10 minutes until just softened. Press gently into mold with the back of a spoon. Blot excess moisture if needed.
3. Refrigerate mold for 10 minutes, then carefully unmold each skull.
4. Arrange on a platter with basil and tomatoes, or use as spooky toppings for salads and snack boards.
Notes
For best results, don’t overbake the mozzarella or it may dry out.
Mozzarella skulls are best served fresh but can be stored in an airtight container for up to 2–3 days.
For added flavor, sprinkle herbs like oregano or basil into the mold before baking.
- Prep Time: 10 minutes
- Cook Time: 10 minutes
- Category: Appetizer, Halloween Recipes
- Method: Bake, Chill
- Cuisine: American, Holiday
- Diet: Vegetarian
Nutrition
- Serving Size: 1 skull
- Calories: 70
- Sugar: 0g
- Sodium: 70mg
- Fat: 5g
- Saturated Fat: 3g
- Unsaturated Fat: 2g
- Trans Fat: 0g
- Carbohydrates: 1g
- Fiber: 0g
- Protein: 5g
- Cholesterol: 15mg
Ingredients & Step-by-Step Process for Spooky Mozzarella Skulls
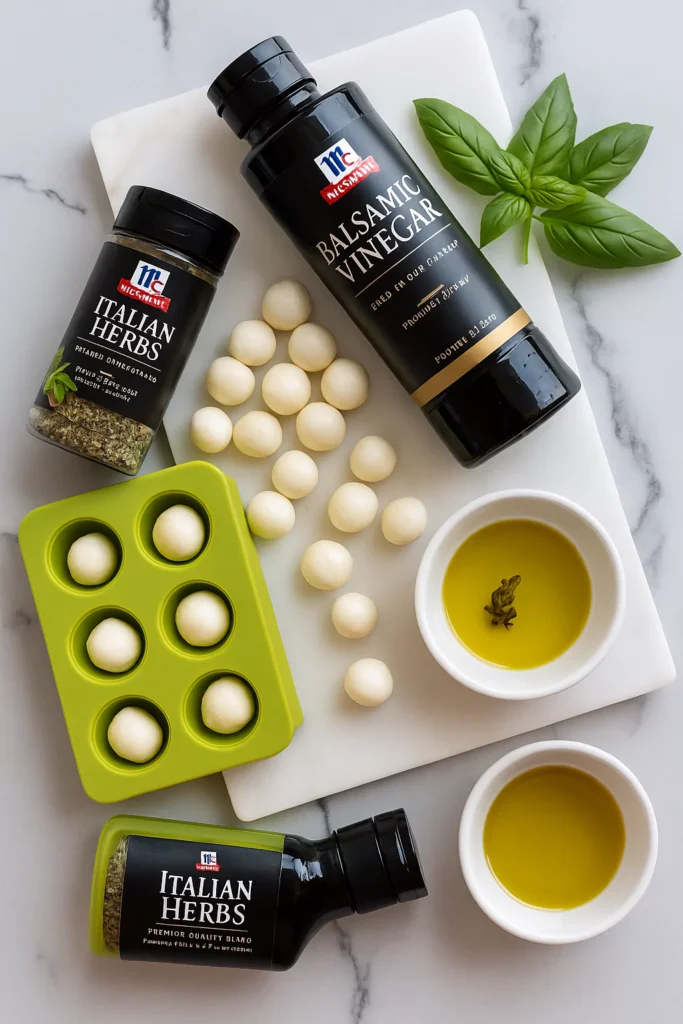
Key Ingredients for Mozzarella Skulls
When it comes to spooky recipes, simple is always best. The beauty of Spooky Mozzarella Skulls is that they only require a few easy-to-find ingredients and tools. With mozzarella pearls, a silicone skull mold, and your oven, you’ll have everything you need to bring this eerie yet tasty snack to life.
Here’s what you’ll need to get started:
| Ingredient | Details |
|---|---|
| Mini Mozzarella Balls | Also called ciliegine, about cherry tomato-sized. |
| Silicone Mold | Use oven-safe skull molds, often found on Amazon or craft stores. |
| Oven | Preheated to 350°F to soften the mozzarella. |
Mozzarella pearls are the perfect size for molding, so you don’t need to cut or reshape them before baking. The silicone mold is just as important—its flexibility makes unmolding simple and prevents the cheese from tearing. Make sure yours is heat-safe before putting it in the oven.
Step-by-Step Guide to Making Spooky Mozzarella Skulls
Preheat your oven to 350°F. Dry each mozzarella ball with a paper towel to remove any excess moisture. Place one ball into each cavity of the mold. This step ensures the skulls will hold their shape without excess liquid interfering.
Bake and Press: Bake for 8–10 minutes, just until soft enough to shape. Use the back of a spoon to gently press the mozzarella into the mold so it fills every detail. If you notice excess liquid, blot it with a paper towel. Overbaking will cause the cheese to dry out, so watch them closely.
Chill and Unmold: Refrigerate the mold for about 10 minutes. Once cool, carefully remove the skulls and place them on a serving platter. They’ll hold their spooky details best when chilled before handling.
For a hauntingly delicious spread, try pairing these mozzarella skulls with Halloween Deviled Eggs—together they create a spooky, protein-packed platter.

Serving Ideas & Creative Twists for Spooky Mozzarella Skulls

How to Serve Spooky Mozzarella Skulls
The easiest way to serve your mozzarella skulls is on a platter with fresh basil leaves, cherry tomatoes, and a drizzle of olive oil or balsamic glaze. They look dramatic yet taste refreshingly light. For a crowd, consider placing them atop a pasta salad or skewering them with tomatoes and basil for spooky Caprese skewers. If you want to get extra festive, scatter them across a snack board alongside crackers, olives, and roasted vegetables.
Another creative idea is to float them on a warm tomato soup. The skulls slowly soften, creating a creamy surprise that makes guests grin as they scoop into their bowls. For dessert lovers who want a balance of sweet and savory on the table, you can pair these with themed treats like Monster Cookie Fudgy Brownies to round out your Halloween spread.
Fun Variations for Every Halloween Table
Mozzarella skulls don’t have to be plain. Add flavor by sprinkling herbs like oregano or basil into the molds before pressing in the cheese. For a smoky touch, try using smoked mozzarella instead of the traditional kind. You can even stuff the mozzarella with a tiny sun-dried tomato or olive before molding, giving each bite an unexpected twist.
If you’re building a full Halloween menu, consider pairing the skulls with colorful tri-color pasta or even spooky-shaped pasta for a complete themed dish. These little tweaks keep the recipe exciting while still simple enough to pull off.
Storage & Freshness for Spooky Mozzarella Skulls
How to Store Spooky Mozzarella Skulls
Once unmolded, place the mozzarella skulls in a single layer inside an airtight container. Store them in the refrigerator, where they’ll keep their shape and flavor for up to 2–3 days. If you need to prepare further in advance, keep the mozzarella pearls sealed in their liquid until the day you’re ready to bake and mold them. Avoid leaving the skulls uncovered in the fridge, as they’ll dry out quickly.
For presentation, remove them from the fridge about 15 minutes before serving so they come to room temperature and regain that creamy, tender texture. If you’d like to get creative, serve them alongside themed treats like Halloween Witch Finger Cookies for a balanced mix of savory and spooky.
Keeping Spooky Mozzarella Skulls Fresh
Another useful trick is to refresh slightly hardened skulls by drizzling them with olive oil and a sprinkle of sea salt before serving. This brings back a glossy look and helps restore moisture, making them appear as fresh as the moment you unmolded them. If you’re planning a large party, consider making multiple batches and keeping extras sealed until you’re ready to set out the next tray. That way, your Halloween table always looks crisp and appetizing.
When it comes to freshness, mozzarella is at its best within the first couple of days after molding. The longer it sits, the more it can lose that signature creaminess. To maintain quality, keep your mozzarella skulls in the coldest section of your refrigerator, ideally in the cheese drawer or near the back of the fridge. This stable, cool environment slows down bacterial growth and helps preserve their soft, smooth texture until it’s time to serve.
Frequently Asked Questions About Spooky Mozzarella Skulls
How to keep mozzarella from spoiling?
Always store mozzarella in an airtight container. If it comes in liquid, keep it submerged until ready to use. For homemade skulls, refrigeration is key.
How long can mozzarella stay out of the fridge?
Fresh mozzarella should never be left out for longer than 2 hours at room temperature. Bacteria can then grow and pose a risk to safety.
How to stop mozzarella from going mouldy?
Keep mozzarella sealed and cold. If storing longer than a few days, change the liquid brine or wrap tightly in plastic before refrigerating.
What can I do with mozzarella?
Beyond spooky skulls, mozzarella works in salads, pasta, pizza, or as a creamy topping for soups. It’s one of the most versatile cheeses, fitting into savory snacks and family dinners alike.
Conclusion
Spooky Mozzarella Skulls demonstrate that Halloween dishes do not have to be hard to create an impact. With a few simple materials and a silicone mold, you can make a festive and delicious treat. These cheesy skulls can be used as appetizers, salad toppers, or as part of a themed snack board, providing you with a limitless number of options to surprise your visitors. Best of all, they’re simple enough for kids to help with, turning the process into a fun family activity. Try them this season and see how quickly they become a haunting tradition on your Halloween table.
For More recipes Follow me on Facebook!