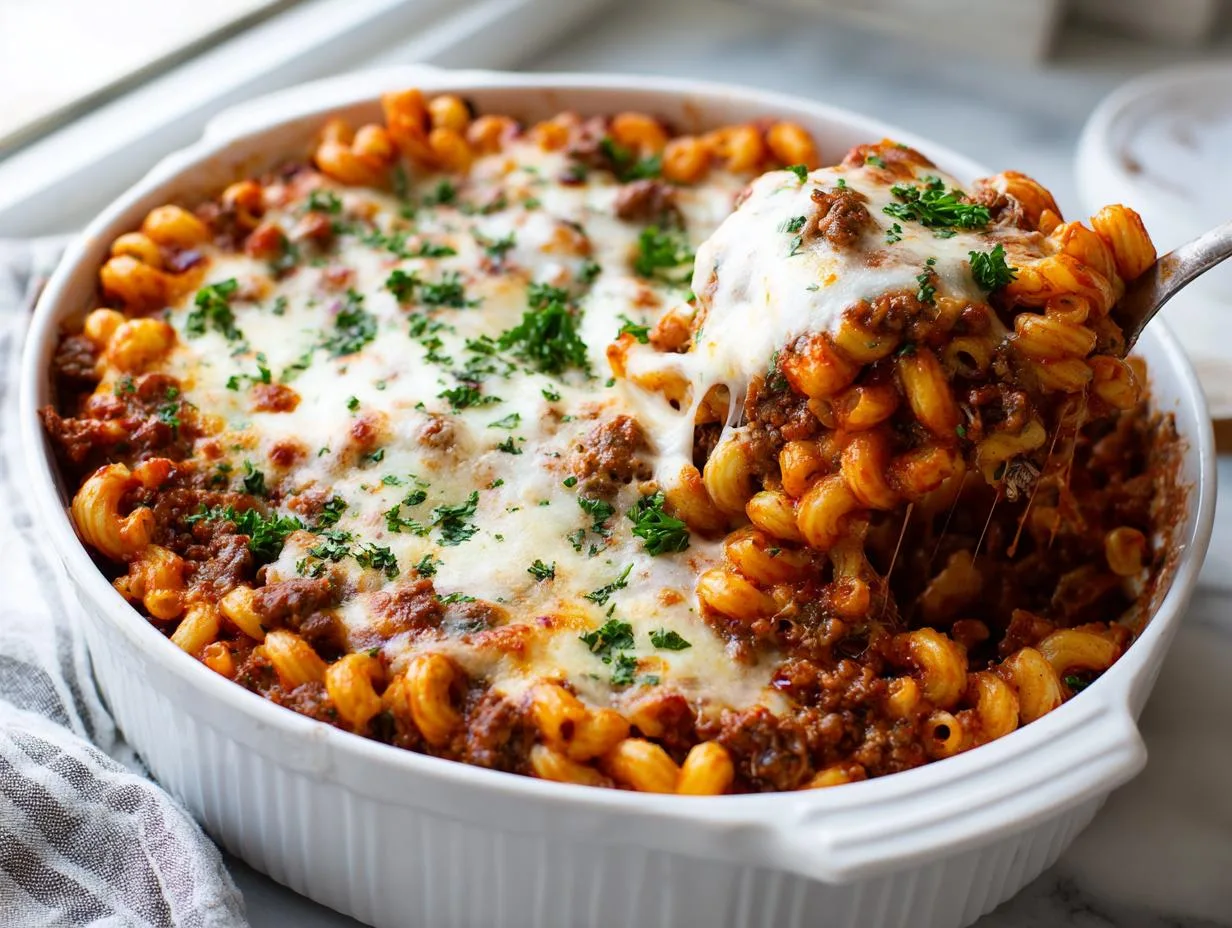
I still remember my first attempt at making cheeseburgers from scratch – what a disaster! The patties fell apart, the buns got soggy, and I nearly set off the smoke alarm. But after years of tweaking (and plenty of burnt offerings), I’ve perfected what I proudly call my Ultimate Homemade Cheeseburger. This isn’t just any burger – it’s everything a cheeseburger should be: juicy, cheesy, and packed with flavor without requiring fancy ingredients or chef skills.
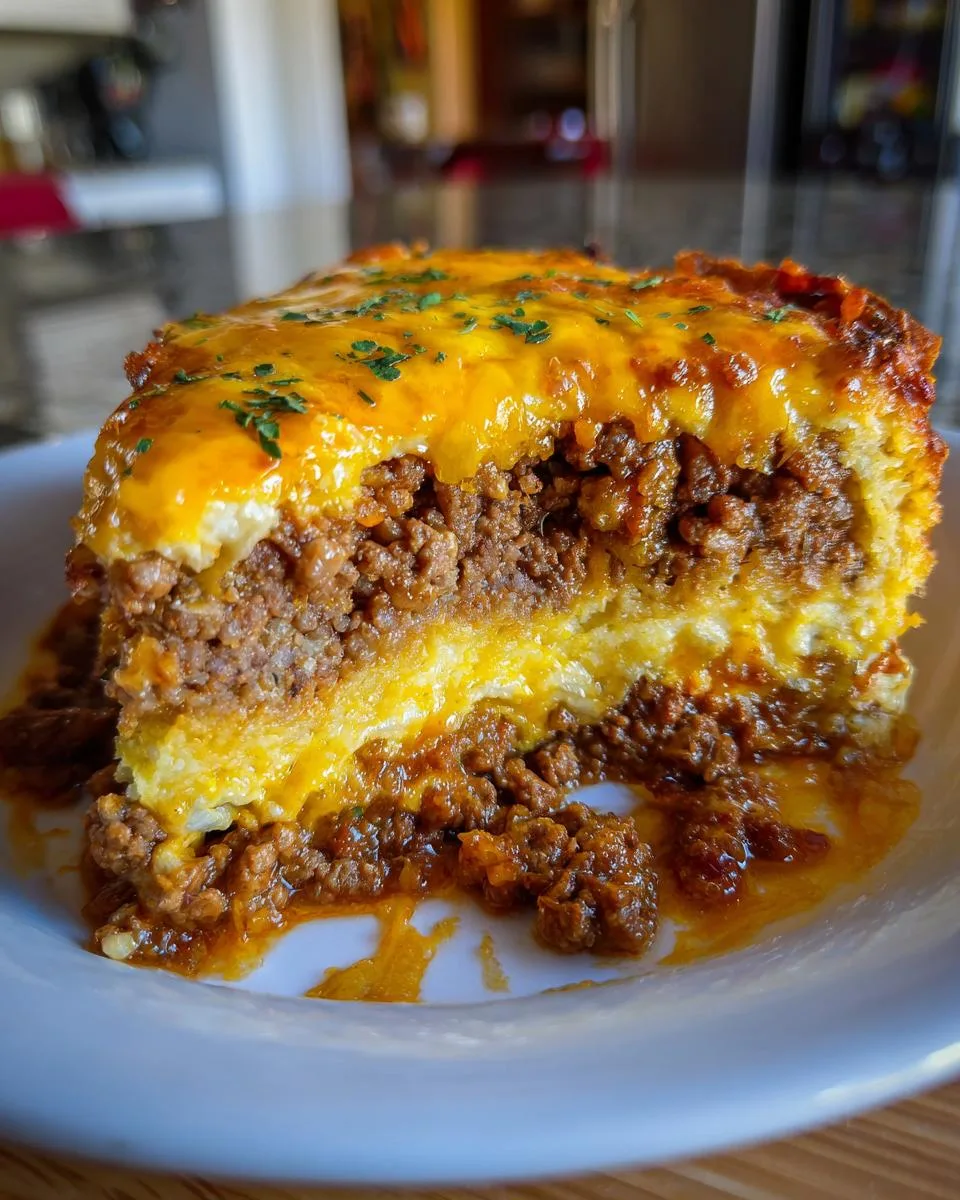
Table of Contents
Table of Contents
Why You’ll Love This Ultimate Homemade Cheeseburger
What makes mine special? It’s all about keeping things simple but smart. I learned from my dad that good burgers start with quality ground beef (80/20 is my go-to) and proper seasoning. The real magic happens when you let the cheese melt into every nook of that beautifully browned patty. Whether it’s a busy weeknight or weekend cookout, this recipe never fails to satisfy. My kids literally cheer when they smell these burgers sizzling!
This cheeseburger recipe hits all the right notes for a perfect weeknight meal. Here’s why it’s become my family’s go-to:
- Weeknight lifesaver: Ready in under 30 minutes start to finish – faster than waiting for delivery!
- Pantry-friendly: Uses ingredients you probably already have in your fridge and cabinets.
- Kid-approved: My picky eaters inhale these (and don’t even notice the hidden veggies I sometimes sneak in).
- Flavor bomb: That Worcestershire sauce? Trust me, it makes all the difference.
- Budget hero: Feeds a family of four for less than $10 total.
The best part? It’s impossible to mess up. Even my kitchen-disaster-prone sister can make this one!
Ingredients for the Ultimate Homemade Cheeseburger
Here’s everything you’ll need for the juiciest, cheesiest burgers ever – and I promise, no weird ingredients hiding in here! These are staples that make magic together:
- 1 lb ground beef (80/20 blend is perfect – enough fat for flavor but not too greasy)
- 1 medium onion, chopped small (trust me, the sweet caramelized bits make it!)
- 1 cup shredded cheddar cheese (sharp for grown-ups, mild for kids)
- 2 large eggs (room temp blends smoother)
- 1 cup milk (whole milk makes it extra rich)
- 1/2 cup all-purpose flour (don’t pack it – just scoop gently)
Plus those little extras that take it from good to “Oh my god, what IS this?!” – garlic powder, Worcestershire sauce (my secret weapon), and basic salt & pepper. Simple, right?
Equipment You’ll Need
Don’t worry – no fancy gadgets required for these burgers! Just grab:
- A good ol’ 10-inch skillet (cast iron works magic for that perfect crust)
- One mixing bowl (I use the same chipped Pyrex my grandma gave me)
- A 9-inch pie dish (any oven-safe baking pan will do in a pinch)
- Your trusty whisk (or a fork if the whisk’s gone missing – again)
That’s it! Now let’s make some cheesy magic happen.
How to Make the Ultimate Homemade Cheeseburger
Okay, here’s where the fun begins! I’ve messed this up enough times to know exactly how to get it right now. Follow these steps, and you’ll have golden, cheesy perfection in no time.
Step 1: Cook the Beef and Onions
First things first – crank that oven to 400°F (200°C) so it’s nice and hot when we need it. Now grab your favorite skillet (I swear by my cast iron) and toss in the ground beef and onions over medium heat. Here’s my trick: don’t stir too much! Let those onions caramelize and the beef get those gorgeous brown bits. Once it’s cooked through (no pink left!), drain the excess fat – but leave just a tablespoon for flavor.
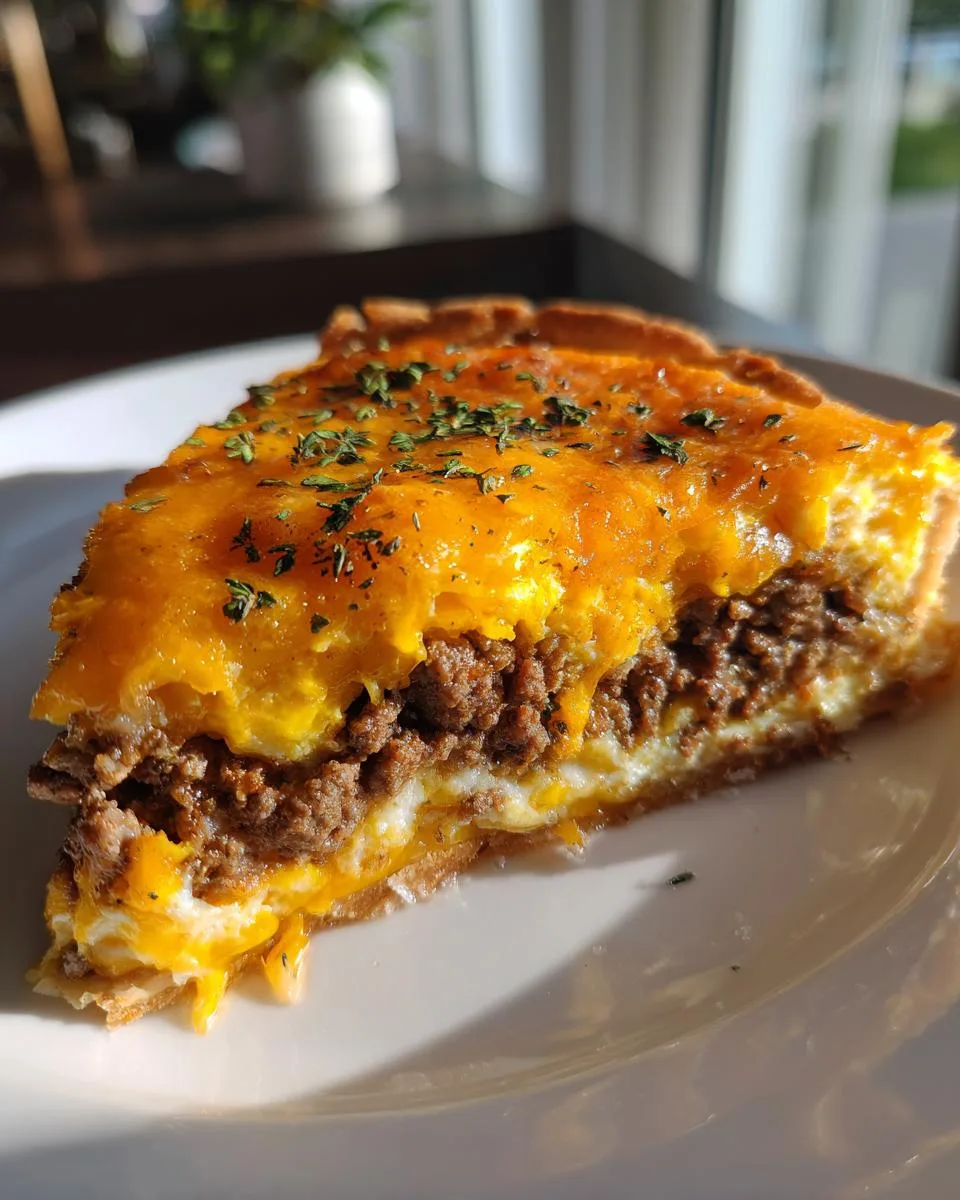
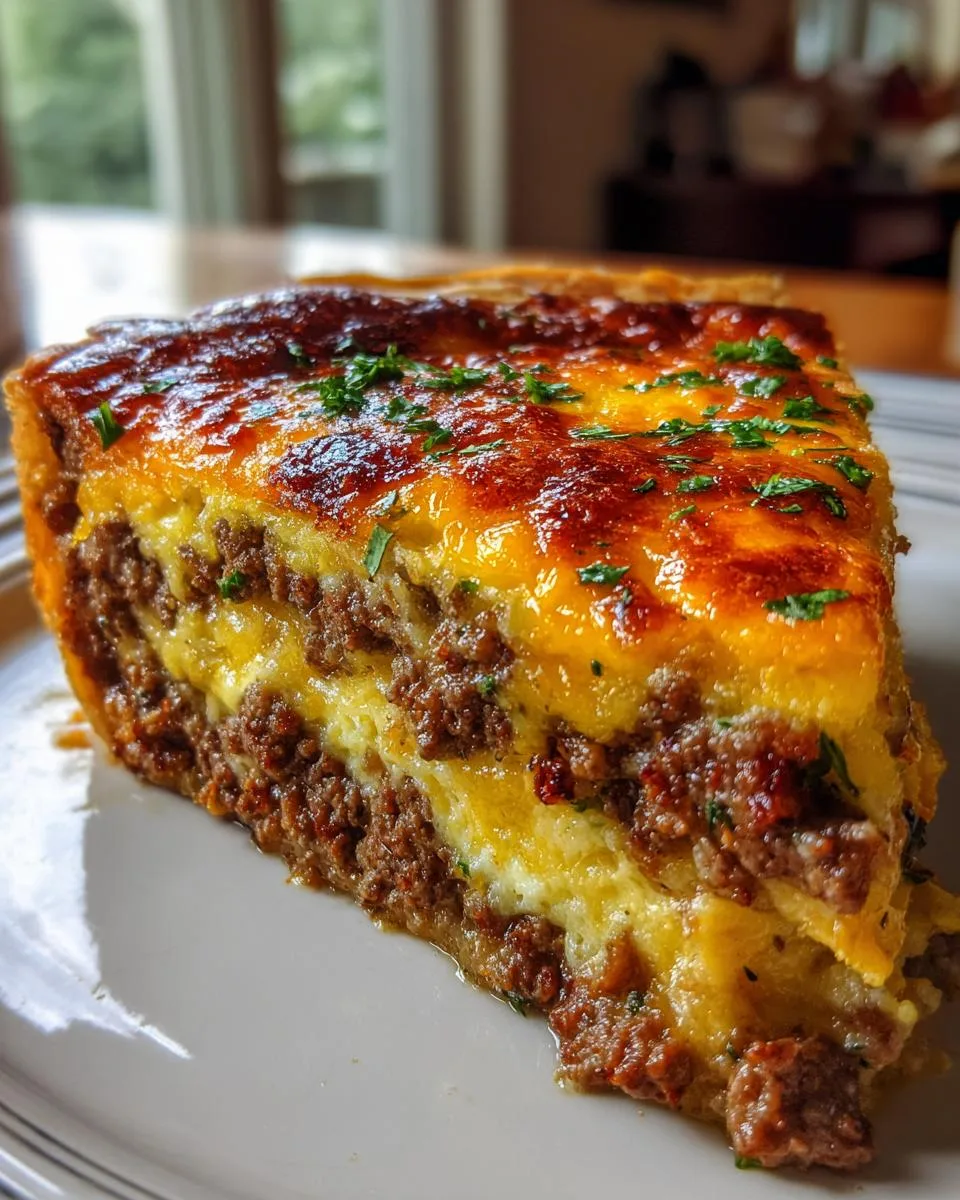
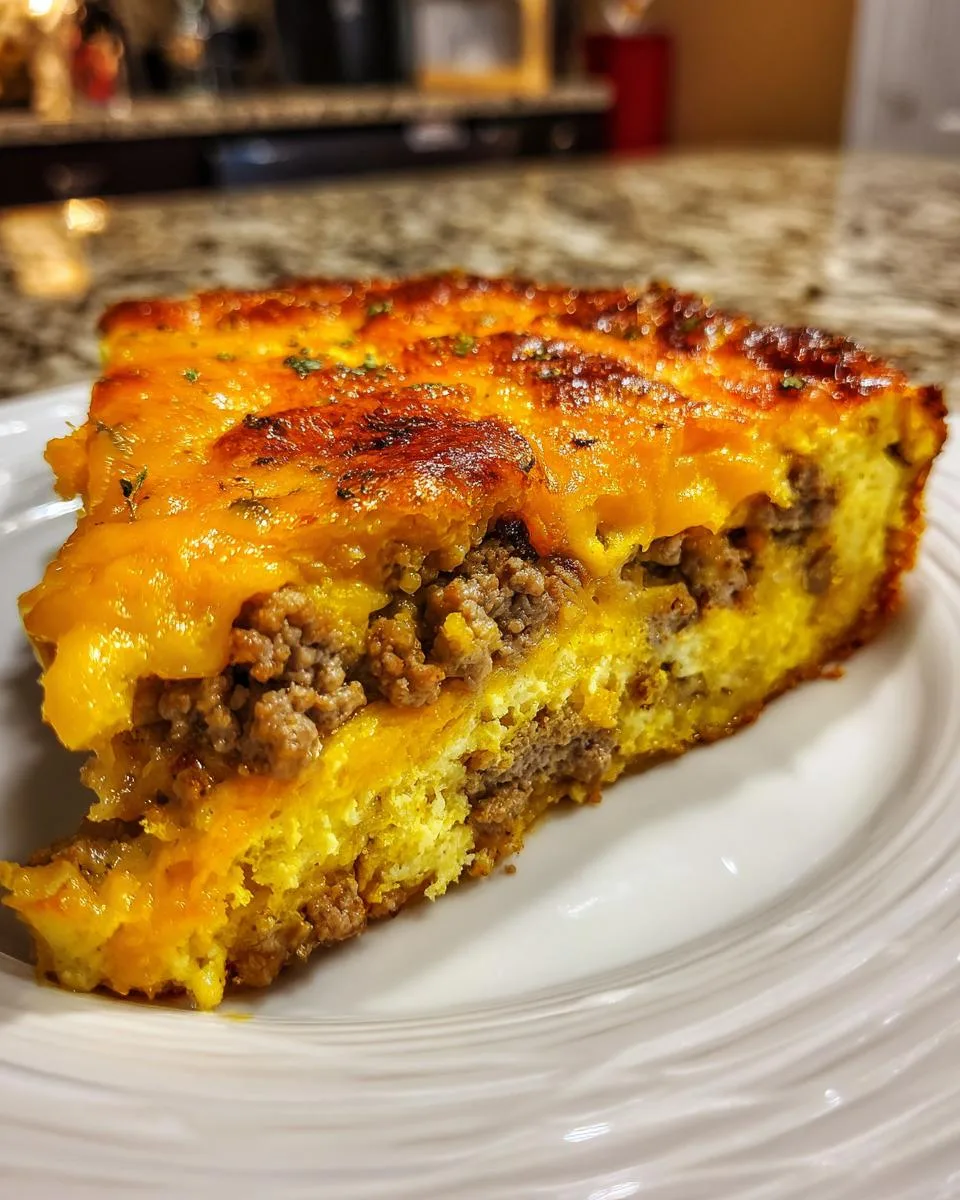
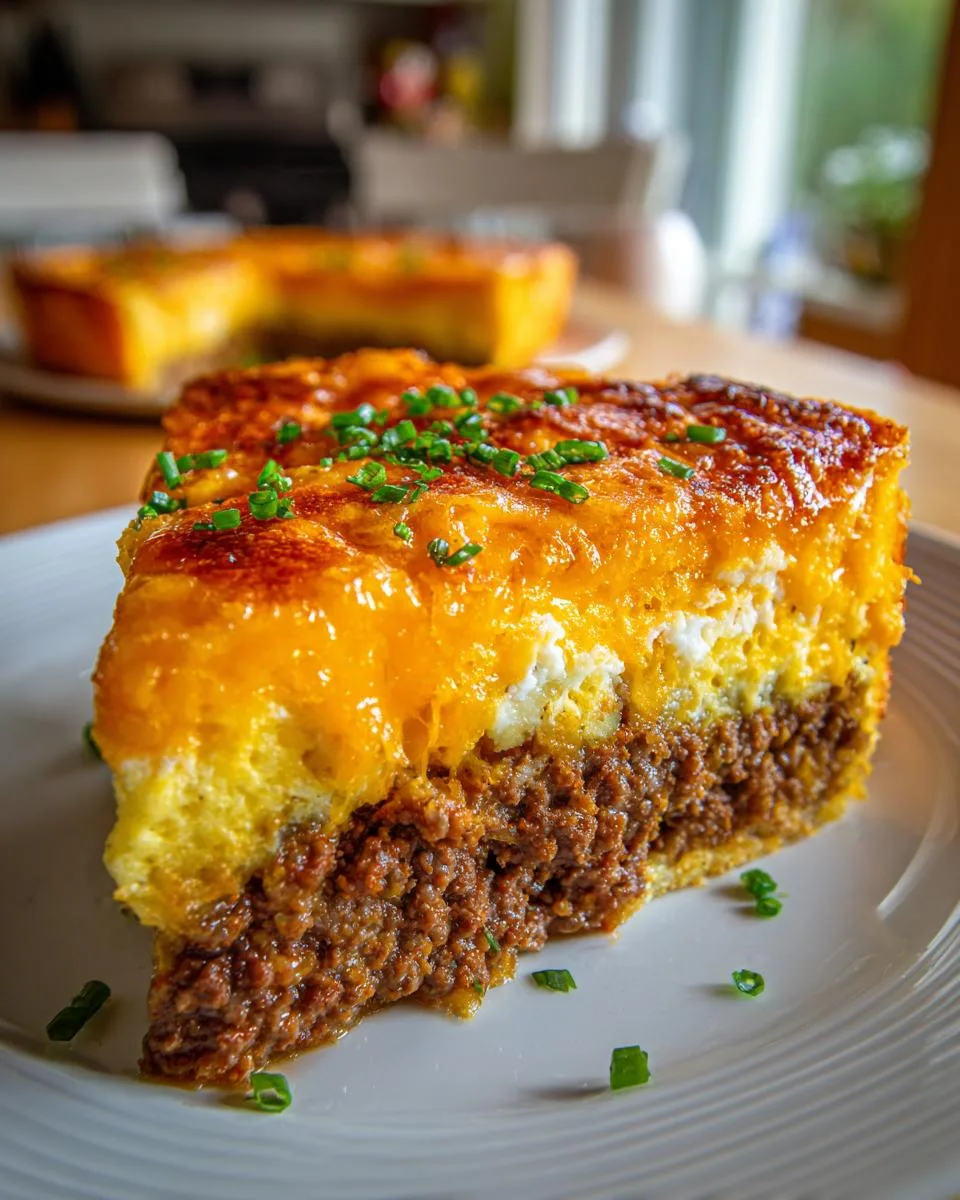
Step 2: Layer the Pie Dish
Grease your pie dish like you mean it – nothing’s worse than stuck-on cheeseburger! Spread that beautiful beef mixture evenly across the bottom. Now the best part: shower it with cheese! I like to use my hands to sprinkle it so every bite gets cheesy goodness.
Step 3: Prepare the Batter
In your mixing bowl (or that big measuring cup you never use for measuring), whisk together the eggs until they’re frothy. Slowly pour in the milk while whisking – this prevents lumps. Add the flour gradually until you’ve got a smooth batter that ribbons off the whisk. Don’t overmix – a few tiny lumps are okay!
Step 4: Bake to Perfection
Carefully pour your batter over the beef and cheese layers – it should seep into all the nooks and crannies. Pop it in your preheated oven for 25-30 minutes. You’ll know it’s done when the top is golden and the center doesn’t jiggle when you nudge the pan. Pro tip: if the top browns too fast, just tent it with aluminum foil.
Print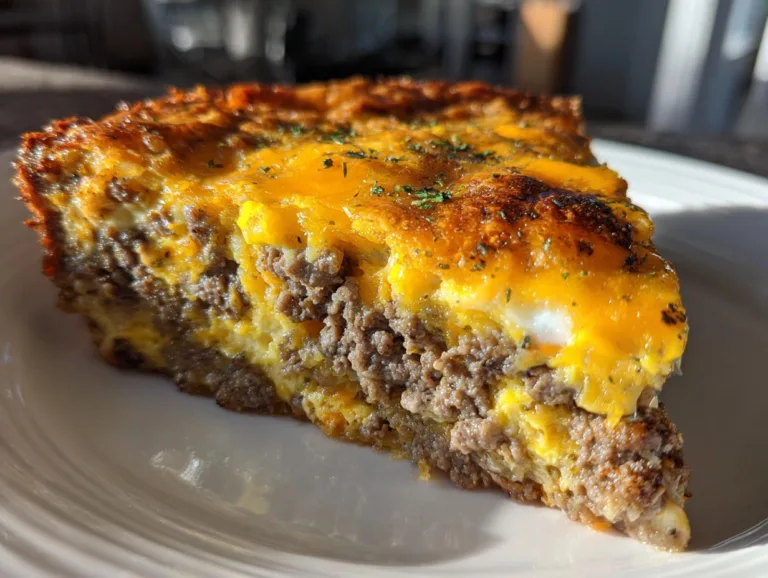
Ultimate Homemade Cheeseburger: 5 Secrets to Juicy Perfection
A simple and delicious homemade cheeseburger pie made with ground beef, cheese, and a savory egg-milk batter.
- Total Time: 45 mins
- Yield: 6 servings 1x
Ingredients
- 1 lb ground beef
- 1 medium onion, chopped
- 1 cup shredded cheddar cheese
- 1/2 tsp salt
- 1/4 tsp black pepper
- 2 large eggs
- 1 cup milk
- 1/2 cup all-purpose flour
- 1 tsp garlic powder
- 1 tsp Worcestershire sauce (optional)
- Cooking spray or butter for greasing the pan
Instructions
- Preheat your oven to 400°F (200°C).
- In a skillet over medium heat, cook the ground beef and chopped onion until the beef is browned and the onion is soft. Drain excess fat.
- Season the meat mixture with salt, pepper, garlic powder, and Worcestershire sauce if using.
- Grease a 9-inch pie dish and spread the beef mixture evenly in the bottom.
- Sprinkle the shredded cheddar cheese evenly over the beef.
- In a mixing bowl, whisk together the eggs, milk, and flour until smooth. Pour the mixture evenly over the beef and cheese.
- Bake for 25–30 minutes or until the top is golden and the center is set.
- Let cool slightly before slicing and serving.
Notes
- Use lean ground beef for less fat.
- Add diced tomatoes or mushrooms for extra flavor.
- Serve with a side salad or steamed vegetables.
- Prep Time: 15 mins
- Cook Time: 30 mins
- Category: Main Dish
- Method: Baking
- Cuisine: American
- Diet: Low Lactose
Nutrition
- Serving Size: 1 slice
- Calories: 320
- Sugar: 3g
- Sodium: 450mg
- Fat: 18g
- Saturated Fat: 8g
- Unsaturated Fat: 7g
- Trans Fat: 0.5g
- Carbohydrates: 15g
- Fiber: 1g
- Protein: 25g
- Cholesterol: 120mg
Tips for the Best Ultimate Homemade Cheeseburger
After burning more cheeseburgers than I’d like to admit, I’ve collected some foolproof tricks to make yours perfect every time:
- Pick the right beef: 80/20 ground chuck gives you juicy burgers without swimming in grease. Anything leaner dries out!
- Sneak in veggies: Grated zucchini or mushrooms blend right in (my kids never notice) and add moisture.
- Rest before slicing: Let it sit 5 minutes after baking – that cheesy goodness needs time to set!
- Broil for crispiness: For an extra-golden top, broil the last 2 minutes (but don’t blink – it burns fast!).
Oh, and always make extra – these disappear faster than cookies at a bake sale! If you want more dinner ideas like this, check out our dinner recipes.
Variations for Your Ultimate Homemade Cheeseburger
One of my favorite things about this recipe is how easily you can mix it up – I’ve probably made a dozen different versions by now! Here are some crowd-pleasing twists:
- Mushroom lovers: Sauté some sliced creminis with the onions for an earthy twist (my husband’s favorite).
- Tomato tang: Mix in a handful of sun-dried tomatoes for pops of bright flavor.
- Cheese swap: Try pepper jack for heat or Swiss for a milder, nuttier taste.
- Bacon bonus: Because everything’s better with bacon – crumble some cooked strips into the beef mixture.
The best part? You can’t mess it up. Just keep the basic proportions the same and let your cravings guide you!
Serving Suggestions
This cheeseburger pie is amazing on its own, but here’s how I love to serve it for a complete meal. A simple green salad cuts through the richness perfectly – my go-to is crisp romaine with a tangy vinaigrette. Steamed broccoli or roasted potatoes make it feel extra special. And don’t forget the classics – pickles and ketchup on the side for dipping! For casual nights, we just grab forks and eat straight from the pie dish (no judgment here).
Storage and Reheating
Here’s the beautiful thing about this cheeseburger pie – it tastes even better the next day! Store leftovers tightly covered in the fridge for up to 3 days. When reheating, I always use the oven (350°F for 10-15 minutes) to keep that perfect crust texture. In a pinch, the microwave works too – just zap it in 30-second bursts so the cheese doesn’t turn rubbery. Pro tip: add a tiny splash of milk before reheating to keep it moist!
Nutritional Information
Here’s the approximate nutrition per serving (but remember – values change based on your exact ingredients and cheese choices!). Each slice packs about 320 calories with 25g of protein to keep you full. Not too shabby for such a tasty ASTRO meal!
FAQs About the Ultimate Homemade Cheeseburger
Can I freeze this cheeseburger pie?
Absolutely! My freezer always has slices ready for emergencies. Wrap individual portions tightly in foil, then freeze for up to 2 months. Thaw overnight in the fridge before reheating – I pop mine in a 350°F oven for 15 minutes to bring back that crispy crust.
What cheese works best besides cheddar?
Oh, let me count the ways! Pepper jack adds a spicy kick, Swiss makes it extra melty, and American gives that classic diner flavor. My weird-but-wonderful combo? Half sharp cheddar, half smoked gouda – the kids call it my “magic cheese.”
Can I make this without eggs?
You bet! I’ve used flax eggs (1 tbsp ground flax + 3 tbsp water per egg) with great results. The texture changes slightly – it’s more dense but still delicious. Just whisk the flax mixture extra well before adding.
Why does mine turn out soggy?
Happened to me too! Make sure to drain ALL that beef fat (leave just a tablespoon) and pat the onions dry with paper towels. Also, don’t skip preheating the oven – that initial heat blast prevents sogginess.
Can I use ground turkey instead?
Sure can! Just add 1 tbsp olive oil to keep it moist. My vegetarian sister even makes it with Impossible meat – says it tastes “scarily real!”
Share Your Experience
Now it’s your turn! Did you try my Ultimate Homemade Cheeseburger? I’d love to hear how it turned out. Snap a pic, leave a comment, or tag me – nothing makes me happier than seeing your cheesy creations! And hey, if you’ve got your own twist on this recipe, spill your secrets – I’m always looking for new ideas! You can also follow along with more of our cooking adventures over at Facebook.