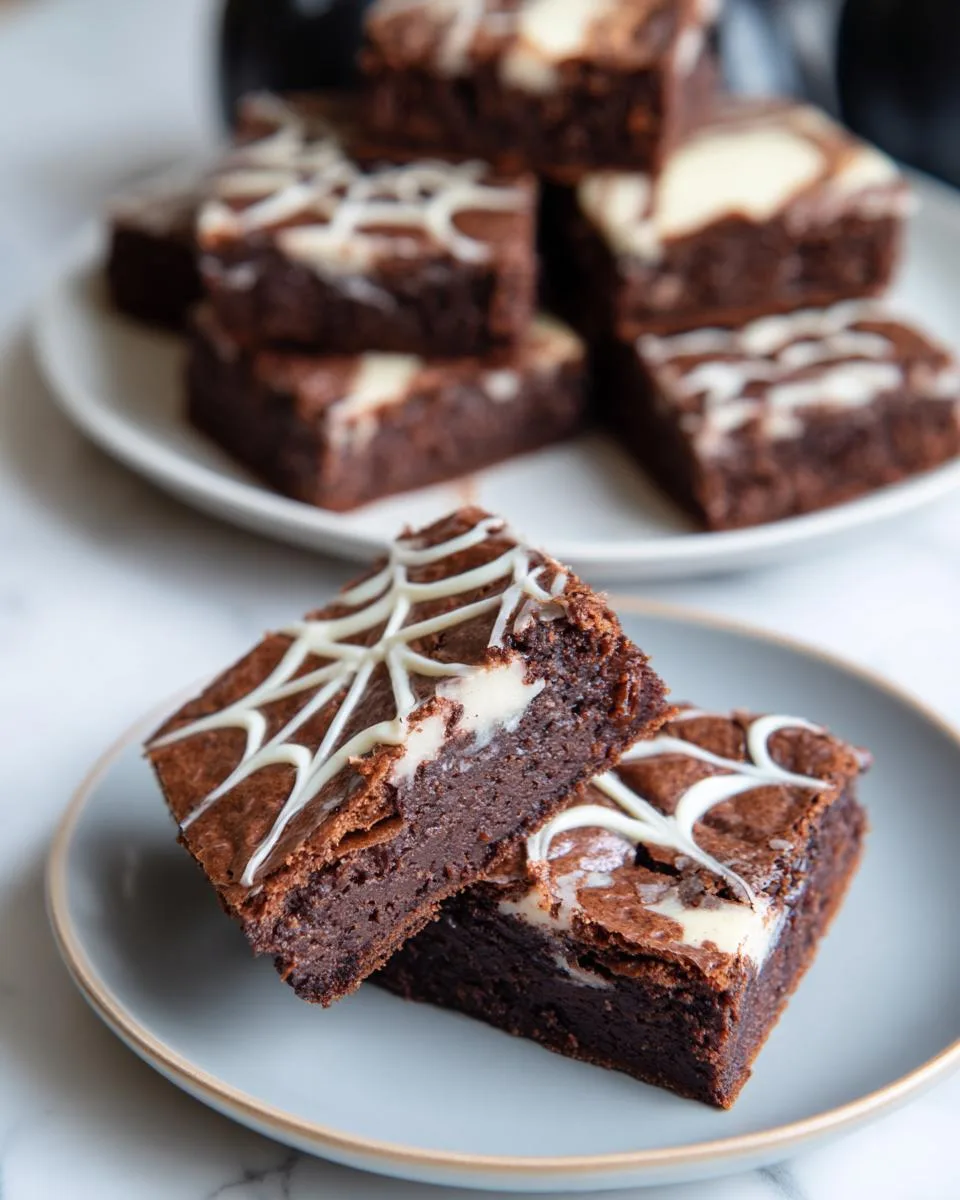
Picture this: It’s Halloween night, the air is crisp, and your kitchen smells like a chocolate lover’s dream. That’s exactly what happens when I whip up my White Chocolate Spiderweb Brownies – rich, fudgy dark chocolate squares transformed into something spooktacular with a delicate web of melted white chocolate. I started making these years ago for my niece’s costume party, and now they’re our non-negotiable Halloween tradition.
What I love most is how the bittersweet chocolate plays against the sweet white chocolate drizzle – it’s like trick-or-treating in every bite! The spiderweb design looks fancy but trust me, it’s way easier than you’d think. All you need is a steady hand and about five minutes to turn ordinary brownies into the star of your Halloween dessert table.
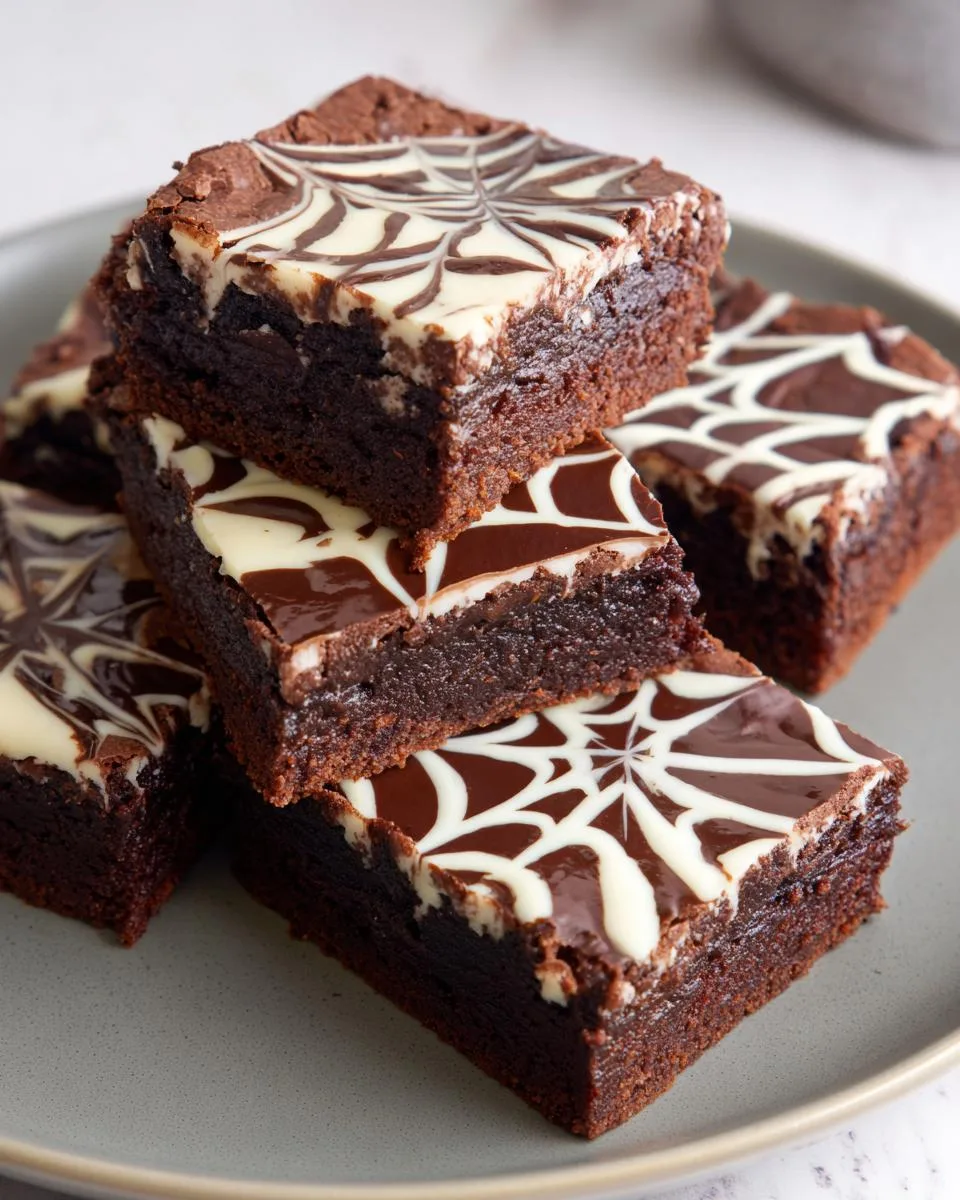
Table of Contents
Table of Contents
Ingredients for White Chocolate Spiderweb Brownies
Okay, here’s the magic list – everything you’ll need to make these showstopping brownies. I’ve learned through many batches that quality ingredients really matter here, especially the chocolate! Let’s break it down:
For the brownies
- ½ cup unsalted butter (that’s 1 stick – and yes, it must be real butter!)
- 4 ounces high-quality dark chocolate, chopped (I splurge on the good stuff)
- 1 cup granulated sugar
- 2 large eggs (room temperature works best)
- 1 teaspoon vanilla extract
- ¼ cup unsweetened cocoa powder
- ¼ teaspoon salt
For the spiderweb decoration
- 2 ounces white chocolate, chopped (don’t use chips – they don’t melt as smoothly)
See? Simple ingredients, but when combined right, they create absolute magic. Now let’s get mixing!
How to Make White Chocolate Spiderweb Brownies
Get ready to make the most fun brownies of your life! I promise, even if you’re not the artistic type, that spiderweb design is way easier than it looks. Just follow these steps and you’ll have everyone thinking you’re a pastry pro.
Preparing the Brownie Batter
First, preheat your oven to 350°F (175°C) – this is crucial for even baking. Now, melt your butter and dark chocolate together (I use the microwave in 30-second bursts, stirring between each). Let it cool slightly so it doesn’t scramble those eggs when you add them!
Whisk in the sugar, eggs, and vanilla until everything’s glossy and smooth. In another bowl, mix your cocoa and salt, then gently fold it into the wet ingredients. The key here? Stop mixing the second everything’s combined – overmixing makes tough brownies. Pour into your lined pan and bake for 25-30 minutes until they’re set but still slightly fudgy.

Creating the White Chocolate Spiderweb
Here comes the fun part! Once your brownies are completely cool (no cheating – warm brownies will make the white chocolate melt!), melt your white chocolate carefully. I put mine in a zip-top bag, snip a tiny corner, and pipe concentric circles on the brownies.
Now take a toothpick and drag lines from the center outward to make the web. If you mess up? No stress – just wipe it off and try again. Pop them in the fridge for 15 minutes to set, and voila – spooky perfection!
Print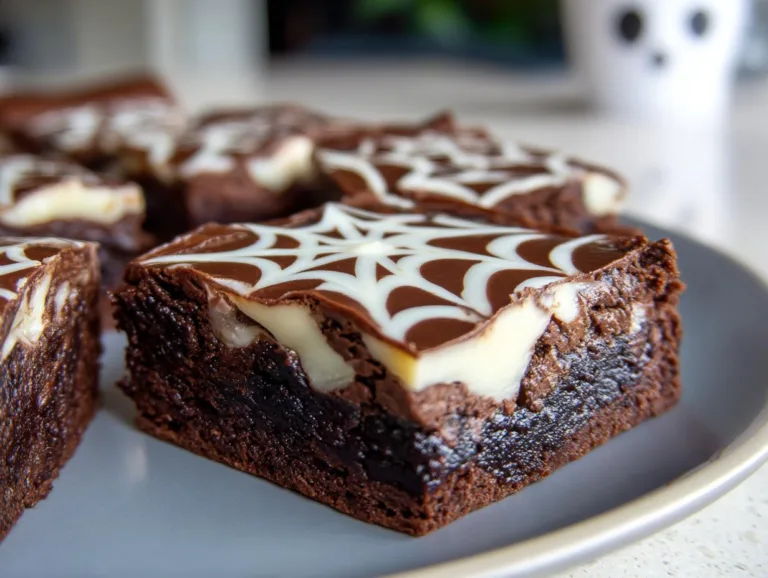
Spooky White Chocolate Spiderweb Brownies in 5 Easy Steps
Decadent dark chocolate brownies topped with a decorative white chocolate spiderweb, perfect for Halloween or any spooky occasion.
- Total Time: 45 minutes
- Yield: 9 brownies 1x
Ingredients
- 1/2 cup unsalted butter
- 4 ounces high-quality dark chocolate, chopped
- 1 cup granulated sugar
- 2 large eggs
- 1 teaspoon vanilla extract
- 1/4 cup unsweetened cocoa powder
- 1/4 teaspoon salt
- 2 ounces white chocolate, chopped
Instructions
- Preheat the oven to 350°F (175°C). Grease and line an 8×8-inch baking pan with parchment paper.
- Melt the butter and dark chocolate together in a microwave-safe bowl or double boiler until smooth. Let it cool slightly.
- Whisk in the granulated sugar, eggs, and vanilla extract into the chocolate mixture until well combined.
- In a separate bowl, whisk together the cocoa powder and salt. Gradually fold the dry mixture into the wet mixture until just combined.
- Pour the batter into the prepared baking pan and smooth the top. Bake for 25-30 minutes, or until a toothpick inserted into the center comes out with a few moist crumbs. Let the brownies cool completely in the pan.
- Melt the white chocolate in a microwave or double boiler. Transfer it to a small piping bag or a zip-top bag with a small corner snipped off.
- Using a toothpick or fine-tipped tool, gently drag lines from the center of the brownies to the edges. Connect the lines with a wave-like line to create a spiderweb effect.
- Let the white chocolate set by chilling the brownies in the refrigerator for 15-20 minutes. Once set, lift the brownies out of the pan and cut into squares.
Notes
- For best results, use high-quality chocolate.
- Allow brownies to cool completely before adding the white chocolate decoration.
- Store leftovers in an airtight container at room temperature for up to 3 days.
- Prep Time: 15 minutes
- Cook Time: 30 minutes
- Category: Dessert
- Method: Baking
- Cuisine: American
- Diet: Vegetarian
Nutrition
- Serving Size: 1 brownie
- Calories: 280
- Sugar: 25g
- Sodium: 70mg
- Fat: 15g
- Saturated Fat: 9g
- Unsaturated Fat: 5g
- Trans Fat: 0g
- Carbohydrates: 35g
- Fiber: 2g
- Protein: 3g
- Cholesterol: 60mg
Tips for Perfect White Chocolate Spiderweb Brownies
After burning through way too many batches (oops!), I’ve nailed down these foolproof tricks:
Quality chocolate is non-negotiable – that cheap baking chocolate will make your spiderwebs look dull and grainy. Spend the extra dollar on good dark and white chocolate – your taste buds will thank you.
Patience with cooling is everything. I know it’s tempting, but decorating warm brownies turns your spiderweb into a melted mess. Wait at least an hour – I put mine near an open window to speed things up.
Make your lines thin when piping the white chocolate. Thick globs won’t create that delicate web effect. If your bag’s hole is too big, just snip a tinier corner!
Store them properly – these last 3 days in an airtight container, but I always hide them in the fridge so the spiderwebs stay crisp. Just let them come to room temp before serving.
Ingredient Substitutions
Ran out of something? No worries – here’s how to adapt these White Chocolate Spiderweb Brownies when you’re in a pinch:
Butter: Coconut oil works in a 1:1 swap, but your brownies will be slightly less rich. For dairy-free, I’ve had success with vegan butter sticks too.
Dark chocolate: Milk chocolate makes them sweeter (kids love this version!), but you’ll lose that deep chocolate flavor. Semi-sweet chips can sub in a pinch.
White chocolate: Candy melts work for decorating, though they taste sweeter and less creamy. Pro tip – add a teaspoon of coconut oil to help them flow smoother!
Serving and Storage
Here’s the best way to enjoy your White Chocolate Spiderweb Brownies – trust me, I’ve eaten enough of these to know! Serve them slightly chilled for that perfect snap when you bite into the white chocolate web. They’re heavenly with a cup of strong coffee to balance the sweetness.
For storage, tuck them into an airtight container with parchment between layers. They’ll keep at room temperature for 2 days, but I prefer the fridge where they stay fresh for up to 5 days. The spiderwebs might soften a bit after day three, but they’ll still disappear fast – mine always do!
White Chocolate Spiderweb Brownies FAQ
How long do the brownies need to cool before adding the spiderweb?
At least 1 hour – I know it’s torture to wait, but decorating warm brownies will melt your beautiful spiderweb design into a puddle. I test by touching the center – it should feel completely cool, not even slightly warm.
Can I use candy melts instead of white chocolate?
Yes, but with a trade-off! Candy melts are more forgiving for piping, but they taste sweeter and lack that creamy richness of real white chocolate. If you go this route, add a tiny bit of coconut oil (½ tsp per 2oz) to help them flow smoothly.
Why did my brownies turn out crumbly?
Oh no – sounds like they baked too long! These should be slightly underdone when you pull them out (a toothpick should have moist crumbs, not come out clean). Overbaking dries them out. Next time, check at 20 minutes.
Help! My spiderweb lines broke!
No panic – this happens to me too when I rush! Just scrape off the messy part, re-pipe fresh white chocolate, and chill for 15 minutes. Pro tip: work in small sections so the chocolate doesn’t harden while you’re decorating.
Nutritional Information
Just so you know what you’re biting into – each White Chocolate Spiderweb Brownie clocks in around 280 calories (hey, it’s Halloween, live a little!). These are estimates, of course – your exact nutrition will vary based on ingredients. Per serving: 15g fat (9g saturated), 35g carbs, and 2g fiber. The white chocolate adds about 3g extra sugar per brownie compared to plain ones. Worth every bite if you ask me!
For More recipes Follow me on Facebook!