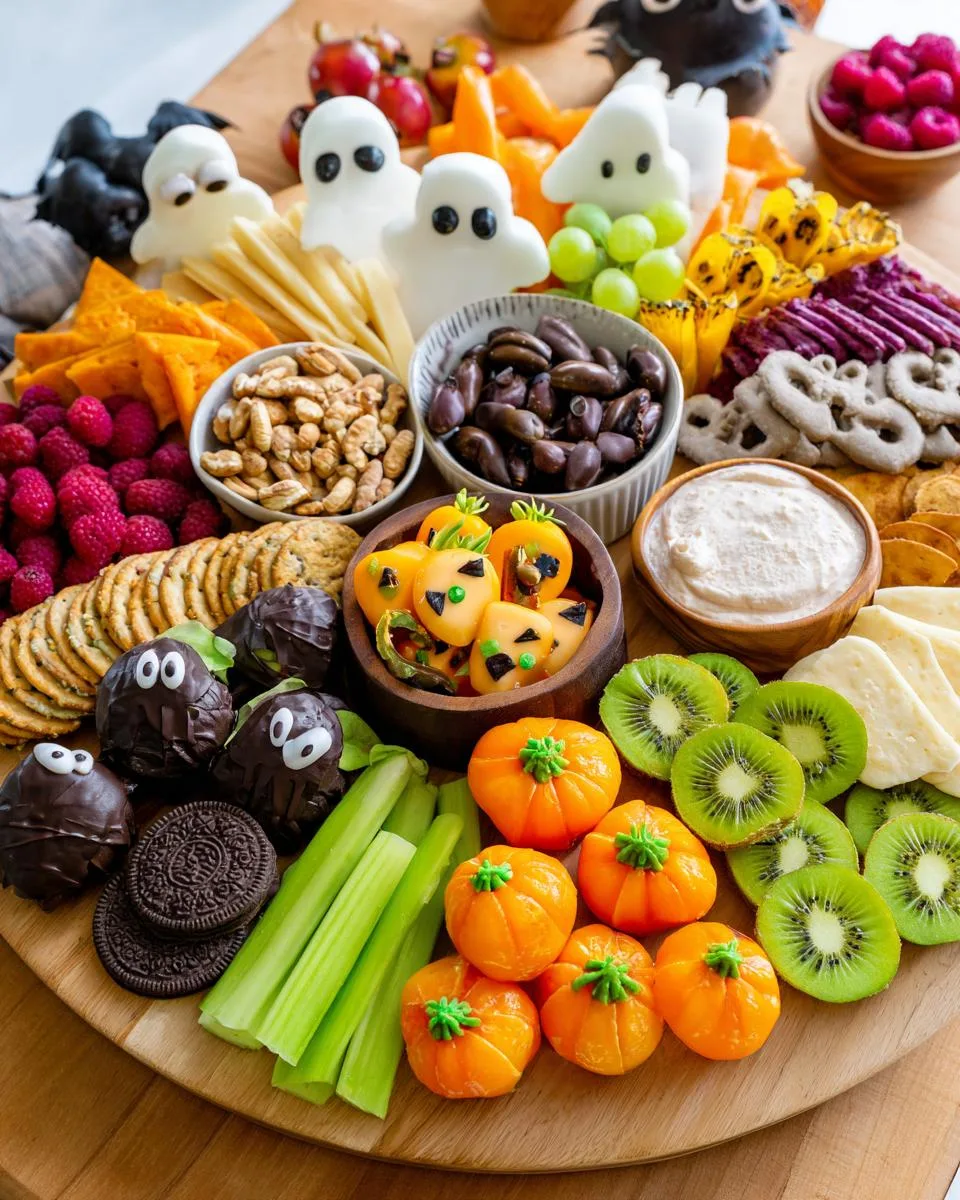
Halloween isn’t just about candy—it’s about the experience, and my favorite way to set the mood? A spooky-but-delicious Halloween Charcuterie Board (or as I like to call it, a “Char-boo-terie” board)! Every year, my family gathers to carve pumpkins, watch old monster movies, and snack on a board packed with creepy-cute treats. I’ll never forget the year my then-five-year-old squealed at the kiwi “monsters” – now it’s a must-have tradition. This twist on classic charcuterie is all about playful flavors and ghoulish fun, perfect for parties or even a cozy night in with popcorn and Hocus Pocus. Trust me, once you try it, you’ll want to make it every October!

Table of Contents
Table of Contents
Why You’ll Love This Halloween Charcuterie Board
This isn’t your average snack spread—it’s pure Halloween magic. Here’s why it’s a hit:
- Effortlessly fun: No fancy skills needed—just cookie cutters, melted chocolate, and a little creativity!
- Kid-approved: Little helpers love assembling kiwi monsters and mandarin pumpkins (and sneaking chocolate pretzels).
- Totally customizable: Swap in spooky candies, vegan cheeses, or whatever screams “Halloween” to you.
- Showstopper vibes: The oohs and ahhs when you unveil it? Priceless. Bonus: It’s Insta-worthy before anyone takes a bite.
Halloween Charcuterie Board Ingredients
Okay, here’s where the magic starts—with a mix of savory, sweet, and just spooky enough ingredients. Pro tip: I group everything before assembling so I don’t forget a single ghoulish detail!
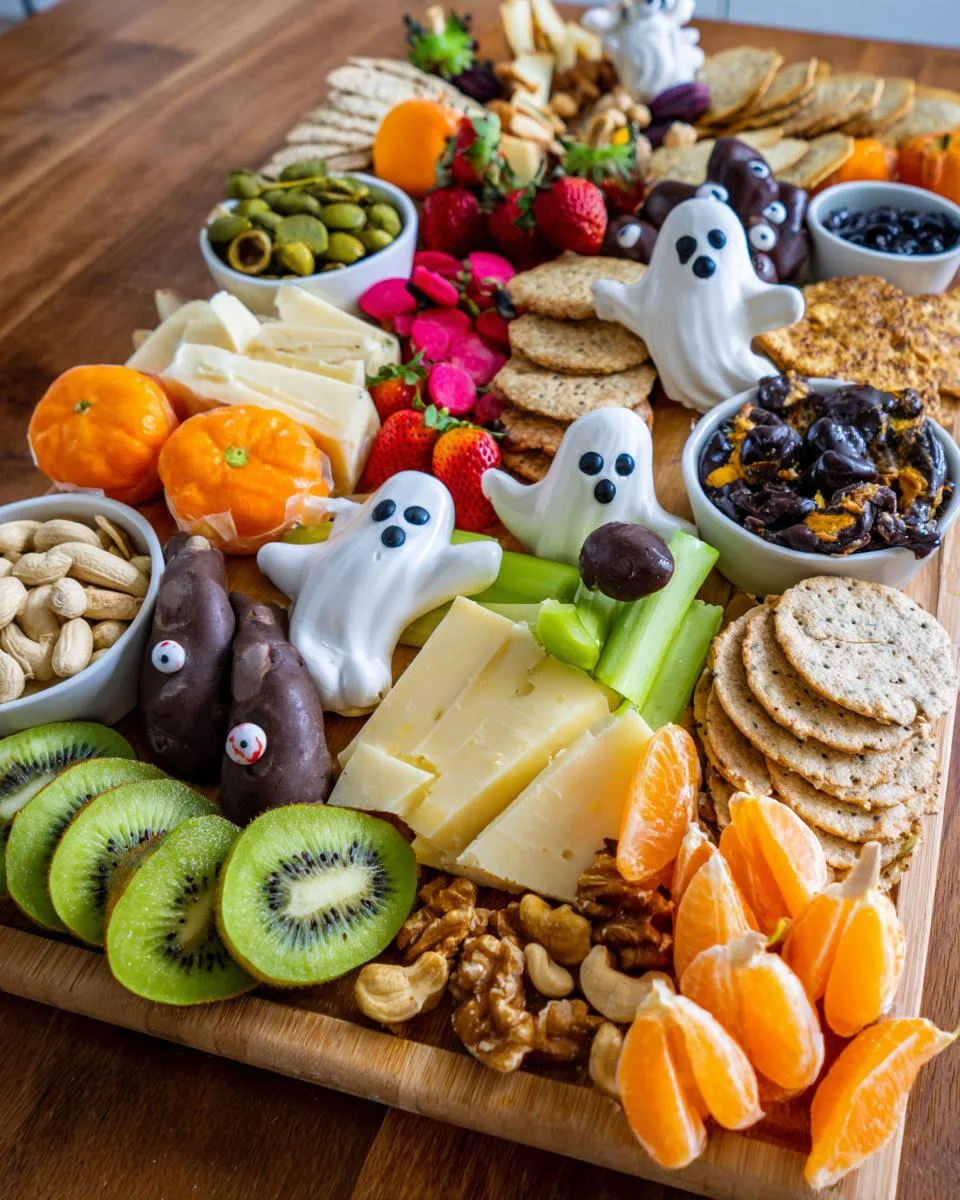
Cheeses (the “Boo”-zy Stars)
- 6 oz sharp cheddar (cut into bat or ghost shapes—cookie cutters are your best friend here)
- 6 oz Gouda (cubed for easy grabbing)
- 1 small wheel of brie (wrapped in puff pastry strips to look like a “mummy”—trust me, it’s easier than it sounds!)
- 4 oz marinated mozzarella balls (aka “eyeballs” when you add olive slices on top)
Fruits & Veggies (Nature’s Candy)
- 3 kiwis (halved and carved into little monsters with chocolate eyes)
- 1 cup blackberries (perfect “spider eggs” or just tasty pops of dark color)
- 4 mandarins (turned into mini “pumpkins” with celery stems)
- 5-6 mini sweet peppers (give ’em chocolate-dot faces for a silly “screaming” effect)
Snacks & Extras (Because Spooky Needs Crunch)
- 1 cup caramel corn (for texture and that autumnal vibe)
- ½ cup chocolate-covered pretzels (look like witch broomsticks if you get creative!)
- Small bowl of guacamole (serve in a tiny cauldron for drama)
- Assorted crackers (I use bat-shaped ones if I can find ’em!)
Note: All measurements are for a board serving 8-10—adjust up or down depending on your zombie horde’s appetite!
Equipment You’ll Need
No fancy gadgets here—just a few basics to bring your Halloween charcuterie board to life:
- Cookie cutters (ghost, bat, or pumpkin shapes—the cheesier, the better!)
- Paring knife (for carving kiwi monsters and pepper faces)
- Small bowls (cauldron-shaped if you’re extra like me)
- Large serving board (wood or slate works great for that rustic spooky vibe)
That’s it! Now let’s get haunting—er, assembling.
How to Make a Halloween Charcuterie Board
Ready to turn ordinary ingredients into a frightfully fun feast? Here’s my step-by-step guide to creating a Halloween charcuterie board that’ll steal the spotlight at any gathering. The secret? Work in sections—trust me, it keeps the chaos (the fun kind!) under control.
Prep the Spooky Fruits and Veggies
Start with the stars of the show: your edible Halloween creatures! Pro tip: Do this first so the chocolate sets while you work on other elements.
- Mandarin “pumpkins”: Cut a tiny “X” on top of each mandarin wedge. Insert a 1-inch celery stick—push gently until it stands upright like a stem. Voilà, instant mini pumpkins!
- Kiwi “monsters”: Halve kiwis lengthwise. Use a paring knife to carve jagged “hairlines,” then peel back the skin below. Melt white chocolate, pipe on oval eyes, and add a blackberry seed or chocolate chip pupil for that monster-movie glare.
- Screaming peppers: Pat mini peppers dry (chocolate won’t stick otherwise!). Use melted chocolate to dot on wide eyes near the stem end—angle them downward for maximum drama. Add a zigzag chocolate mouth below. Let set for 5 minutes before handling.
Shape and Arrange the Cheeses
This is where your Halloween charcuterie board gets its personality. Work with cold cheese—it holds shapes better!
- Cut cheddar into shapes: Use ghost or bat cookie cutters on ¼-inch thick cheddar slices. For cleaner edges, dip cutters in warm water first.
- Create “mummy brie”: Wrap room-temperature brie with thin strips of puff pastry (store-bought works great!). Leave gaps for the “bandages,” bake at 375°F for 15 minutes until golden. Let cool slightly before adding olive slice eyes.
- Place mozzarella “eyeballs”: Spear mozzarella balls with toothpicks, top each with a sliced black olive “iris.” Stand them upright in a small bowl filled with marinade—they’ll look like they’re floating!
Assemble the Halloween Charcuterie Board
Now for the best part—bringing it all together! Start with larger items, then fill gaps with smaller bits.
- Anchor with cheeses: Place shaped cheeses first—space them out so colors pop against the board. Put mummy brie slightly off-center as a focal point.
- Add fruits & veggies: Group mandarin pumpkins together like a patch. Scatter kiwi monsters near the edges where their faces are visible. Tuck screaming peppers between cheeses for contrast.
- Fill in with snacks: Pour caramel corn into “spooky” clusters. Let chocolate pretzels spill like broken broomsticks. Use a mini cauldron (or bowl) for guacamole—surround with bat crackers as if they’re flying out!
Final tip: Step back every few minutes to check balance. You want a mix of heights, colors, and textures—like a delicious haunted landscape!
Print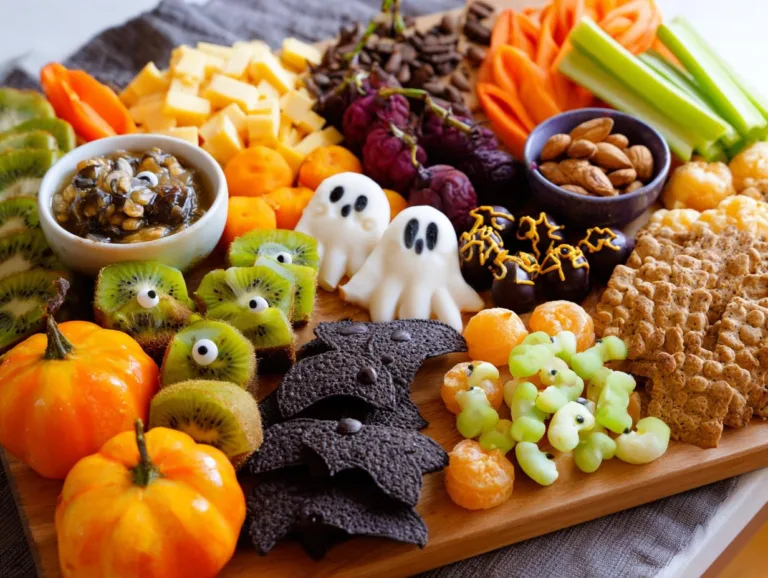
Spooky & Easy Halloween Charcuterie Board in 30 Minutes
A fun and spooky Halloween-themed charcuterie board with themed fruits, cheeses, and snacks.
- Total Time: 30 minutes
- Yield: 1 large board (serves 8-10) 1x
Ingredients
- 6 ounces cheddar
- 6 ounces Gouda
- Marinated mozzarella
- Prepared mummy brie
- Kiwis
- Blackberries
- Strawberries
- Mandarins
- Sweet peppers
- Moon Drop grapes
- Green apples
- Olives
- Caramel corn
- Chocolate covered pretzels/almonds
- Dried apricots
- Pistachios
- Guacamole
- White or semi-sweet chocolate for melting
- Crackers, for serving
Instructions
- Cut a small ‘x’ in the mandarin. Place a small 1-inch piece of celery in the ‘x’ and gently push down so that it goes through to make ‘pumpkins’.
- Cut the kiwi in half. Use a paring knife to score where you’d like the ‘hair line’ to be. Then use a peeler or a paring knife to peel away the rest. Add a small squeeze of chocolate for the eyes and mouth as you’d like.
- Pat the peppers dry, add a squeeze of chocolate for the eyes, add candy eyes, and mouth to make ‘shocked peppers’.
- Cut the cheese using ghost, pumpkin, or bat shapes. If the cheese is white, place a dark-colored fruit below, then place the cheese on top. Arrange cheeses on your board. Add fresh or faux pumpkins or a skull.
- Add cauldrons full of olives, chocolate-covered almonds, guacamole, and place the prepared kiwi, peppers, and mandarins on the board.
- Scatter the board with caramel corn, chocolate-covered pretzels, dried apricots, pistachios, and an assortment of crackers.
Notes
- Use cookie cutters for fun cheese shapes.
- Keep fruits and veggies chilled until serving.
- Adjust quantities based on serving size.
- Prep Time: 30 minutes
- Cook Time: 0 minutes
- Category: Appetizer
- Method: No-Cook
- Cuisine: American
- Diet: Vegetarian
Nutrition
- Serving Size: 1/10 of board
- Calories: 250
- Sugar: 12g
- Sodium: 300mg
- Fat: 15g
- Saturated Fat: 6g
- Unsaturated Fat: 7g
- Trans Fat: 0g
- Carbohydrates: 20g
- Fiber: 3g
- Protein: 8g
- Cholesterol: 25mg
Tips for the Best Halloween Charcuterie Board
Want your Halloween charcuterie board to be the talk of the tomb? These simple tricks make all the difference:
- Chill out: Keep cheeses and fruits cold until assembly—nobody likes melty monster faces or sweaty brie!
- Theme it up: Tuck in plastic spiders, mini skeletons, or even a fog machine (okay, maybe just a dry ice bowl) for extra spook points.
- Allergy-friendly swaps: Use seed butter instead of chocolate for nut-free homes, or vegan cheeses for dairy-free witches.
- Prep ahead: Make chocolate-dipped items and shaped cheeses the night before—just cover well so they don’t dry out.
- Embrace chaos: Perfect symmetry is for vampires. Let some pretzels “fall” dramatically—it adds to the haunted charm!
Halloween Charcuterie Board Variations
The beauty of a Halloween charcuterie board? You can totally make it your own! Here are my favorite easy swaps:
- Vegan-friendly: Use coconut-based cheeses and swap chocolate for melted dairy-free chips on the kiwi monsters.
- Candy lovers: Toss in gummy worms, candy corn, or chocolate skulls—just watch them disappear first!
- Savory twist: Add deviled eggs with olive spider toppings.
Seriously—if it’s edible and slightly spooky, it belongs here!
Serving and Storage
Here’s the deal—this Halloween charcuterie board is best served fresh. The kiwi monsters stay vibrant, the melted chocolate stays put, and those mandarin pumpkins stay perky. If you must store leftovers (rare in my house!), keep guacamole and juicy fruits separate in airtight containers—nobody likes soggy crackers. Cheeses? They’ll last 2 days max!

FAQs About Halloween Charcuterie Boards
Q1. Can I make parts of this Halloween charcuterie board ahead?
Absolutely! The shaped cheeses and chocolate-decorated fruits hold up great overnight—just store them separately in airtight containers. Assemble the board 1-2 hours before serving so everything stays fresh. Pro tip: Keep guacamole and juicy fruits chilled until the last minute to prevent sogginess.
Q2. What’s the point of a charcuterie board for Halloween?
It’s all about the experience! A Halloween charcuterie board turns snacking into interactive fun—kids love spotting kiwi monsters, adults appreciate the clever twists on classics, and everyone gets to graze while mingling. Plus, it’s way more memorable than a bowl of candy!
Q3. How do I keep my board from looking messy?
Work in sections! Start with cheeses as anchors, then add larger fruits/veggies, and finally fill gaps with small snacks. Step back every few minutes to check balance. If chocolate drips, call it “ghost tears” and lean into the spookiness—imperfections add charm!
Q4. Can I make this nut-free or vegan?
Easy swaps! Use seed butter instead of chocolate for decorating, and opt for vegan cheeses (my coconut-based “cheddar” works great in bat shapes). Load up on spooky fruits, olives, and veggie creatures—they’re naturally allergy-friendly.
Q5. What if I don’t have Halloween cookie cutters?
No worries—freehand bat wings with a knife, or use a shot glass to cut cheese moons! Even simple squares become “tombstones” with a piped RIP in chocolate. Creativity beats perfection every time.
Halloween Charcuterie Board Nutrition
Nutrition varies by ingredients. Values are estimates per serving (1/已经成为10 of the board): 250 calories, 15g fat (6g saturated), 20g carbs, 3g fiber, 12g sugar, 8g protein, 300mg sodium. Spooky never tasted this balanced!
For More recipes Follow me on Facebook!