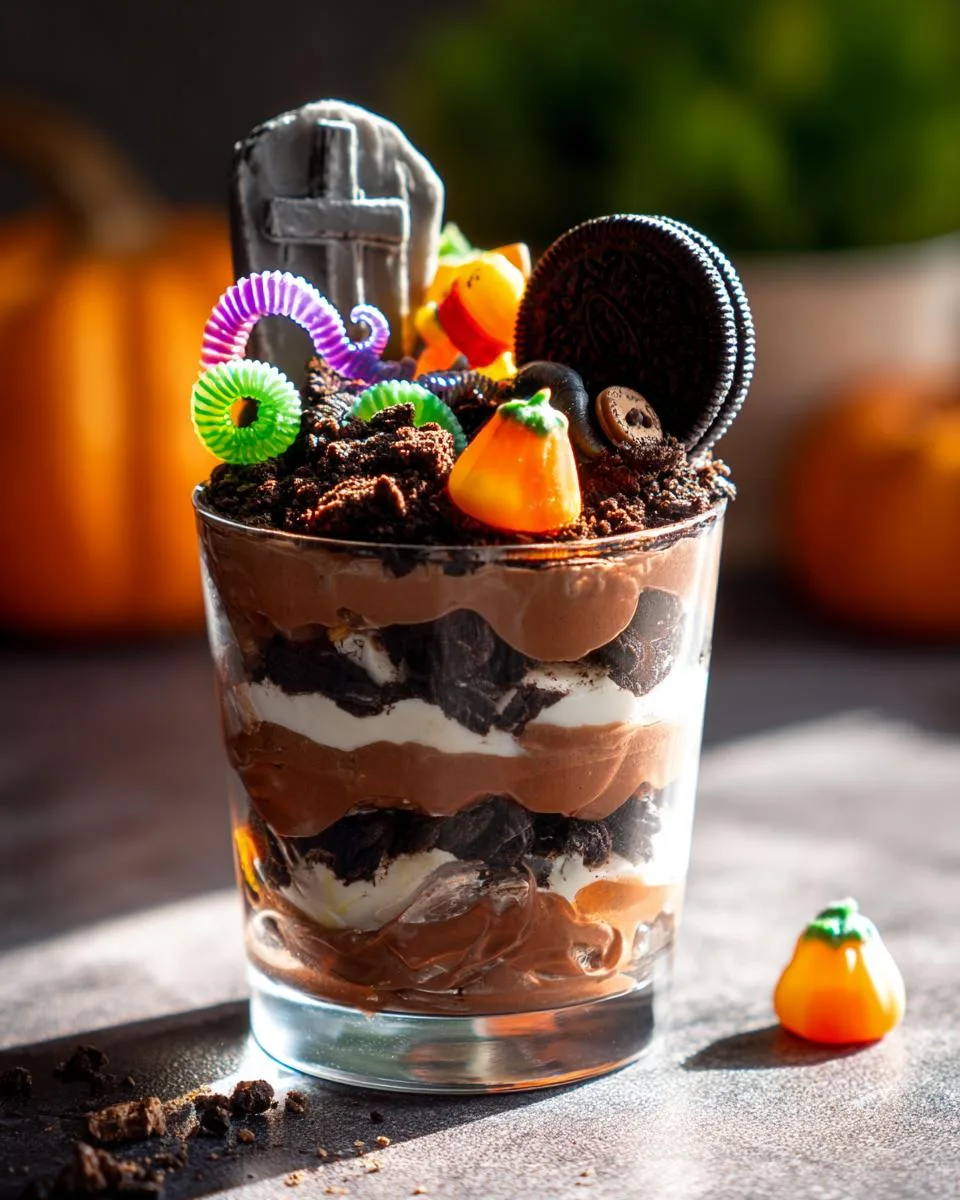
Oh my gosh, you have to try these Halloween dirt cups! They’re the easiest, most fun dessert for spooky season—trust me, I’ve made them for every Halloween party since my niece begged me to whip them up for her 6th grade bash. The kids went wild for them! Imagine creamy chocolate pudding layered with crushed Oreo “dirt,” topped with cookie tombstones and gummy worms crawling out like they’re rising from the grave. The best part? No baking required—just mix, layer, and decorate. These little cups are always the first treat to disappear from the dessert table. Even the grown-ups sneak seconds when they think no one’s looking!

Table of Contents
Table of Contents
Why You’ll Love Halloween Dirt Cups
Seriously, what’s not to love about these creepy-cute treats? Here’s why they’re a Halloween must-make every year:
- Crazy easy – No oven needed! Just 15 minutes of hands-on work (perfect for last-minute party prep)
- Kid-approved fun – Little hands love decorating with gummy worms and helping crush the Oreos
- Totally customizable – Swap in different cookies, use vegan pudding, or go crazy with candy eyeballs
- Party perfection – Individual cups mean no slicing, and they double as edible decor!
I’ve even caught teenagers pretending to be “too cool” for Halloween sneaking thirds of these dirt cups at our block party. That’s the real test of a great recipe!
Print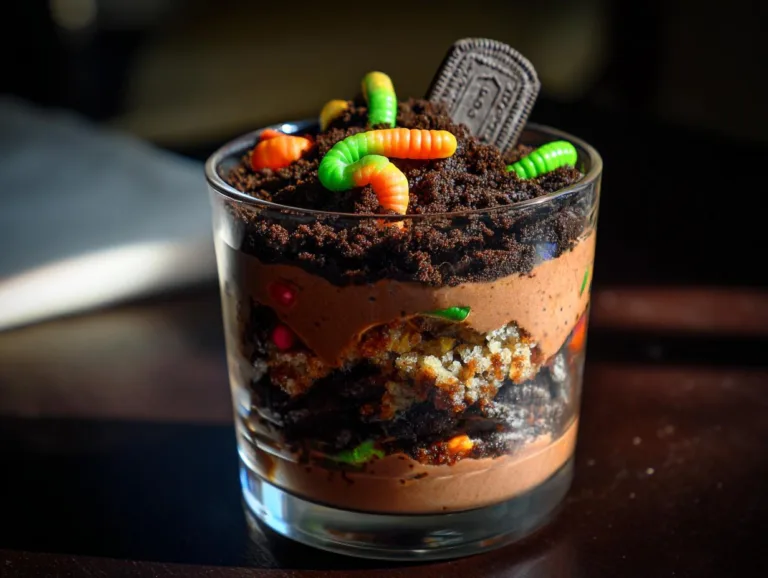
Spooky 5-Min Halloween Dirt Cups You Must Try
A fun and spooky Halloween dessert that resembles dirt with tombstones. Easy to make and perfect for parties.
- Total Time: 35 minutes
- Yield: 8 servings 1x
Ingredients
- 12 Oreo Cookies
- 16 oz Cool Whip
- 1 box Instant Chocolate Pudding Mix (3.3 oz)
- 2 cups Milk
- 8 Milano Cookies
- Gummy Worms and Candy Pumpkins (optional)
- Wilton Black Writing Icing
Instructions
- Whisk together the pudding mix and milk in a medium bowl. Refrigerate for 10 minutes or until set.
- Fold in the Cool Whip until well combined. Refrigerate for 20 minutes to chill the mixture.
- Place Oreos in a food processor or blender and crush until fine.
- Assemble the cups: Fill small cups 1/3 full with the pudding mixture.
- Top with a small amount of crushed Oreos. Repeat layers in all cups.
- Write ‘RIP’ on Milano cookies with black icing. Place them in each cup as tombstones.
- Decorate with gummy worms and candy pumpkins. Enjoy!
Notes
- Refrigerate dirt cups until ready to serve.
- Customize with different candies for variety.
- Best enjoyed the same day they are made.
- Prep Time: 15 minutes
- Cook Time: 0 minutes
- Category: Dessert
- Method: No-Bake
- Cuisine: American
- Diet: Vegetarian
Nutrition
- Serving Size: 1 cup
- Calories: 250
- Sugar: 20g
- Sodium: 180mg
- Fat: 10g
- Saturated Fat: 5g
- Unsaturated Fat: 3g
- Trans Fat: 0g
- Carbohydrates: 35g
- Fiber: 1g
- Protein: 3g
- Cholesterol: 5mg
Ingredients for Halloween Dirt Cups
Grab these simple ingredients – I bet most are already in your pantry! The magic happens when ordinary stuff transforms into graveyard goodness. Here’s exactly what you’ll need:
- 12 Oreo cookies – Regular or double-stuffed (because extra cream never hurt anybody!)
- 16 oz Cool Whip – Let it sit at room temp for 15 minutes so it folds in smoothly
- 1 box (3.3 oz) instant chocolate pudding mix – The kind that says “instant” is crucial here!
- 2 cups cold milk – Whole milk makes it extra creamy, but any kind works
- 8 Milano cookies – These become the perfect little tombstones
- Wilton black writing icing – For those spooky “RIP” messages
- Gummy worms & candy pumpkins – The creepier the better! I always grab extra worms – they “disappear” during prep
Ingredient Substitutions
No stress if you need to swap things out – I’ve tried all these variations with great results:
- Gluten-free? Use GF chocolate sandwich cookies instead of Oreos
- Dairy-free? Try coconut whipped topping and almond milk
- Less sugar? Sugar-free pudding mix works perfectly
- No Milano cookies? Graham crackers or Pepperidge Farm Chessmen make great tombstones too
- Extra chocolatey? Add a tablespoon of cocoa powder to the pudding mix
See? No scary surprises here – just simple swaps to make these dirt cups work for everyone at your Halloween bash!
How to Make Halloween Dirt Cups
Okay, let’s get our hands dirty – in the best way possible! These Halloween dirt cups come together faster than a ghost disappears at sunrise. Just follow these simple steps, and you’ll have graveyard-ready treats in no time.
Step 1: Prepare the Pudding Mixture
First things first – let’s make that creamy chocolate base. Grab a medium bowl and whisk together the instant pudding mix with cold milk. I like to whisk for a full 2 minutes to make sure there are no lumps – trust me, you don’t want any surprise powder pockets! Pop it in the fridge for about 10 minutes until it’s softly set (it’ll thicken more as it chills). Now gently fold in the Cool Whip until it’s all one happy, fluffy chocolate cloud. Back in the fridge it goes for another 20 minutes – this chill time is crucial for perfect texture!
Step 2: Crush the Oreos
Time to make our “dirt”! Toss those Oreos into a food processor and pulse until they’re fine crumbs. No processor? No problem! I’ve used a zip-top bag and rolling pin many times – just channel your inner kid and crush away! Want some texture? Leave a few slightly larger chunks for that authentic “freshly dug grave” look. Pro tip: do this step right before assembling so the crumbs stay crisp.
Step 3: Assemble the Layers
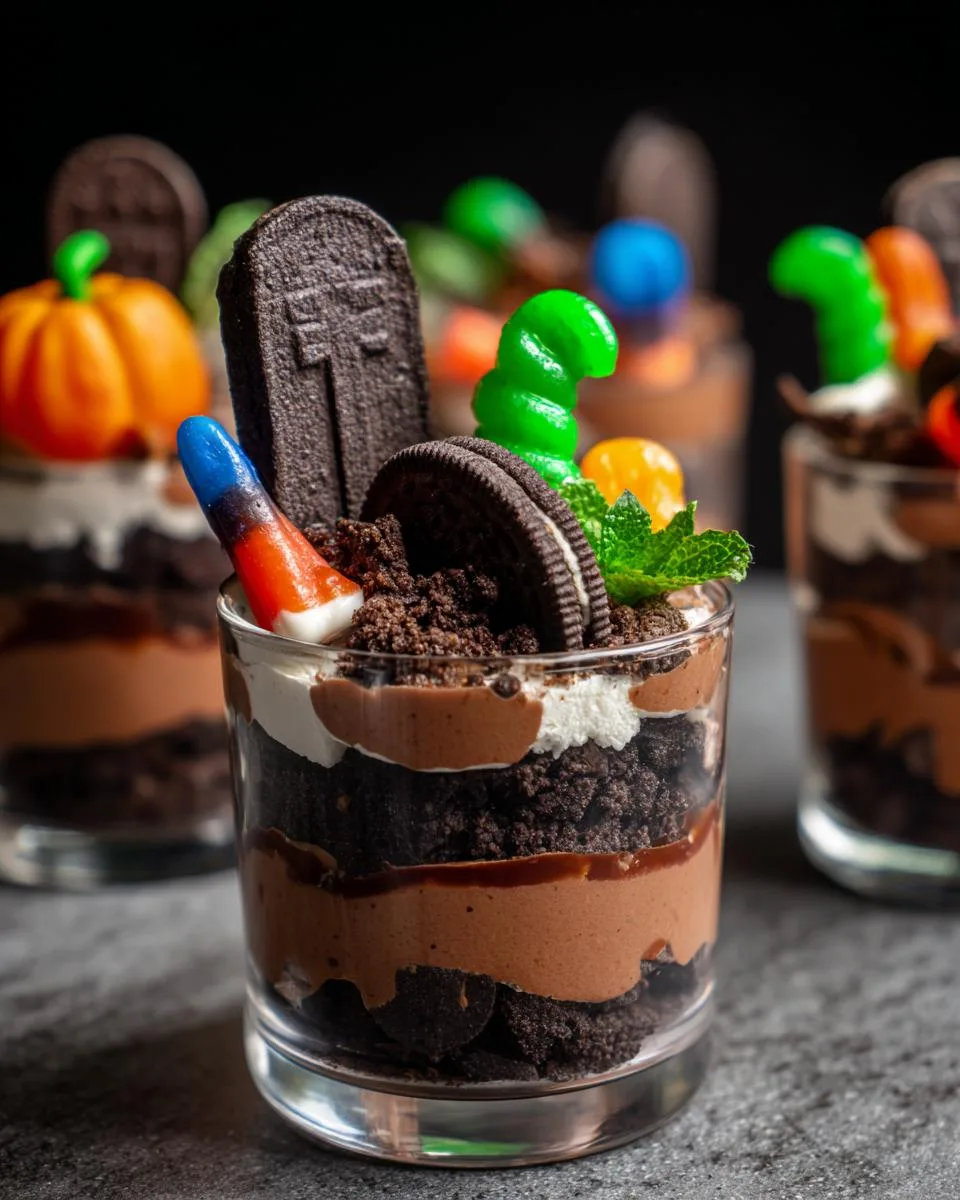
Here’s where the magic happens! Grab your clear cups (I use 8 oz plastic ones so you can see all the layers). Spoon about 2 tablespoons of pudding mixture into each cup, then sprinkle with a tablespoon of Oreo crumbs. Repeat the layers – pudding then crumbs – until the cups are nearly full. I like to leave about ½ inch at the top for decorations. Gently tap the cups on the counter to settle everything – no air pockets allowed in our graveyard!
Step 4: Decorate with Tombstones and Candy
Now for the fun part! Take your Milano cookies and pipe “RIP” or funny epitaphs with the black icing (my nephew once wrote “Here Lies My Diet” – classic!). Stick one tombstone in each cup at a slight angle. Scatter gummy worms peeking out from the dirt and place candy pumpkins around like they’re growing in your edible graveyard. Want extra creepy? Add candy eyeballs peering up from the dirt! Refrigerate until serving – if you can resist eating them immediately!
See? I told you this was easy! The hardest part is waiting for them to chill – but that just builds anticipation for your little monsters (and the grown-up ones too).
Tips for Perfect Halloween Dirt Cups
After making these dirt cups for more Halloween parties than I can count, I’ve picked up some tricks to make them extra special. Here are my can’t-live-without tips:
- Chill like you mean it – That pudding mixture needs its fridge time! Skipping the chill steps makes for soupy dirt cups (and nobody wants a muddy mess)
- Crush cookies last-minute – Oreo crumbs lose their crunch if they sit too long. I always crush mine right before assembling
- Layer with love – Alternate pudding and crumbs in thin layers for that authentic “digging through dirt” effect when eating
- Get creative with decorations – Try candy bones instead of worms, or pipe spiderwebs on the tombstones with extra icing
- Serve chilled but not frozen – Take cups out of the fridge 10 minutes before serving so the pudding softens just enough
Oh! And here’s my secret weapon – keep extra crushed Oreos in a bowl nearby. Kids (and let’s be honest, adults too) love sprinkling extra “dirt” on top right before eating. It’s the little touches that make these dirt cups unforgettable!
Storing and Serving Halloween Dirt Cups
Here’s the scoop on keeping your dirt cups fresh and spooky – because nothing ruins a graveyard faster than melted pudding! These treats are happiest when chilled, so pop them in the fridge as soon as they’re decorated. I always use an airtight container or cover the cups with plastic wrap to prevent any “ghostly” fridge smells from creeping in.
For absolute best texture, serve your dirt cups within 24 hours of making them. The Oreo crumbs stay nice and crisp that way. That said, I’ve definitely kept them for 2 days when desperate (Halloween emergencies happen!), though the crumbs soften a bit – still delicious, just more “wet earth” than “freshly dug grave.”
Want to prep ahead? Here’s my party-day strategy: Make the pudding mixture up to a day in advance and store it separately from the crushed Oreos. Assemble everything a few hours before guests arrive – the layers stay picture-perfect, and the tombstones won’t get soggy. Pro tip: Write on the Milano cookies right before sticking them in so the icing stays sharp!
One last serving trick: Arrange the cups on a tray with extra candy scattered around like fallen leaves. I sometimes drizzle chocolate syrup between them to look like creepy cracks in the earth. Watch how fast your little monsters dig in!
Nutritional Information for Halloween Dirt Cups
Let’s be real – we’re not eating dirt cups for their health benefits! But since I know some folks like to keep track (or need to for dietary reasons), here’s the general nutritional scoop. Remember, these numbers can change based on the exact brands you use or if you make any substitutions – consider this your friendly neighborhood estimate!
A typical dirt cup clocks in around 250 calories, with most coming from the delicious combo of cookies, pudding, and whipped topping. You’re looking at about 35g of carbohydrates (hey, it’s a treat!), 10g of fat (thank you, creamy Oreo middles!), and 3g of protein per serving. The exact numbers will dance around a bit depending on whether you use regular or double-stuffed Oreos, full-fat or light Cool Whip, etc.
Oh, and a quick heads-up about allergens since I know that’s important for many families: The standard recipe contains wheat (from the cookies), dairy (from milk and whipped topping), and soy (in the Oreos). That’s why I always keep the ingredient substitution list handy – it’s saved me more than once when friends with food sensitivities come to our Halloween parties!
At the end of the day, these dirt cups are meant to be a fun, occasional treat. I always say one cup won’t hurt – and watching kids’ faces light up when they see the gummy worms crawling out? That’s priceless nutrition for the soul!
FAQs About Halloween Dirt Cups
Over the years, I’ve gotten all sorts of questions about these spooky treats – here are the ones that pop up most often at my Halloween parties. Consider this your dirt cup survival guide!
Do Halloween dirt cups need to be refrigerated?
Absolutely! That pudding mixture is basically a milk party, and milk doesn’t like to sit out too long. Keep these babies chilled until serving time – I usually pull them out of the fridge about 10 minutes before guests arrive so they’re not ice-cold. Leftovers (if you have any!) should go right back in the fridge. Trust me, nobody wants warm “dirt” – it’s just not the same creepy-cute experience!
Can I make Halloween dirt cups ahead of time?
Here’s my golden rule: Assemble the day you’ll serve them for maximum crunch factor. That said, you can totally prep components ahead! The pudding mixture keeps beautifully in the fridge for up to 24 hours before assembling (just give it a quick stir first). Crush the Oreos up to 2 hours beforehand if you store them in an airtight container – any longer and they start losing their satisfying crunch. The tombstones? Write on those whenever – they’ll stay crisp for days!
What other candies can I use for decorations?
Oh, let your spooky imagination run wild! Some of my favorite variations include:
- Candy eyeballs peeking out from the dirt (so creepy!)
- Chocolate bat sprinkles perched on the tombstone edges
- Sour gummy spiders instead of worms for extra fright
- Candy corn scattered like fallen teeth (eww!)
- Mini marshmallows rolled in cocoa powder to look like ghost poops (kids LOVE this gross-out factor)
Last year I even found skeleton-shaped gummies that worked perfectly – the possibilities are endless! Just avoid anything too heavy that might sink into the pudding, and steer clear of super-messy candies that bleed color (learned that the hard way with some neon gummies…).
Where did dirt cups originate?
Funny story – these actually started as wormy dirt cake in the 1980s! Some genius mom (probably exhausted from Halloween prep) decided to mix pudding with crushed cookies and toss in some gummy worms. The graveyard version with tombstones came later as Halloween parties got more elaborate. I love how such a simple idea became a holiday classic – proof that sometimes the easiest recipes stick around the longest!
Can I make these in one big dish instead of individual cups?
You bet! A 9×13 inch pan works great for a graveyard trifle effect. Just layer the pudding and crumbs like lasagna, then stick the tombstones across the top. Bonus? You can write funny epitaphs on all the cookies! I sometimes do this for potlucks – it’s always a hit when people “dig in” with a big spoon. Pro tip: Use extra-long Milano cookies for dramatic tombstone height!
Share Your Creations!
Alright, my fellow Halloween bakers – I need to see what you create with this recipe! There’s nothing I love more than scrolling through dirt cup masterpieces at 2 AM (what? I get inspired!). Snap a photo of your spookiest creations and tag me on Instagram – I’ll feature my favorites in my stories! Can’t wait to see your creepy tombstones and wiggly worm decorations.
Had a brilliant twist on the recipe? Found the perfect gummy critters? Ran into a funny kitchen disaster? Drop a comment below! Your tips and stories help make this little Halloween tradition even better every year. And hey – if your kids came up with hilarious tombstone messages like “Here Lies My Vegetables,” you have to share those too!
Happy haunting, friends – now go make some edible graveyards that would make any zombie proud!
For More recipes Follow me on Facebook!