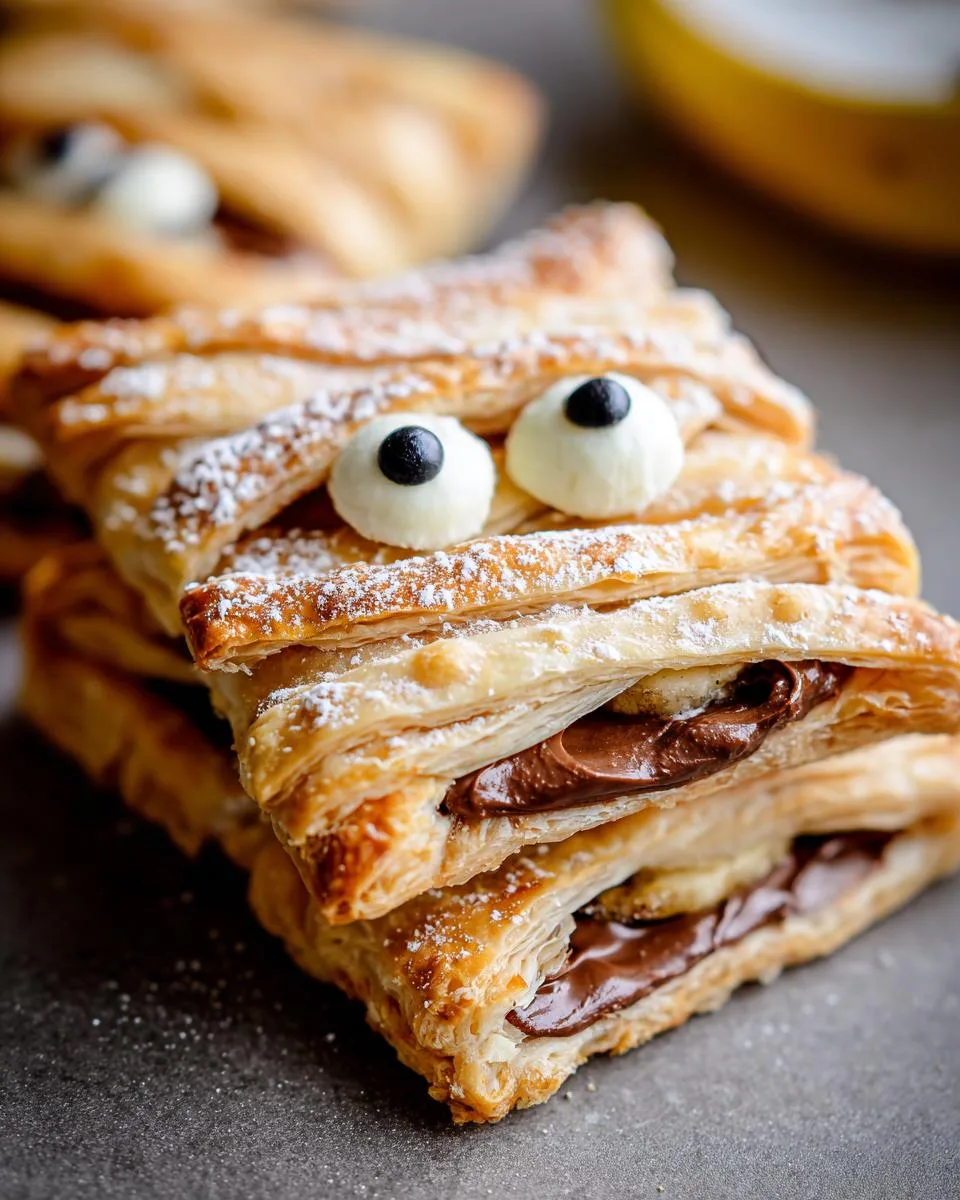
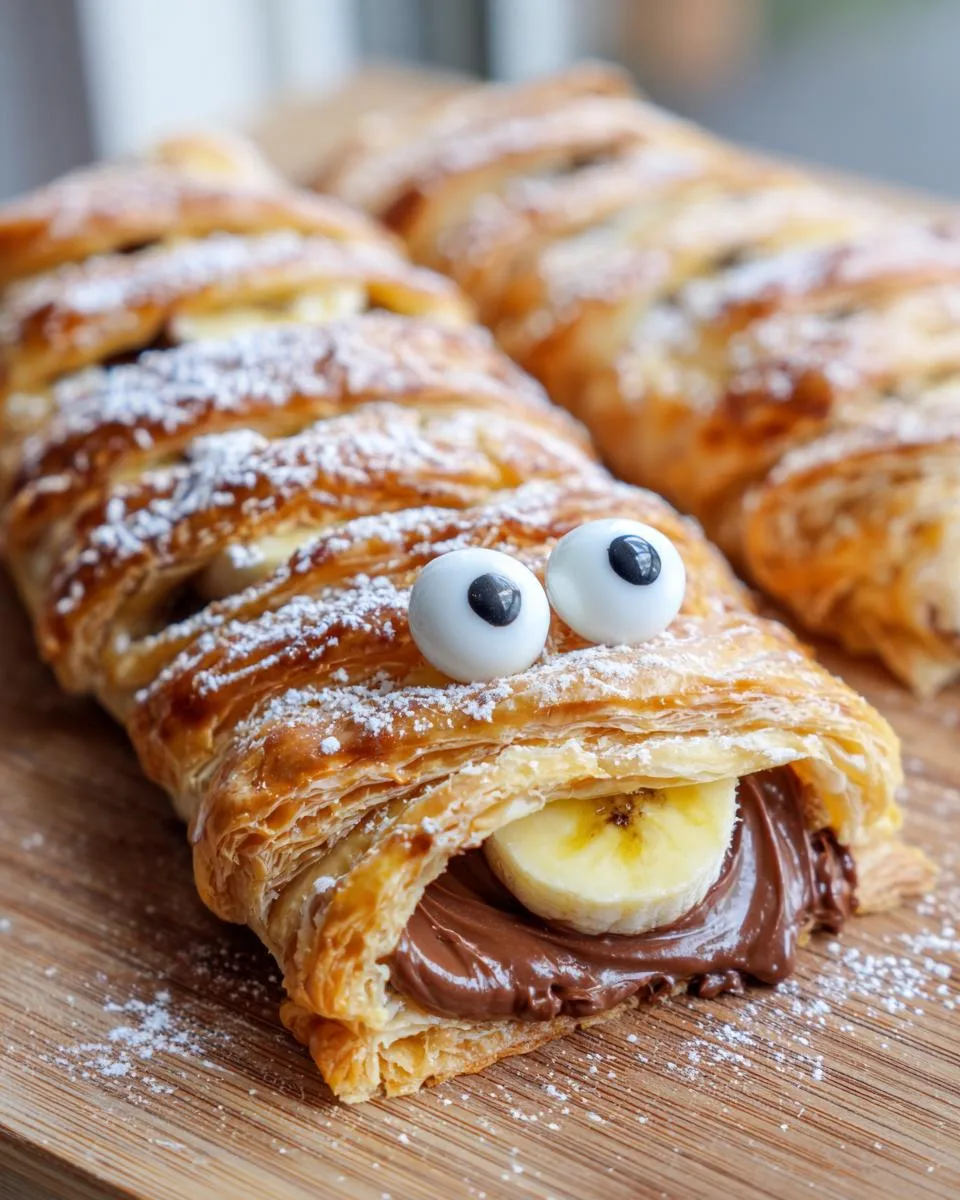
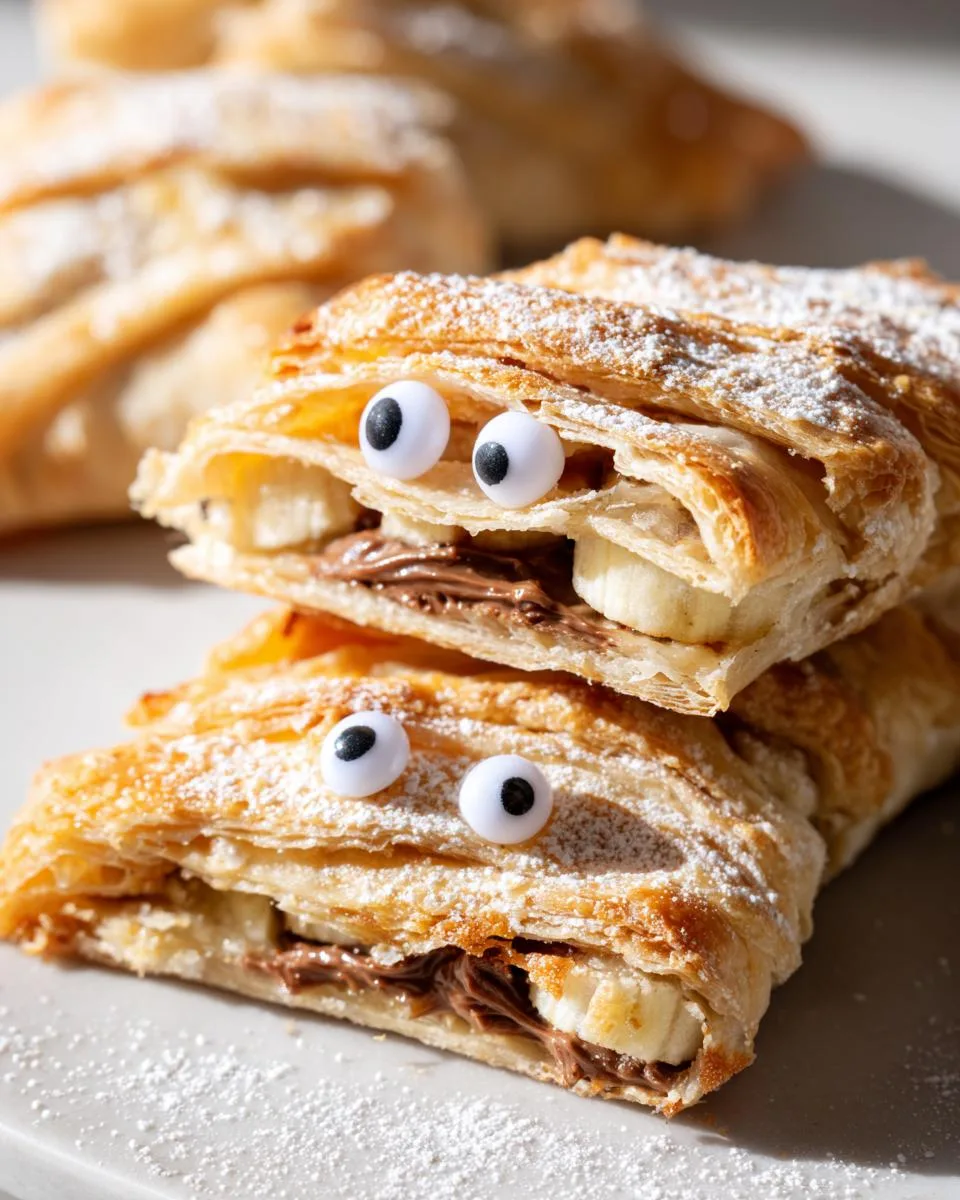
Oh my gosh, you guys – these Nutella Mummy Hand Pies are my absolute favorite Halloween treat to make! I started creating these a few years back when my niece (who’s gluten-free) begged me to make something special for her class party. The moment I saw her friends’ eyes light up when they spotted these adorable mummy pastries, I knew I’d stumbled onto something magical. The best part? They’re secretly vegan and gluten-free, but no one ever guesses because they’re just that delicious. Flaky pastry wrapped around creamy Nutella and sweet banana slices, with those silly googly eyes peeking out – it’s the perfect combination of spooky and sweet that both kids and adults go crazy for!
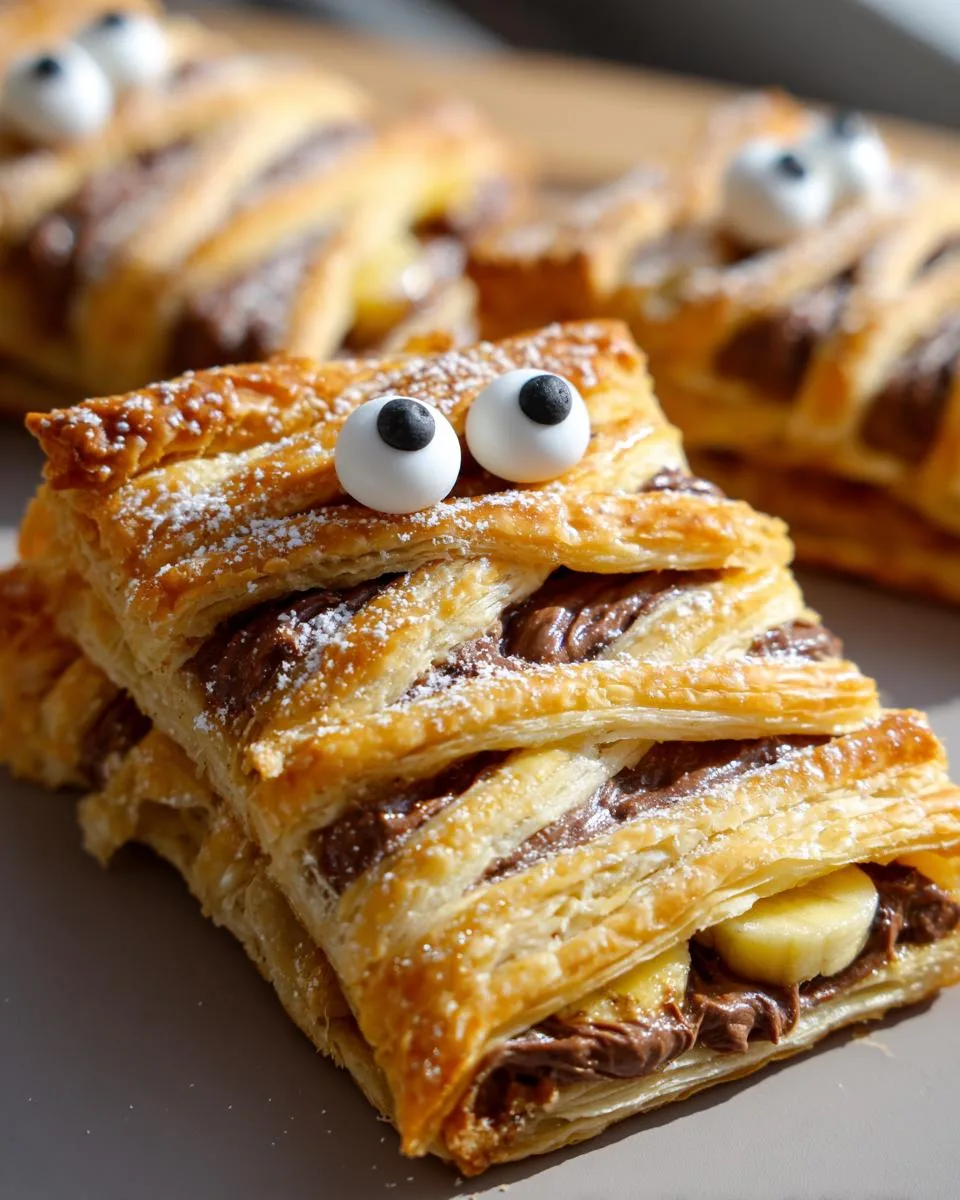
Table of Contents
Table of Contents
Why You’ll Love These Nutella Mummy Hand Pies
Trust me, these little mummies will steal the show at any Halloween gathering! Here’s why they’re absolutely perfect:
- So easy to make – Ready in under 40 minutes with store-bought pastry
- Secretly vegan & gluten-free – Nobody will guess these treats are allergy-friendly
- Kid-approved fun – The googly eyes and mummy wrapping always get giggles
- Simple ingredients – Just puff pastry, Nutella, bananas and a few pantry staples
- Perfect Halloween energy – Spooky but not scary, just the right amount of silly
I’ve made these for school parties, potlucks, and even my book club – they disappear every single time!
Print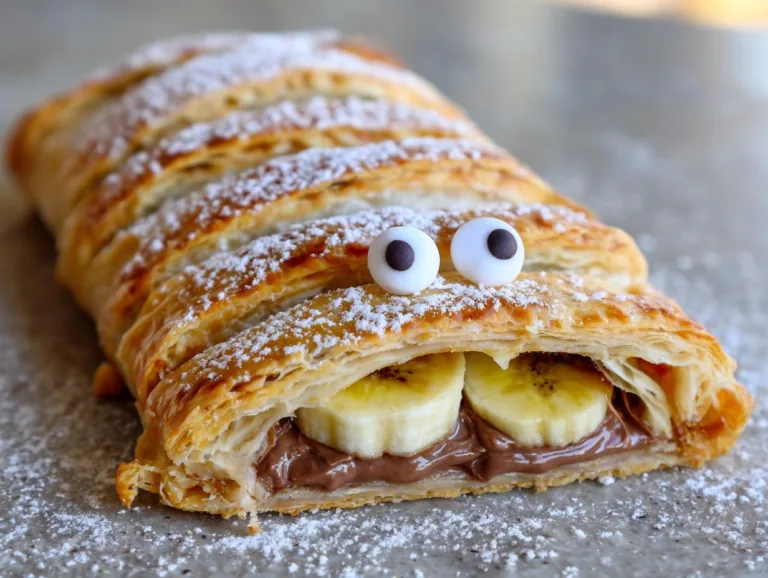
Irresistible Nutella Mummy Hand Pies in Just 40 Minutes
Vegan and gluten-free Nutella mummy hand pies with banana filling, decorated with googly eyes for a fun Halloween treat.
- Total Time: 38 minutes
- Yield: 12 hand pies 1x
Ingredients
- 2 sheets of ready roll puff pastry (Vegan & gluten-free)
- 6 tablespoons of Vegan Nutella
- 2 medium sized bananas
- 3 tablespoons of dairy-free milk (for the ‘egg wash’)
- 2 tablespoons of caster / granulated sugar
- Googly eyes
- 1 packet of dairy-free white chocolate buttons
- 2 tablespoons of icing sugar (dusting)
Instructions
- Pre-heat oven to 180°C fan and line 2 baking trays with grease-proof paper.
- Unroll the pastry sheets leaving in the baking paper. Use a rolling pin to slightly flatten out any wrinkles in the pastry.
- Using a sharp knife or pizza roller, cut one and a half of the other pastry sheet into rectangles (approximately 4 inches by 2.5 inches). Cut the remaining half of the pastry sheet into long, thin strips. Roll out the scraps to cut out a few more shapes.
- Transfer the pastry rectangles to the refrigerator for 5 minutes.
- Transfer the vegan Nutella into a piping bag and pipe some into the middle of each pastry rectangle. You can also use a spoon and spread it on. Top with some thin slices of fresh banana.
- Brush some dairy-free milk around the edge of the pastry, this will help the pastry stick. Tip: Don’t add too much filling or it will ooze out when baking.
- Lay the strips of pastry over the filling in a zig-zag pattern, creating a ‘mummy’ effect. Repeat for all of the pies. Make sure to use your finger to press the strips down so that they don’t lift when they bake & puff up in the oven.
- Brush the pastry with some dairy-free milk and sprinkle over some sugar. This will help the browning of the pastry.
- It’s best to bake the pies a tray at a time as the pastry will puff up. I like to bake 6 on a tray at a time. Place into the middle of the pre-heated oven and bake for 15-18 minutes or until golden in colour and the pastry is flakey.
- Remove from the oven and allow to cool slightly on the tray then transfer to a wire rack to cool completely.
- If your white chocolate buttons are too big, simply use the base of a piping tip, press it down on top of the button to cut then into a smaller circle shape.
- Use left over Nutella in a piping bag and pipe on a small dot to the middle of each eye.
- Make sure the pastry and filling is cold before adding on the eyes. If the pastry or filling is still hot / warm, it’ll melt the chocolate eyes. Place on the eyes and sprinkle the pastries with some icing sugar (optional).
- Serve at room temperature or warm.
Notes
- Store hand pies in an airtight container at room temperature for up to 2 days.
- Reheat in the oven for a few minutes to restore crispiness.
- Use a light hand with the filling to prevent sogginess.
- Prep Time: 20 minutes
- Cook Time: 18 minutes
- Category: Dessert
- Method: Baking
- Cuisine: American
- Diet: Vegan
Nutrition
- Serving Size: 1 hand pie
- Calories: 220
- Sugar: 12g
- Sodium: 150mg
- Fat: 10g
- Saturated Fat: 3g
- Unsaturated Fat: 6g
- Trans Fat: 0g
- Carbohydrates: 28g
- Fiber: 2g
- Protein: 3g
- Cholesterol: 0mg
Ingredients for Nutella Mummy Hand Pies
Gather these simple ingredients – I promise you probably have most of them already! The magic happens when these basic items come together:
- 2 sheets ready-roll puff pastry (make sure it’s vegan & gluten-free – I love the Jus-Rol brand)
- 6 tbsp Vegan Nutella (or any chocolate-hazelnut spread – the runnier the better for piping!)
- 2 medium bananas (just ripe, not too mushy – slice them thin right before using)
- 3 tbsp dairy-free milk (for our “egg wash” – oat milk works great)
- 2 tbsp caster sugar (for that golden crunch – granulated works too)
- Edible googly eyes (the fun part! Find them in baking aisles)
- 1 packet dairy-free white chocolate buttons (for making mini eyes if needed)
- 2 tbsp icing sugar (just for dusting – optional but pretty)
See? Nothing fancy – just pantry staples that transform into the cutest Halloween treats!
Equipment You’ll Need for Nutella Mummy Hand Pies
Before we get started, let’s gather our baking tools – nothing too fancy, just the basics that most home bakers already have on hand:
- 2 baking trays (standard half-sheet pans work perfectly)
- Grease-proof paper (parchment paper saves so much cleanup)
- Rolling pin (to smooth out those pastry wrinkles)
- Sharp knife or pizza cutter (my pizza roller is my secret weapon for clean cuts)
- Piping bag or small plastic bag (for that perfect Nutella swirl – though a spoon works too)
- Wire rack (essential for cooling so bottoms stay crisp)
That’s it! Now we’re ready to make some adorable mummy magic happen.
How to Make Nutella Mummy Hand Pies
Alright, let’s get to the fun part – making these adorable little mummies come to life! I promise it’s easier than it looks, and the results are always worth it. Just follow these steps, and you’ll have a batch of perfect hand pies in no time.

Preparing the Pastry
First things first – preheat your oven to 180°C fan (that’s about 350°F for my US friends) and line two baking trays with grease-proof paper. Now, unroll your puff pastry sheets but leave them on their baking paper – this makes everything so much easier! Use a rolling pin to gently smooth out any wrinkles in the pastry. Don’t go crazy here – just a few rolls to even things out.
Here’s my favorite trick: use a sharp knife or pizza cutter to slice one and a half pastry sheets into rectangles (about 4 inches by 2.5 inches). Cut the remaining half sheet into long, thin strips – these will be our mummy wrappings! Don’t throw away any scraps – roll them out to make a few extra shapes. Pop the rectangles in the fridge for 5 minutes – this helps prevent shrinking when baking.
Adding the Nutella and Banana Filling
Now for the good stuff! Transfer your vegan Nutella into a piping bag (or a plastic bag with the corner snipped off). Pipe about a tablespoon into the center of each pastry rectangle – don’t go too close to the edges! I learned the hard way that overfilling leads to messy explosions in the oven. Top each Nutella dollop with 2-3 thin banana slices – the perfect sweet pairing!
Brush a little dairy-free milk around the edges of each rectangle – this acts like glue for our mummy wrappings. Pro tip: if your Nutella is super thick, warm it slightly for easier piping. Just don’t make it too runny or it’ll leak everywhere!
Creating the Mummy Effect
This is where the magic happens! Take your thin pastry strips and lay them diagonally across the filling in a zig-zag pattern. Don’t worry about perfection – messy mummies are cuter anyway! Leave little gaps so the “filling” peeks through like bandages. Here’s the crucial step: press each strip firmly with your finger where it meets the base pastry – this stops them from lifting during baking.
Brush the tops with more dairy-free milk and sprinkle with sugar – this gives that gorgeous golden color and slight crunch. I like to do six at a time per tray because they puff up beautifully and need space to breathe.
Baking and Finishing Touches
Bake one tray at a time in the middle of your preheated oven for 15-18 minutes until golden and flaky. Let them cool slightly on the tray – they’re delicate when hot! Then move to a wire rack to cool completely. This step is crucial before adding eyes – warm pastries will melt your chocolate!
For the eyes: if your white chocolate buttons are too big, press a piping tip into them to make smaller circles. Pipe tiny Nutella dots for pupils. Wait until everything is completely cool, then gently press the eyes into place. A light dusting of icing sugar makes them look like they’re covered in cobwebs – so spooky cute!
And voila! You’ve just made the most adorable Halloween treats that are sure to impress. Serve them at room temperature or slightly warm – if they last that long before being devoured!
Tips for Perfect Nutella Mummy Hand Pies
After making these adorable nutella mummy hand pies dozens of times, I’ve learned all the little tricks to get them just right! Here’s my best advice:
- Keep that pastry cold – Chilling the cut rectangles for 5 minutes prevents shrinking and helps them hold their shape
- Less is more with filling – Resist overstuffing! Just a tablespoon of Nutella keeps them from bursting open
- Press those strips down – Really seal the mummy wrappings to the base so they don’t puff up separately
- Cool completely before eyes – Warm pies will melt your chocolate decorations – patience is key!
- Make extras – Trust me, you’ll want more than you think – these disappear fast!
Follow these simple tips, and you’ll have picture-perfect mummies every single time!
Storage and Reheating Instructions for Nutella Mummy Hand Pies
These little mummies are best enjoyed the day they’re made, but they’ll keep just fine in an airtight container at room temperature for up to 2 days – if they last that long! The pastry might soften a bit, but here’s my trick: pop them in a 160°C oven for 3-4 minutes to bring back that perfect crispiness. Just make sure to remove any chocolate eyes first if reheating – we don’t want melted eyeballs staring at us! For longer storage, you can freeze them (without decorations) for up to a month – just thaw and refresh in the oven before adding those cute googly eyes.
Nutritional Information of Nutella Mummy Hand Pies
Okay, let’s be real – these are treats, not health food! But for those curious, each mummy hand pie comes in at about 220 calories. Here’s the breakdown per serving (based on making 12 pies): roughly 10g fat (3g saturated), 28g carbs, and 12g sugar. Remember – this is just an estimate since brands and exact measurements vary. The bananas add natural sweetness while the vegan Nutella brings that irresistible chocolatey goodness. Not too shabby for such a fun Halloween dessert!
Frequently Asked Questions About Nutella Mummy Hand Pies
How to Keep Hand Pies from Getting Soggy?
Oh, the dreaded sogginess – I’ve battled this myself! The secret is twofold: first, don’t overfill with Nutella (tempting as it is!). Too much moisture from the filling makes the pastry soggy. Second, always cool them completely on a wire rack – never leave them sitting on the baking tray where steam gets trapped. If you’re making them ahead, store them with a paper towel in the container to absorb any extra moisture. And here’s my grandma’s old trick – a tiny sprinkle of powdered sugar right before serving helps absorb any residual moisture too!
How Long Do Hand Pies Last?
These cuties are best enjoyed fresh (who can resist, right?), but they’ll keep for about 2 days at room temperature in an airtight container. The bananas might get a bit brown, but they’ll still taste amazing! If you want to prep ahead, I recommend assembling them up to the baking step, then freezing the unbaked pies. Just add 2-3 extra minutes when baking from frozen. The eyes should always be added right before serving though – trust me, melted chocolate eyeballs aren’t the spooky look we’re going for!
Can I Freeze Nutella Mummy Hand Pies?
Absolutely! Just freeze them before adding the decorations. I like to flash freeze them first on a baking sheet for about an hour, then transfer to freezer bags. They’ll keep for a month – not that they’ll last that long! When you’re ready, bake from frozen at the same temperature, adding a few extra minutes. The pastry stays beautifully flaky this way. Pro tip: write the baking date on the bag with a marker – future-you will be so grateful when Halloween sneaks up again!
Final Thoughts About Nutella Mummy Hand Pies
I can’t wait for you to try these Nutella Mummy Hand Pies – they’re seriously the most fun you’ll have baking this Halloween! Whether you’re making them for a party or just because, I promise they’ll bring smiles to everyone who sees them. Tag me if you share photos of your creations – I love seeing your mummy masterpieces! Now go grab that puff pastry and let’s make some edible magic happen. You can find more recipes like this on our site.
For More recipes Follow me on Facebook!