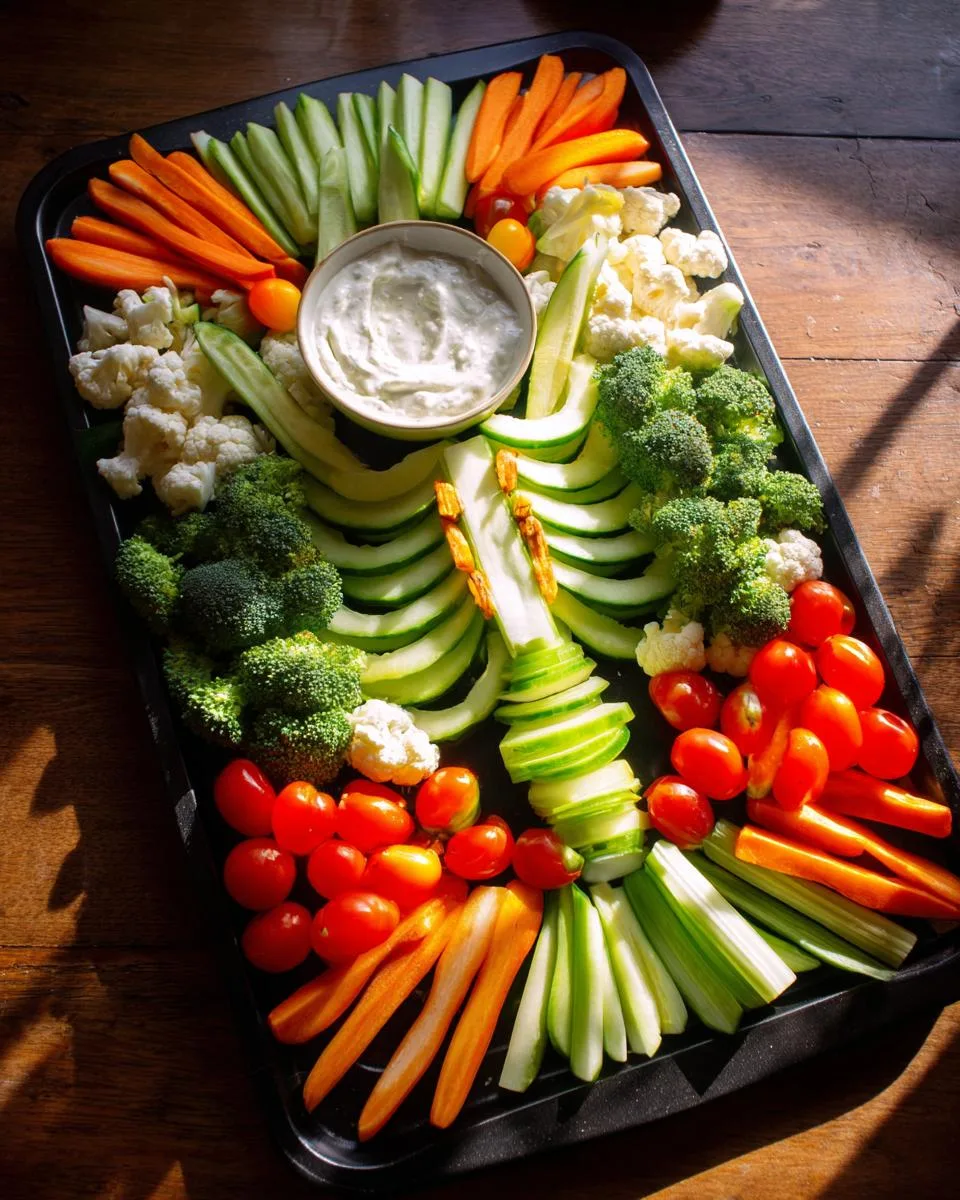
Oh my gosh, do I have the cutest Halloween party idea for you! Every year, I scramble to find something that’s equal parts spooky and snackable – until I discovered this genius skeleton veggie tray. Picture this: creepy-crawly carrot fingers, cucumber rib cages, and a dip bowl grinning back at you with olive eyes. It’s the kind of edible centerpiece that makes both kids and adults go “Whoaaa!” I still remember my niece’s reaction last year – she was too busy “reassembling” the skeleton limbs with her tiny hands to notice she was actually eating vegetables. Sneaky parenting win!
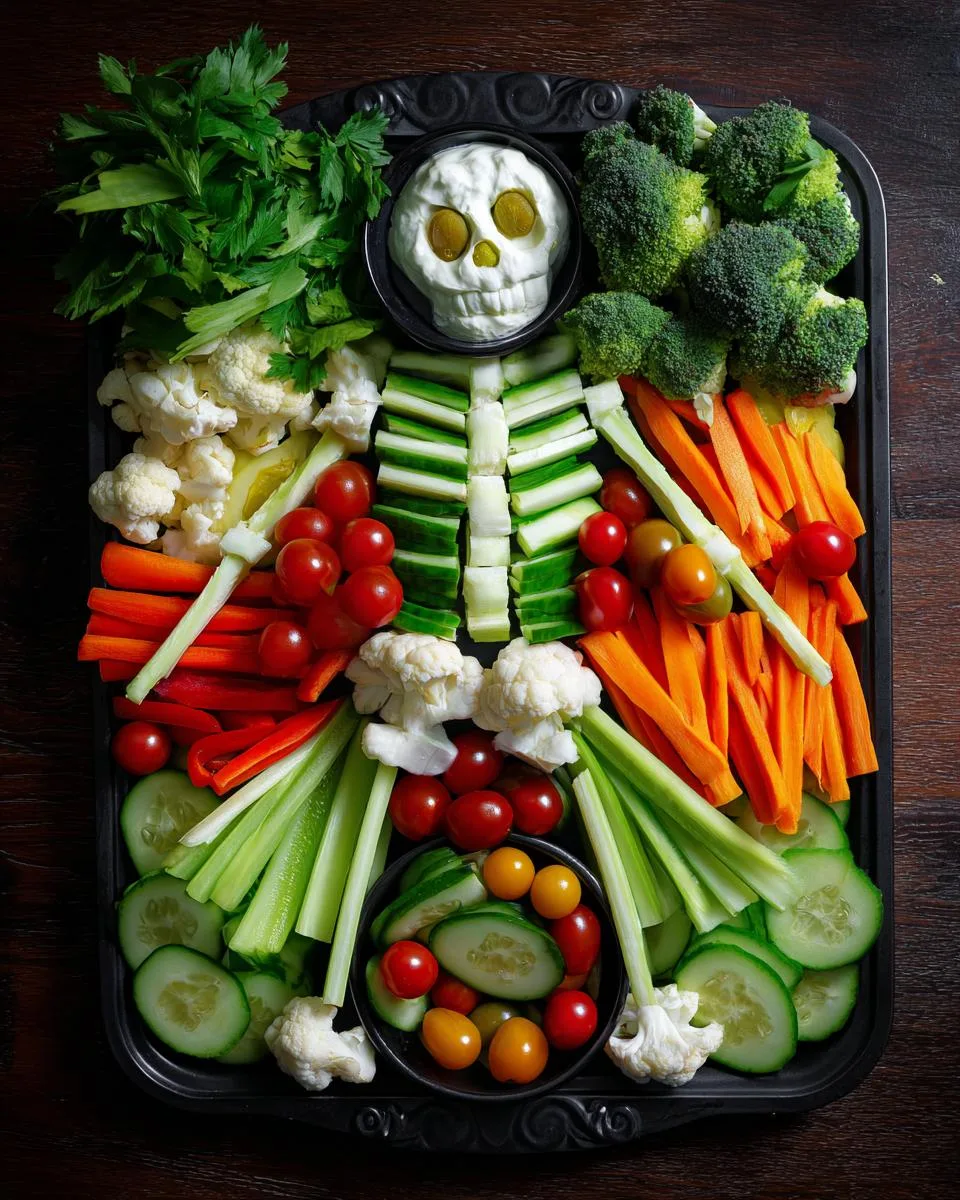
Table of Contents
Table of Contents
Why You’ll Love This Skeleton Veggie Tray
Listen, this isn’t just another veggie platter—it’s a skeleton veggie tray that steals the show every time! Here’s why it’s a must-try:
- Super easy: No fancy skills needed—just slice, arrange, and watch the magic happen.
- Total crowd-pleaser: Kids go nuts for the creepy design, and adults love that it’s actually healthy.
- Halloween perfection: It’s spooky, fun, and way more creative than a bowl of candy.
- Sneaky nutrition: All those colorful veggies? Gone before anyone realizes they’re eating something good for them.
Trust me, once you see how fast this disappears at parties, you’ll be making it every October!
Print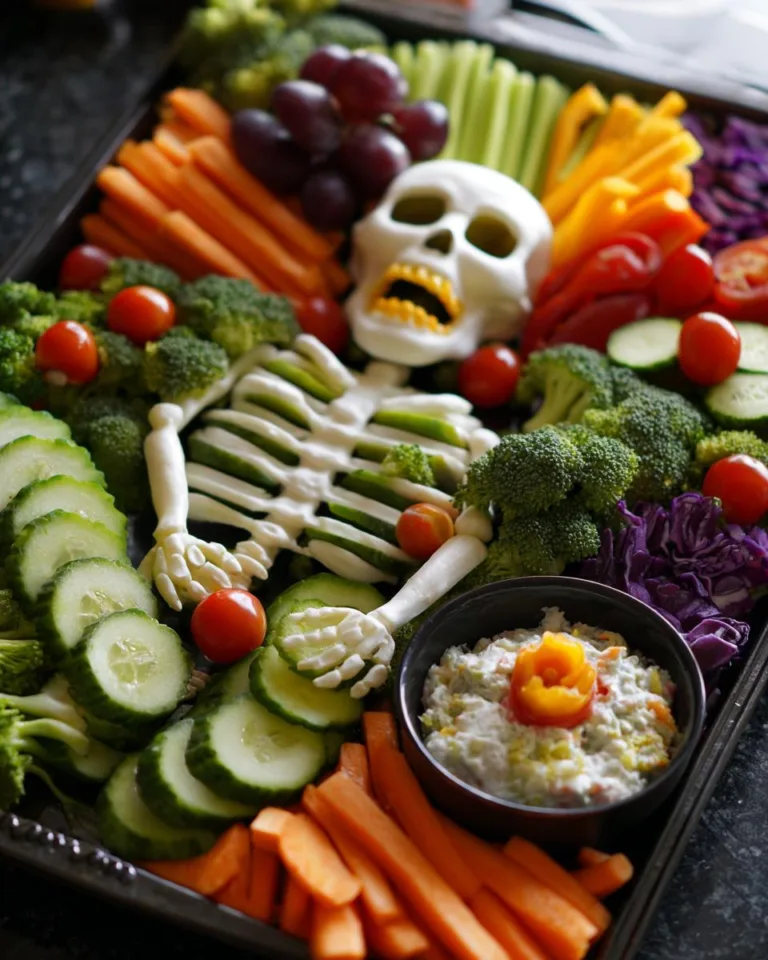
Creepy 10-Minute Skeleton Veggie Tray Your Kids Will Devour
A fun and creative veggie tray shaped like a skeleton, perfect for Halloween or themed parties.
- Total Time: 20 minutes
- Yield: 1 skeleton veggie tray 1x
Ingredients
- ¼ medium capsicum (bell pepper)
- ¼ medium cucumber
- 1 medium carrot
- 1 large celery stick
- 6 small broccoli florets
- 6 small cauliflower florets
- 4 whole cherry tomatoes
- 1 cup sour cream dip
- 2 olive slices
Instructions
- Put the bowl for the dip and skeleton head at the top of the tray so you can position your skeleton underneath it.
- Slice the cucumber into thick rounds and put them under the bowl for the spine.
- Slice the capsicum into long thin strips. Cut in half and place either side of the cucumber to form the rib cage.
- Arrange the broccoli and cauliflower florets to form the hips. Make sure the stems are cut quite short or they will fall over and be hard to position.
- Cut the celery and carrot into long limbs and position for the arms and legs.
- Add the cherry tomatoes for the hands and feet.
- Cut more carrot sticks into short thin sticks to form the fingers and toes.
- Fill the bowl up with dip. Add two sliced olives for the eyes. Cut six small carrot rectangles and position under the eyes to form the teeth/mouth.
- Thinly slice the mushrooms and place them around the bowl to finish off the skull and you’re done!
Notes
- Use fresh vegetables for the best presentation.
- Keep the tray refrigerated until ready to serve.
- Customize the dip to your preference.
- Prep Time: 20 minutes
- Cook Time: 0 minutes
- Category: Appetizer
- Method: No-Cook
- Cuisine: American
- Diet: Vegetarian
Nutrition
- Serving Size: 1 tray
- Calories: 150
- Sugar: 8g
- Sodium: 120mg
- Fat: 5g
- Saturated Fat: 2g
- Unsaturated Fat: 3g
- Trans Fat: 0g
- Carbohydrates: 20g
- Fiber: 6g
- Protein: 4g
- Cholesterol: 10mg
Ingredients for Your Skeleton Veggie Tray
Okay, let’s talk veggies—the real stars of this spooky show! Here’s everything you’ll need to bring your skeleton veggie tray to life (well, undead life?):
- ¼ medium capsicum (bell pepper) – Slice into thin strips for those creepy rib bones.
- ¼ medium cucumber – Thick rounds for the spine; they hold everything together!
- 1 medium carrot – Cut into sticks for arms/legs, and tiny slivers for bony fingers and teeth.
- 1 large celery stick – Long pieces for limbs—snap them dramatically for extra “broken bone” effect.
- 6 small broccoli & cauliflower florets – These make perfect little hip bones (trim stems short so they don’t topple!).
- 4 cherry tomatoes – Halved for ghoulish hands and feet.
- 1 cup sour cream dip – The “brains” of the operation—hollowed-out bell pepper or bowl for the skull.
- 2 olive slices – For those haunting eyeballs staring back at you.
Pro tip: Grab extra carrots—they disappear fast when kids start nibbling on skeleton fingers!
Equipment You’ll Need
Don’t worry—you won’t need any fancy gadgets for this skeleton veggie tray! Just grab:
- A sharp knife (for clean cuts on those carrot fingers!)
- A cutting board (bonus points if it’s Halloween-themed)
- A large serving tray (the bigger, the spookier—mine’s shaped like a coffin!)
That’s it! Though I sometimes add tweezers for fussy olive-eye placement—but shhh, that’s just my perfectionism talking.
How to Assemble Your Skeleton Veggie Tray
Alright, let’s bring this bony buddy to life! Assembling your skeleton veggie tray is like playing edible Tetris—but way more fun. Follow these steps, and you’ll have a spooky masterpiece in no time.
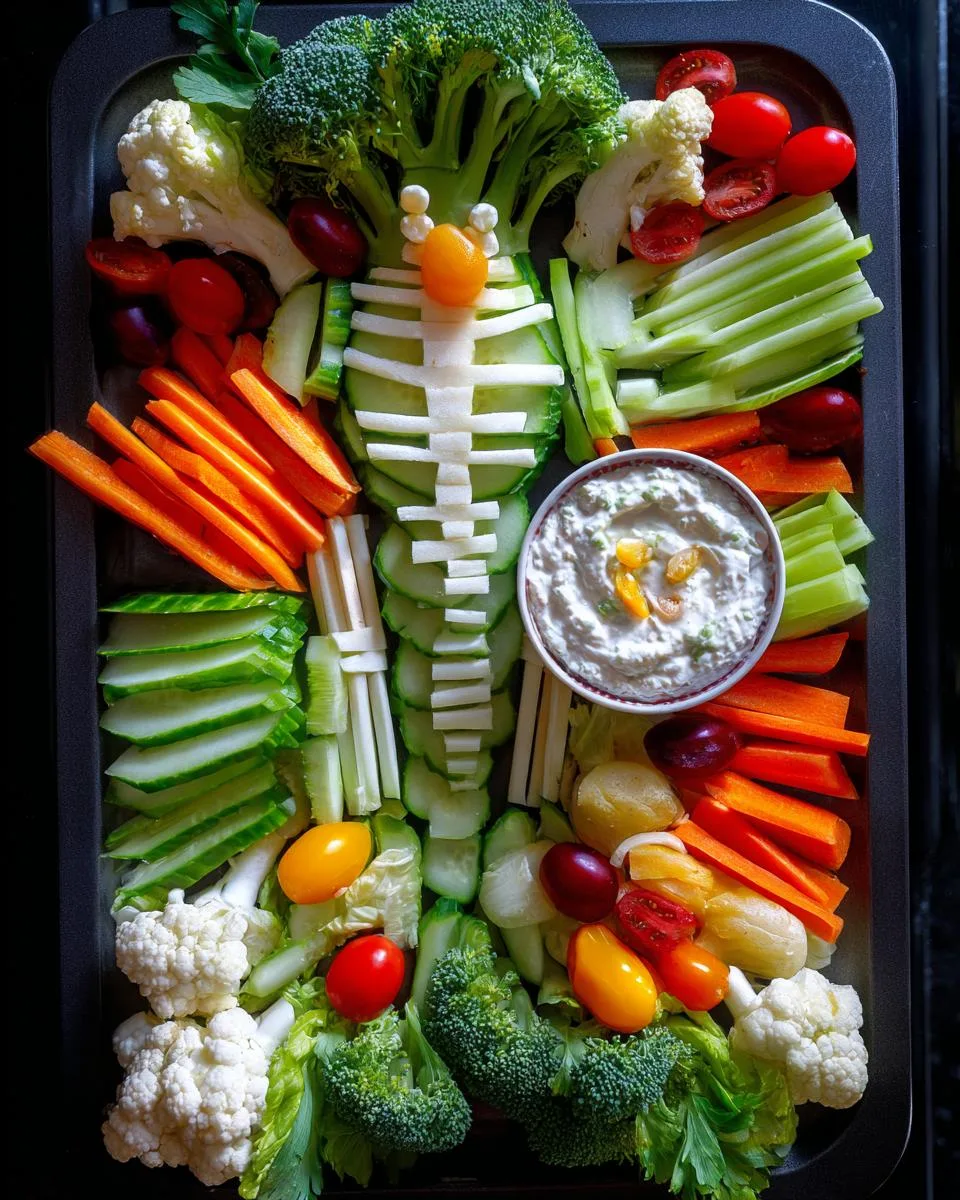
Step 1: Position the Head and Spine
First things first—the skull! Plop your dip bowl at the top of the tray (this is your skeleton’s head). Now grab those thick cucumber rounds and line them up vertically underneath to form the spine. I like to angle them slightly for a “slouching zombie” effect—makes it extra creepy!
Step 2: Create the Rib Cage
Time for some ribs! Take those thin capsicum strips and arrange them in pairs along the spine, curving outward like bony arches. Alternate the lengths—some short, some long—for a realistic, uneven look. Pro tip: Overlap the ends slightly onto the cucumber spine so they don’t go wandering off the tray!
Step 3: Build the Hips and Limbs
Now for the lower half! Cluster your broccoli and cauliflower florets at the base of the spine to make hip bones. Then, lay out celery and carrot sticks diagonally for arms and legs. Want a “broken bone” look? Snap a carrot stick in half dramatically—kids LOVE that gruesome touch!
Step 4: Add Hands, Feet, and Facial Features
The fun part! Place halved cherry tomatoes at the ends of limbs for hands/feet. Use thin carrot slivers to create bony fingers and toes poking out. For the face, float two olive slices in the dip (eyes) and arrange tiny carrot rectangles underneath for a toothy grin. Last touch? Mushroom slices around the bowl for a proper skull shape—BOO-tiful!
Tips for the Perfect Skeleton Veggie Tray
Want your skeleton veggie tray to be the talk of the Halloween party? Here are my foolproof tricks from years of making these ghoulish goodies:
- Chill everything first: Cold veggies stay crisp and are easier to slice—plus nobody likes a sweaty skeleton!
- Trim those stems: Cut broccoli and cauliflower stems SHORT so they don’t topple like Jenga blocks.
- Double the dip: Hide an extra bowl underneath the tray—kids WILL dive into that skull first.
- Go dark: Use a black tray or parchment for maximum spook factor (red pepper “blood” splatters optional but encouraged).
Trust me, these small touches make all the difference between “meh” and “MUMMY APPROVED”! Check out more recipes for more fun ideas.
Ingredient Substitutions
Ran out of something? No worries—this skeleton veggie tray is crazy flexible! Here are my favorite swaps that still keep it spooky:
- Dip drama: Swap sour cream for hummus, guacamole, or even black bean dip for a “dirtier” skeleton look.
- Cucumber crisis: Use zucchini rounds instead—they hold up just as well for the spine.
- Pepper problems: No capsicum? Try jicama sticks or even blanched green beans for the ribs.
- Olive outrage: Black grapes sliced in half make great creepy eyeballs too!
Last Halloween, I used purple cauliflower for “rotting bones”—the kids thought it was disgustingly awesome. Get creative! You can find more spooky treats like Halloween deviled eggs.
Serving and Storage Suggestions
Here’s the secret to keeping your skeleton veggie tray fresh and frighteningly good—pop it in the fridge until right before serving! The cold keeps those carrot fingers crisp and prevents the dip from getting weepy. Pair it with other Halloween nibbles like “mummy” hot dogs or “eyeball” deviled eggs for a full graveyard spread. Leftovers? Cover with plastic wrap and it’ll stay spooky-fresh for up to 2 days (if it lasts that long!).

Nutritional Information
Okay, let’s be real – nobody’s counting calories when there’s a grinning veggie skeleton staring at them! But for those who ask (looking at you, Aunt Linda), here’s the scoop: Nutrition varies based on ingredients. Per serving, you’re looking at roughly 150 calories and 5g fat – mostly from that delicious dip “brain.” The rest? Pure veggie power with all the vitamins and fiber you’d expect from something this colorful!
FAQs About Skeleton Veggie Trays
Got questions? I’ve got answers! Here’s everything you need to know about creating the perfect skeleton veggie tray for your Halloween bash:
Can I make this skeleton veggie tray ahead of time?
Absolutely! Prep all the veggies the night before and store them in separate containers. But wait to assemble until 1-2 hours before serving—you don’t want soggy cucumber bones!
How long will the veggie skeleton last on the table?
About 2 hours max if it’s warm out. After that, the dip might get weepy. Solution? Keep a backup tray in the fridge and swap ’em out halfway through the party—sneaky, right?
What’s the best dip for Halloween veggie trays?
I’m obsessed with “bloody” beet hummus or green goddess dressing for extra creep factor! But classic ranch works too—just add black food coloring for goth vibes. You might also like our Spooky Spider Web 7-Layer Dip.
Can I add meat to my skeleton platter?
Ohhh yes—pepperoni “muscles” or ham slice “skin” take this from vegetarian to terrifying! Just layer them under the veggies for a full anatomy lesson.
Help! My broccoli hips keep falling over!
Been there! Trim those stems SUPER short and nestle them against other veggies for support. Or cheat like I do—tiny dabs of cream cheese as “glue”! For more Halloween fun, check out our Halloween Stuffed Peppers.
For more Halloween inspiration, follow us on Facebook!